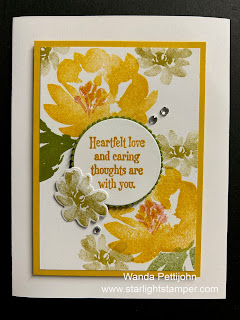
The base of my card is a folded half-sheet of Basic White card stock. This card opens on the right and the fold is on the left.
I cut a 3" x 4-1/4" piece of Basic White for the focal piece. And a 3-1/4" x 4-1/2" piece of Crushed Curry was cut for the layer. This is where my big mistake came. The pieces should have been bigger. I'm not sure how much bigger though. I didn't realize it until I was going to be adding the words.
Anyway, I stamped the large flowers from the "Textured Floral" set using Crushed Curry ink. The centers were stamped using the die in the same set with Cajun Craze ink that was stamped off once.
The leaves were stamped using Old Olive ink and the smaller flowers were stamped using Wild Wheat ink. An extra small flower was also stamped and die cut using the matching die from the same bundle. If you don't have the new Wild Wheat color, you can easily get by with Crumb Cake ink. They look very similar.
The words I used are from the "Quiet Moments" set (another set I wondered why I bought) and they were stamped using Crushed Curry ink. I had set my words up in my Stamparatus and stamped them a couple of times to get them dark enough. It's sad that the Stamparatus is retired but you can always get a MISTI stamp positioner. And there's a couple ways to make one too. One is, take a Stampin' Up! stamp case, one of the ones that looks like they would have a DVD in it. Place your card stock on the inside and affix your stamp to the other side. I'd recommend using removable tape to hold your paper in place. You can also add a magnetic sheet to the back of the case and use magnets to hold your card stock down too. And your other option is to make a Stamp-a-Ma-Jig using Legos. I prefer the other ways over this one but one does with what they have! So where was I? Oh, once the words were stamped I die cut them using the 1-5/8" die from the "Layering Circles" die set. And the Old Olive layer behind it was made using a circle die from the "Stylish Shapes" set that was just a little bit larger. I had stamped the words that were on the original card and die cut them. That's when I found out that my floral piece was smaller than the original card. So I adjusted the circles I needed to use and found words that would fit in them. Once the circles were die cut I taped the two pieces together.
To assemble the card I taped the Basic White floral piece to the Crushed Curry piece. Dimensionals were added to the back and the piece was set in place on the front of the card base. Next the word piece was set in place with Dimensionals. The die cut flower was glued in place. A little glue on the part that touches the word piece and a little on the bottom where it's on the floral stamped piece. Three crystal rhinestones were added and the card was done.
This was a very quick and easy card to make and I do like how it turned out, even with it's minor flaws!! I am thinking how fun it would me to make a One Sheet Wonder sheet. Click here to see how to do the "One Sheet Wonder" technique. It's a great image for a number of other occasions too!
Thank you SO very much for taking your time to stop in and see today's sympathy card,
Wanda


1 comment:
Well.....even with a clipped wing.....You did an AMAZING job on this card.
SO BEAUTIFUL!
Post a Comment