Thursday, August 31, 2023

Around the Bend, Pansy Patch, Friendship or Thinking of You Card, Stampin' Up!

Hello and welcome to my blog.  Today I have a super quick and easy card for you to make. Please read on to see how I made this card.

The base of my card is a folded half-sheet of Basic White card stock. It opens on the bottom and the fold is on the top.

I cut a piece of Blackberry Bliss and a piece of Basic White to measure 4-1/2" x 3-1/4".  I took the Basic White piece and die cut the leave image using the die from the "Around the Bend" bundle. I die cut it about 1/4" from the bottom left area and about the same on the upper right corner area. Lay it on top of the Blackberry Bliss (or whatever color you wanted to work with) and see if it looks even enough by lining up the left side and the top side. If it doesn't you can always trim a little from the left and top.

Before taping and gluing it to the Blackberry Bliss piece, I stamped the words from the "Pansy Patch" set. I will share with you a little trick I used to bend clear stamps and make them stay.  Place the piece you want to stamp on the opposite side of the Stamparatus or MISTI, make sure it's backwards. Or better said, when you close the cover you see the piece as you'd like it on your card. So on the inside you are looking at the back of that piece. I hope that I made that clear. You can use some Washi tape or post it tape or a post it note to hold it in place. I used Post it tape because a little goes a long way. I can reuse it and I cut it in thin strips. I bought a roll about 4 years ago and I still have a lot left on the roll. Okay, sales pitch is over (Post it people, if you're reading, please send a promotional check to me LOL).  Once I got the piece taped to the cover of my MISTI (I use a MISTI for most of my smaller stamping) open the cover and take the stamp and line it up where you want it to be. Close the cover and press down to make sure it's stuck. Then remove the piece from the front and set it inside and you're ready to stamp. I used Blackberry Bliss ink to stamp the words. I can't decide if it's a thinking of you card or friendship card, or both???

Then I taped and glued the piece to the Blackberry Bliss card stock. I used glue on the leaves and tape on the other areas. Dimensionals were added to the back and the piece was set in place on the front of the card.

I die cut two flowers from the "Around the Bend" set using Basic White card stock. I also took a scrap piece of Blackberry Bliss and die cut the flower center. I glued the two flower pieces together, offsetting them a little so they look fuller. Then the center was glued in place. I die cut the double leaves using a scrap piece of Soft Sea Foam card stock. A Dimensional was added to the back of the flower and it was set in place on top of the card. I added a dot of glue to the back of the leaf piece and set it in place under the flower. And the card was done. I thought about adding some bling to the card but I liked the clean and simple look.

This was a fun, quick, and easy card to make. I can see myself using this layout again in the future.

Thank you SO very much for taking your time to stop in and see my friendship/thinking of you card,
Wanda

Wednesday, August 30, 2023

Timeless Arrangements, Thank You Card, Stampin' Up!

Hello and welcome to my blog. Today I have a card to share with you that I found on Pinterest. You can see the original card here. There is no link to any information on how the card was made so please read on to see how I made this card.

The base of the card is a folded half-sheet of Basic White card stock. This card opens on the right and the fold is on the left.

I cut a 4" x 5-1/4" piece of Fresh Freesia card stock. Before taping it to the card base I die cut one of the images from the "Timeless Arrangements bundle. I die cut right in the middle so I didn't have to be concerned about any of the area cut being exposed.

A 3-7/8" x 5-1/8" piece of Basic White card stock was cut for the top layer. I took the circles die from the "Timeless Arrangements" and stamped them on the two corners using Blackberry Bliss ink. I stamped off first, then stamped on the card stock a total of three times without adding more ink. I did this for both corners. 

Then I took my Blending brush and scrubbed on some Blackberry Bliss ink on both corners. I had originally thought it was Fresh Freesia ink but it was too light and I had to start over.

Next I added the Garden Green flowers using a die in the set. I stamped with full ink and then stamped again near the full ink image. 

Two more of the dies in the bundle were used for the other flowers and leaves images. I used Garden Green for the leaves image and Blackberry Bliss for the smallest floral image. I glued all three of those pieces together. Once you die cut them there is a tiny rectangle below the flowers/leaves and they line up nicely when stacked and affixed together. I set them aside to dry.

The words are from the same set and were stamped using Blackberry Bliss ink. I die cut them with the rectangle die from the same "Timeless Arrangements" bundle. I glued the floral pieces to the upper part of the word piece. Dimensionals were added to the back and the piece was set in place on the front of the card.

Rhinestones were added to the front of the card and the card was done.

Pretty, isn't it?  Now you can see why I wanted to make it. I really like it an I really like playing with this fun set.

Thank you SO very much for taking your time to stop in and see today's thank you card,
Wanda

Tuesday, August 29, 2023

Timeless Arrangements, Color & Contour, Thank You Card, Stampin' Up!

Hello and welcome to my blog. Today I have a card for you that I saw on Pinterest and I wanted to see if I had the current supplies to make it. You can see the original card here.  There are no instructions there so  please read on to see how I made the card. 

The base of my card is a folded half-sheet of Basic White card stock. It opens on the right and the fold is on the left.

I die cut the scalloped rectangle using the die from the "Color & Contour" bundle. I used Basic White card stock for this piece.  While I was cutting it I was also cutting one of the floral pieces from the "Timeless Arrangements along with a matching spring image. After cutting it (and cleaning up all the pieces that go everywhere and get stuck in the dies) I die cut one more of the floral strip pieces so make sure you give yourself room in the middle of the piece to cut the three pieces.  I started about 3/4" up from the bottom of the inside piece. 

The words are from the "Timeless Arrangements" bundle and were stamped using Blackberry Bliss ink. I die cut the piece using the rectangle die from the "Timeless Arrangements" bundle.  Grab your Dimensionals, silver cord, tape and embellishments and let's put the card together.

I added tape to the back of the Designer Series Paper (DSP).  Oh I forgot to tell you what DSP was used here. Mine is from the "Stargazing" 12' x 12" package. I cut it at 3-1/4" x 4-5/8". That was taped to the inside of the scalloped rectangle piece. Dimensionals were added to the back and the piece was set in place on the front of the card.

Next I took the word piece and glued on the flower pieces. These are easy to put on because there is a small rectangle of card stock below the flowers so you can just add some glue there and line it up on the word piece. I added one to the top and one to the bottom (on opposite corners) and I added the single flower bunch piece to the middle of the top piece.

I tied a double bow using some silver cord. I used a glue dot to hold it down while I added Dimensionals to the word piece and then that was set in place over the bow. A few silver pearls (retired) were added to the front of the piece and the card was done.

I do like how it turned out even though I didn't have the same DSP as on the original card. And that DSP is retired and I might have some in my workroom but I wanted to use current DSP, card stock, and stamp sets/bundles.

Thank you SO very much for taking your time to stop in and see today's thank you card,
Wanda


Monday, August 28, 2023

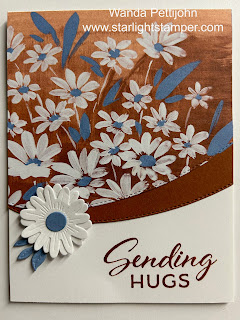
Around the Bend, Cheerful Daisies, Birthday Card, Stampin' Up!

Hello and welcome to my blog.  Today I have a quick and easy birthday card to share with you. Please read on to see how I made this card.

The base of my card is a folded half-sheet of Basic White card stock. This card opens at the bottom and the fold is at the top.

I cut a 5-1/4" x 2-1/4" piece of Designer Series Paper (DSP) from the "Fresh as a Daisy" 12" x 12" package. I taped that to the bottom of the card base.

I took a 4" x 5-1/4" piece of Basic White card stock and I stamped the dotted curved image using Pebbled Path ink. I die cut the piece using the scalloped die from the "Around the Bend" bundle. 

I took a piece of DSP from the same package and I die cut the splotchy curved piece. I taped it to the Basic White stamped piece. Then I set it on top of the front of the card so I could see how much I needed to cut off the top. The piece needed to measure 5-1/4" x 4".  You can use a shorter piece of Basic White card stock if you want. I used a larger piece because I had no idea how much I would be cutting off and I wanted to make sure it was tall enough.  I ended up cutting 1-5/8" off the top.

I taped that to the front of the card.

The flower was done next. It's from the "Around the Bend" set and I die cut two, plus I die cut one flower center. All were die cut using Basic White card stock. I colored the flower center using my light Daffodil Delight Blends pen. Then I took my Pebbled Path ink spot and tapped it on top of the flower center a few times. I glued the flowers together, offsetting them a bit so it looked fuller. And then I glued the flower center in place. I added a Dimensional to the back and I set the piece in place on the upper left of the card. The leaves are from the same "Around the Bend" set and were die cut using Soft Sea Foam card stock. I glued that under the flower.

The words are from the "Cheerful Daisies" bundle and were stamped using Pebbled Path ink. I die cut them using the die from the "Cheerful Daisies" bundle. I set them in place using Dimensionals and the card was done.

This was a fun, quick, and easy card to make.

Thank you SO much for taking your time to stop in and see today's birthday card,
Wanda

Sunday, August 27, 2023

Layering Leaves, Friendship Card, Stampin' Up!

Hello and welcome to my blog. Today I was looking for a card that used the "Layering Leaves" set. It's a set I had bought for the words but there are some leaves and flowers on it that I thought I should tryout. I did have the matching punch so I thought I should use it!  You can see the card I found on Pinterest by clicking here

The base of the card is a folded half-sheet of Basic White card stock. This card opens on the right and the fold is on the left. 

I cut a 4" x 5-1/4" piece of Pretty Peacock card stock for the layer and for the focal piece I cut a 3-3/4" x 5" piece of Basic White card stock. I textured the upper 2/3rds of the card using the "Exposed Brick" embossing folder. You need the bottom part smooth for the words. Or you could stamp the words first and texture the whole piece. Or another option is to texture what you need and make up the balance of the length with a piece of plain Basic White at the bottom. Taping two pieces to the Pretty Peacock piece won't show because the Designer Series Paper (DSP) will hide the seam, even if you don't match them up, evenly!

Once I got the upper part textured I cut a piece of DSP from the "Masterfully Made" 12" x 12" package. It measured 1-1/4" x 3-3/4".  The piece on the original card measured 1" x 4".  Then a strip of Pretty Peacock "Soft Shimmer" paper was cut at 3/8" x 3-3/4".  The original piece was cut at 1/4" x 4".  I taped the Soft Shimmer piece to the center of the Masterfully Made piece of DSP.  I glued that in place on the front of the card. I did set my word piece on the Basic White area for placement before stamping it. 

The "hello" is from the "Layering Leaves set and was stamped using Pretty Peacock ink.

I stamped one of the leaf clusters and a flower image from the same "Layering Leaves" set. I stamped the leaf cluster using Pretty Peacock ink and the flower image I used my markers. I used Pretty Peacock for the stem and Berry Burst for the flowers. I punched them out using the matching punch. They were glued in place on the front of the card. Then the piece was glued to the Pretty Peacock piece and that was then taped to the card base. 

I took my Wink of Stella pen and colored the leaves to make them a bit darker with a little sparkle but it didn't work. So I opened my Pretty Peacock ink pad and touched the tip of the Wink of Stella pen to one of the corner area to pick up some ink. Then I colored in the leaves. I kept my pen only in that one area on my ink pad because I didn't want sparkle all over the pad. Then a few sequins were added to the front and the card was done.

This was a fun card to make and I got to use more than just the words in the "Layering Leaves" set.

Thank you SO much for taking your time to stop in and see today's friendship card,
Wanda

Saturday, August 26, 2023

Cheerful Daisies, Birthday Card, Stampin' Up!

Hello and welcome to my blog.  Today I have a quick and easy card to make, plus a bonus. It's a two for one! I found this card on Pinterest. You can see the original card here.  There were no instructions, so please read on to see how I made today's card.

The base of the card is a folded half-sheet of Moody Mauve card stock. This card opens on the right and the fold is on the left.

I took a 4" x 5-1/4" piece of Moody Mauve and a 4" x 5-1/4" piece of Designer Series Paper (DSP) from the "Fresh as a Daisy" 12" x 12" package and cut from corner to corner.  And for the card stock I cut it the same way. Though I should have cut it from the other corner. But I was able to just flip the card stock over and make it work. I textured the card stock using the "Exposed Brick" embossing folder.

The flowers are from the "Cheerful Daisies" bundle. I die cut them using Basic White card stock. I also die cut the detailed pieces for on top of the flowers. The flowers and leaves are all from one die. Most of the time I'm cutting off flowers but today I was able to just leave them as they were.  That was kind of nice. The leaves were colored in using a Blending Brush and Wild Wheat ink. I also colored the inside of the flowers using a q-tip and Copper Clay ink. I glued the detailed parts to the tops of each flower.

The words are from the same "Cheerful Daisies" bundle and were stamped using a very juicy Moody Mauve ink pad. I like new ink pads but sometimes they are a bit too wet. I did find out that you can move the ink on your pad by taking the back of a plastic spoon and rubbing it along the pad and push the ink to the other end. Then you can stamp with it not being so wet. The ink eventually goes back to the other side and you'll have to move it again if it's still too wet.  So there's your inking tip for the day! Once the words were stamped I die cut them using the die in the bundle. Then I took the little flower cluster in the set and inked it up with Moody Mauve and stamped off once on a scrap piece of paper and then stamped on the word piece. I repeated it for the other side of the word piece. 

Now we are ready to assemble.  Taking both of the angled cut pieces I set them on the front for placement. Then I glued them on the front of the card one at a time. Next the flowers were glued in place and finally the words were glued in place. I was going to set the words in place using Dimensionals but when I set some under it to see what it would look like raised I decided that I liked it raised much better than flat.

A 4" x 5-1/4" piece of Basic White was added to the inside and the card was done.

I do like how quick this card went together and the fun part was I now have two more angle cut pieces to make another card. My daisies looked like they went in one direction so I put the DSP at the bottom part of the card and the card stock at the top part. Had the DSP not had such a defined orientation to the piece I had I would have just added it to the top like the first one. But changing it still works.

Thank you SO very much for taking your time to stop in and see today's birthday card,
Wanda

Friday, August 25, 2023

Around the Bend, Layering Leaves, Sympathy Card, Stampin' Up!

Hello and welcome to my blog. Today I have a quick and easy card to share with you. I found a card on Pinterest and I liked the layout. You can see the original card here.  Please read on to see how I made this card. 

The base of my card is a folded half-sheet of Basic White card stock. The card was cut in half on the short 8-1/2" side so once it was cut it measured 4-1/4" x 11".  

I cut a piece of Designer Series Paper (DSP) from the "Fresh as a Daisy" 12" x 12" package. It measured 3-1/4" x 4-1/4" before die cutting it.  I used the rounded die from the "Basic Borders" die. I like to use some post it tape to hold my die in place. I looked on the back to see how many little dots and dashes were hanging over the edge so I could repeat that for the next layer. 

The next layer is a piece of Copper Clay and I set the same die on top making sure it hung over with three dots and two dashes showing before I cut the piece. Once it was cut I taped it to the DSP. I was able to move it a bit to get more of the card stock showing.  Oh, that piece was cut at 1-1/2" x 4-1/4" before cutting. I wanted to make sure I had plenty of room to work with.  After taping the two pieces together I did think about cutting some of the top off to make more room for the words at the bottom but there was enough room for the words I was using so I left it. But at least you have an out if you made the piece too long.

Next I die cut two flowers using the "Around the Bend" set using Basic White card stock. I cut two flowers and glued them together in the center. Then I took a scrap piece of Boho Blue and die cut the leaves and flower center. I glued the flower center in place. 

A Dimensional were added to the back of the flower and it was set in place on the front of the card. I added a little bit of glue to the end of the leaves piece and set it in place under the flower.  And the card was done.

This was a very quick and easy card to make and I really do like the two layers on the front of the card, they are fun and different.

Thank you SO very much for taking your time to stop in and see today's sympathy card,
Wanda

Thursday, August 24, 2023

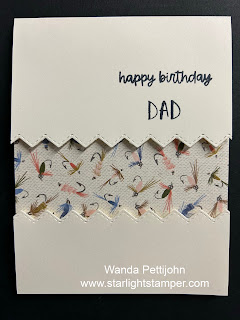
Best Family, Let's Go Fishing, Masculine Birthday Card, Stampin' Up!

Hello and welcome to my blog. Today I have a quick and easy masculine card to share with you. Please read on to see how I made this card.

The base of the card is a folded half-sheet of Very Vanilla card stock. This card opens on the bottom and the fold is on the top. I cut a piece of Very Vanilla card stock that is just a hair shorter than 4-1/4" x 5-1/2" for the inside of the card front.

I took the folded piece and I used the sig zag die cut from the "Basic Border" set and cut the piece at 2-1/2" down. I kept the piece because I will be using it for the bottom part.

The words are from the "Best Family" set and were stamped using black Memento ink. I had set out my Boho Blue ink and when it came time to stamp them I had grabbed the black ink. UGH! I think Boho Blue would have looked nicer but I wasn't going to start over. And you know I just share it all with you, the good, the bad, and the ugly.  This is not ugly but it's not what I had planned! So I am sharing it with you so you don't make the same mistake!  Unless you like the black, then by all means go with it!

The Designer Series Paper (DSP) is from the "Let's Go Fishing" 12" x 12" package and it was cut at 2-1/2" x 4-1/4".  I slipped the other piece of Very Vanilla card stock under the flap on the front of the card and closed the card. I did this so I could eye where the DSP will be taped down. Once the DSP was taped in place I used Dimensionals on every other tip (inside of the front of the card). It doesn't go every other one evenly so I added three together. At the upper part I used double-sided tape. I had actually used Dimensionals but then I couldn't close the card nicely.

Now for the bottom part, I set the bottom part of the Very Vanilla die cut piece on the bottom of the card front to see how much DSP I wanted showing since my piece was wide enough to allow me to do that. from the peak on the top to the valley on the bottom it measured 1-3/8". I used Dimensionals on the tips and across the bottom. Once that was put in place I took the piece to the paper cutter and cut off the excess on the bottom. And the card was done.

This was a fun and quick card to make. I don't know what this technique is called but it's fun, quick, and easy.

Thank you SO very much for taking your time to stop in and see today's masculine card,
Wanda

Wednesday, August 23, 2023

Quiet Meadow, Thinking of You Card, Stampin' Up!

Hello and welcome to my blog. Today I have a fun and quick card to share with you. It's one you can use for a number of other occasions. Ya gotta love versatility cards and stamp sets! Please read on to see how I made today's cards.

The base of my card is a folded half-sheet of Boho Blue card stock. This card opens on the bottom and the fold is on the top.

I cut a 4" x 5-1/4" piece of Basic White card stock and textured it using the "Timber" 3D embossing folder. I glued it on top of the card base.

Next I had a scrap piece of "Countryside Inn" Designer Series Paper (DSP) and trimmed it to measure 2-1/2" x 3-3/4" and a piece of Boho Blue card stock cut at 2-3/4" x 4". I taped the two pieces together.

The word pieces is die cut using the "Countryside Corners" dies. The larger one is cut from a piece of Boho Blue and the smaller one was cut using Basic White card stock. I had gotten mine in a kit and didn't use them as the kit showed because I had gotten two kits and I only wanted to make the one card and figured I would do something with the other pieces. And today is the day to use them. I stamped the words from the "Quiet Meadow" set using Night of Navy ink. 

The flower is also from the "Quiet Meadow" set. It was stamped using Night of Navy ink and fussy cut. I used my Wink of Stella pen and colored the flower in. That caused the ink to blead a bit and bleed a bit and make the flower look like it's light blue. It's a good effect! I set the flower aside to dry. In the meantime I glued the DSP piece to the front of the card . Then I added Dimensionals to the back of the word piece and I set that in place on the front of the card. A Dimensional was added to the back of the flower and it was set in place on the word piece.  A 4"x 5-1/4" piece of Basic White was added to the inside of the card and the card was done.

This was a fun card to make and it is a super simple one. I'm considering buying the "Country Corners" die set because it has a lot of potential. Imagine the quick and easy Christmas cards you can make with this layout?  Plus all the scrap DSP you can use up!

Thank you SO very much for taking your time to stop in and see today's thinking of you card,
Wanda

Tuesday, August 22, 2023

Cheerful Daisies, Fresh as a Daisy, Days to Remember, Birthday Card, Stampin' Up!

Hello and welcome to my blog. Today I have a fun birthday card to share with you. Please read on to see how I made today's card.

The base of the card is a folded half-sheet of Basic White card stock. This card opens on the right and the fold is on the left.

I cut a 4"x 5-1/4" piece of Copper Clay card stock. The piece of Basic White card stock on top of that was cut at 3-3/4" x 5". I textured it using the "Exposed Brick" embossing folder. That was then glued to the Copper Clay piece.

The Designer Series Paper (DSP) is from the "Fresh as a Daisy" 12" x 12" package. I had a scrap piece that I trimmed a bit to measure 2" x 3".  The Copper Clay behind it was cut at 2-1/8" x 3-1/8". I taped it to the piece of DSP. 

Next came the fun part. I die cut two Soft Sea Foam ferny pieces along with solid leaves using the dies from the "Cheerful Daisies" bundle. I made four solid leaves. I also die cut two Copper Clay ferny leaves.

The flowers are from the same bundle and four were die cut using Basic White card stock. I also cut 2 of the top detailed pieces using Basic White card stock. The centers were die cut using the detailed die with a piece of Copper Clay in the center. I just needed that center piece. The flowers were glued together and were offset just a bit to look fuller. Then the detailed piece was added and the Copper Clay center was fit back in like a puzzle piece. 

The words are from the "Days to Remember" set and were stamped using Copper Clay ink on a scrap piece of Basic White card stock. I punched them out using the "Double Oval" punch. I also punched out a Copper Clay scalloped oval using the same punch. I taped the words to the scalloped oval.

To assemble the card I added the ferny pieces first using a little bit of mono glue on the DSP piece. Then the flowers were added using a Dimensional behind each one. Then the four solid leaves were added. The piece was added to the front of the card using Dimensionals. The top and left edge are about 5/8" from the edge of the textured Basic White piece. 

The words were added using Dimensionals to the sides and bottom of the oval and a little bit of glue to the top.  And the card was done. I thought about adding some bling to the card but I think there's enough going on without it.

Thank you SO very much for taking your time to stop in and see today's birthday card,
Wanda

Monday, August 21, 2023

Timeless Arrangements, Darling Details, Artistically Inked, Note Card, Stampin' Up!

Hello and welcome to my blog. Today I have a "different" card to share with you. I was playing around with some papers that I had and some pieces I had left over from making cards and changing my mind about colors. This is what I ended up with. Please read on to see how I made this card.

The base of the card is a folded half-sheet of Basic Whit card stock. My card opens on the right and the fold is on the left.

I cut a 4" x 5-1/4" piece of Basic White card stock and textured it using the "Exposed Brick" embossing folder. I had set it aside because I wasn't sure if I was going to glue it in place or use Dimensionals.

I die cut the rounded corners rectangle piece using two dies (at the same time) from the "Nested Essentials" die set. I used the two largest to make the frame. I used Night of Navy "Soft Shimmer" paper.

"Countryside Inn" Designer Series Paper (DSP) was used on the inside of that rectangle frame. I cut it just a bit smaller than the larger frame. I wanted it to be large enough to glue to the frame but trimmed enough to not overlap. 

The Basic White floral piece is from the "Artistically Inked" bundle. I set the piece over the DSP and moved it around until I thought it looked the best. Then I cut it to fit. I poured some glue on my silicone mat and spread it around and then I set the piece on top of the glue, pushed it down slightly with a scrap piece of copier paper and then set it in place on the DSP. 

The frame was glued in place next. And the pretty Boho Blue flowers behind the frame are from the "Timeless Arrangements" bundle. It was set behind the rectangle piece and moved around until I thought it looked nice. I did have to trim the ends a bit because they hung over too much and looked odd. Once they were trimmed it looked SO much better. Dimensionals were added to the back and the piece was set in place on top of the textured piece. It sits about 1/4" from the left side and 1/4" from the top. 

On a scrap piece of Basic White the words from the "Darling Details" set were stamped using black Memento ink. They were punched out using the "Double Oval" punch. The scalloped oval behind the word piece was punched out using the same punch from the piece of Soft Shimmer paper that was die cut from the center of the frame I had made. I glued the words to the Soft Shimmer piece, Dimensionals were added to the back and it was set in place on the front of the textured piece again placing it about 1/4" on the two sides.

I did decide to use Dimensionals on the back of the embossed piece and it was set in place on the front of the card base.

Crystal rhinestones were added to the card and the card was done.

This was a fun card and it turned out better than I had imagined. When I started it I didn't have high hopes that it would be decent.  

Thank you SO very much for taking your time to stop in and see today's note card,
Wanda


Sunday, August 20, 2023

Sweet Songbirds, Darling Details, Go To Greetings, Friendship Card, Stampin' Up!

Hello and welcome to my blog. Today I was looking for a card that used the "Sweet Songbirds" set. I've been busy playing with other sets and as I was putting away a stamp set I saw the "Sweet Songbirds" and thought I should make a card using it. I found this one on Pinterest. You can see the original one here. There were no directions/measurements so I had to wing it. Please read on to see how I made the card. 

The base of the card is a folded half-sheet of Basic White card stock. This card was cut in half on the 8-1/2" side so once cut it measured 4-1/4" x 11".  It opens on the bottom and the fold is on the top.

I cut a 3-3/4" x 5" piece of Basic White card stock for the top piece. I die cut it using the die from the "Darling Details" bundle. I saved the inside piece for the other elements of the card.

I also cut a piece of Basic White card stock that measured 3-5/8" x 4-7/8" for the layer behind the die cut piece.

The bird was stamped using Calypso Coral ink, along with the wing. There's a matching punch so I punched them both. I also kept the white belly part that was punched too. To make my punching more efficient, I punched out the pieces using a folded piece of copier paper. If you use a single piece it can get stuck in the punch. Then I took one piece and I set the images in the openings and set that on my Stamparatus. I stamped the wing and bird at the same time and then I was able to punch them both at the same time. Easy peasy! The eyes of the bird were stamped using the image from the same "Sweet Songbirds" set using black Memento ink. I set the pieces aside.

Next I stamped the tree branch using Smoky Slate ink. The leaves were stamped at the end of the branch using Lemon Lime Twist ink. The piece was then fussy cut. 

The little flowers were stamped in the upper left corner of the blank Basic White piece. I stamped the leaves first using Lemon Lime Twist ink and then the flowers were stamped using Calypso Coral ink solid and a second generation too. I didn't do a third time or it would have been too light. I repeated this several times until there was a nice cluster in the corner.

The word piece was stamped using Smoky Slate ink and the words on it are from the "Go To Greetings" set and were stamped using black Memento ink. I fussy cut the piece out.

Now it was time to assemble. I used Dimensionals to set the die cut piece on the solid Basic White piece. The branch was added next. I counted up 5 circle clusters in the die cut piece and set the top leaf across it a little. The branch was set in place using Dimensionals. 

The birds feet were added next. I set them on the piece as close as I could get to the branch. They were stamped using black Memento ink.

Dimensionals were added to the back of the bird and it was set in place above the feet. The belly and wings were added using a Dimensional. 

I tied a linen double bow and glued it to the tree branch. The words were added next using a Dimensional on the left and a little bit of glue on the right.

The whole piece was added to the front of the card base using Dimensionals and the card was done.

This was a fun card to make and the colors have such a fresh feeling to them.

Thank you SO very much for taking your time to stop in and see today's friendship card,
Wanda 

Saturday, August 19, 2023

Cheerful Daisies, Days to Remember, Birthday Card, Stampin' Up!

Hello and welcome to my blog. Today I have a birthday card to share with you. It's a quick and easy card to make. Plus it can be used for several other occasions too! Please read on to see how I made today's card.

The base of the card is a folded half-sheet of Basic White card stock. I took a 4" x 5-1/4" piece of Basic White card stock and taped a 4" x 1-3/4" piece of Designer Series Paper (DSP) was taped to the left side. The DSP is from the "Let's Go Fishing" 12" x 12" package. And on the right side I added three strips of textured Basic White card stock. I had textured it with the "Exposed Brick" embossing folder. They were cut 4" x 1/2" each. I glued them in place.

The flowers are from the "Cheerful Daisies" bundle. I die cut two of the larger and medium flower. I also die cut one center for each flower. The flowers were glued together and offset a bit so they looked fuller. The centers were colored using Lemon Lolly ink and then the top detailed pieces were glued in place. I added a little Lemon Lolly to the centers of those pieces and then a little Boho Blue ink was added to both flowers.

The ferny leaves are from the same bundle and were die cut using Soft Sea Foam card stock. The tiny ferny leaves are pieces that were left from removing the centers of the leaves that were attached to the largest flower. I colored them using my light Soft Sea Foam Blends pen.

The words are from the "Days to Remember" set and were stamped on a scrap piece of Basic White using Boho Blue ink. They were punched out using the "Double Punch" and a piece of Boho Blue card stock was used for the scalloped oval layer that was made using the same punch. I taped the two pieces together.

Now I'm ready to assemble the card.

Dimensionals were added to the back of the 4 x 5-1/4" piece of Basic White card stock. 

Next I set the two larger ferny pieces on the upper right of the card to see where they looked best. I set the large flower on top and moved the ferny ones around until I thought it looked good. I set the flower aside and glued the stems in place.  Then the large flower was added using a Dimensional. The little flower was glued in place and then the tiny little ferny pieces were added around the smaller flower and one on the larger flower.

The words were set in place using Dimensionals and the card was done. 

I thought this was a fun, quick, and easy card to make. And I like the idea that it can be used for other occasions too!

Thank you SO very much for taking your time to stop in and see today's birthday card,
Wanda

Friday, August 18, 2023

Playing in the Rain, Days to Remember, Birthday Card, Stampin' Up!

Hello and welcome to my blog. Today I have an interesting birthday card to share with you. I say interesting because I wanted to do the floating color technique but I was not good with picking colors. But I ran with it anyway and this is what I got. Please read on to see how I made this card. 

The base of the card is a folded half-sheet of Basic White card stock. I cut a 4" x 5-1/4" piece of Pecan Pie card stock for the layer. On top of that is a 3-3/4" x 5" piece of Basic White card stock that was textured using the "Exposed Brick" embossing folder. I glued the Basic White piece to the Pecan Pie piece and set it aside.

Next I cut random strips of Crushed Curry, Pecan Pie, and Lemon Lime Twist card stock and glued them to a piece of Window Sheet. I placed toothpicks between the strips to keep the space even. It worked most of the time! I think it's better to just eye it and save yourself some time! Oh and glue oozed out and the toothpick briefly got stuck to the piece. That was fun! LOL Once the strips were glued down I took the die from the "Nested Essentials" set and cut my rectangle. I set that in place on the center of the textured Basic White piece using Dimensionals.

The cute turtle is from the "Playing in the Rain" set. I stamped him using black Memento ink and I colored him in using both light and dark Daffodil Delight, light Pecan Pie, light Old Olive, and light Lemon Lime Twist Blends pens. Once it was colored I fussy cut it. I set it aside.

I stamped the words from the "Days to Remember" set using black Memento ink. I punched them out using the "Double Oval" punch. I also used the same punch for the scalloped oval with Lemon Lime Twist card stock. I taped the ovals together.

Now I was ready to assemble the card. I was hoping that if there was a way I could creatively assemble the pieces, those strips might look better. I did have high hopes!  I added the turtle using both Dimensionals (on the left) and glue on the part that touches the strips. I added the word piece the same way.  And nope, it didn't help the piece at all. Dimensionals were added to the back of the Pecan Pie piece and that mess was set on top of the card base.  And the card was done.  It's not what I had hoped for nor even imagined.  But as always, I share the good, the bad, and the ugly with you!

Thank you so very much for stopping in today,
Wanda

Thursday, August 17, 2023

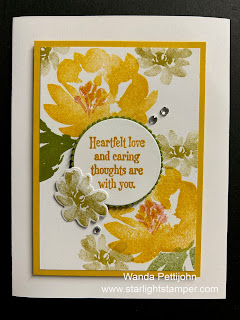
Textured Floral, Quiet Meadow, Sympathy Card, Stampin' Up!

Hello and welcome to my blog. Today I am going to share with you a card I found on Pinterest. You can see the original card by clicking here. I had clicked through the link to find measurements but there weren't any. SO I had to wing it.  My wing must have been broken because I did encounter a couple of issues.  But I managed to make the card and like how it turned out so it wasn't a total loss, right?  Do you ever buy a stamp set and then regret it?  I do that with almost every new catalog. I was wondering why I purchased this set. I found it a bit difficult to work with but when I saw this card on Pinterest I thought differently about the set. I may even play around with it more because this card inspired me! Please read on to see how I made this card. I'll even tell you my errors along the way so you can adjust your card if you wish.

The base of my card is a folded half-sheet of Basic White card stock. This card opens on the right and the fold is on the left.

I cut a 3" x 4-1/4" piece of Basic White for the focal piece. And a 3-1/4" x 4-1/2" piece of Crushed Curry was cut for the layer. This is where my big mistake came. The pieces should have been bigger. I'm not sure how much bigger though. I didn't realize it until I was going to be adding the words. 

Anyway, I stamped the large flowers from the "Textured Floral" set using Crushed Curry ink. The centers were stamped using the die in the same set with Cajun Craze ink that was stamped off once. 

The leaves were stamped using Old Olive ink and the smaller flowers were stamped using Wild Wheat ink. An extra small flower was also stamped and die cut using the matching die from the same bundle. If you don't have the new Wild Wheat color, you can easily get by with Crumb Cake ink. They look very similar. 

The words I used are from the "Quiet Moments" set (another set I wondered why I bought) and they were stamped using Crushed Curry ink. I had set my words up in my Stamparatus and stamped them a couple of times to get them dark enough.  It's sad that the Stamparatus is retired but you can always get a MISTI stamp positioner. And there's a couple ways to make one too. One is, take a Stampin' Up! stamp case, one of the ones that looks like they would have a DVD in it. Place your card stock on the inside and affix your stamp to the other side. I'd recommend using removable tape to hold your paper in place. You can also add a magnetic sheet to the back of the case and use magnets to hold your card stock down too.  And your other option is to make a Stamp-a-Ma-Jig using Legos.  I prefer the other ways over this one but one does with what they have! So where was I? Oh, once the words were stamped I die cut them using the 1-5/8" die from the "Layering Circles" die set. And the Old Olive layer behind it was made using a circle die from the "Stylish Shapes" set that was just a little bit larger.  I had stamped the words that were on the original card and die cut them. That's when I found out that my floral piece was smaller than the original card. So I adjusted the circles I needed to use and found words that would fit in them. Once the circles were die cut I taped the two pieces together. 

To assemble the card I taped the Basic White floral piece to the Crushed Curry piece. Dimensionals were added to the back and the piece was set in place on the front of the card base. Next the word piece was set in place with Dimensionals. The die cut flower was glued in place. A little glue on the part that touches the word piece and a little on the bottom where it's on the floral stamped piece. Three crystal rhinestones were added and the card was done.

This was a very quick and easy card to make and I do like how it turned out, even with it's minor flaws!! I am thinking how fun it would me to make a One Sheet Wonder sheet. Click here to see how to do the "One Sheet Wonder" technique. It's a great image for a number of other occasions too!

Thank you SO very much for taking your time to stop in and see today's sympathy card,
Wanda

Wednesday, August 16, 2023

Layering Leaves, Cheerful Daisies, Friendship Card, Stampin' Up!

Hello and welcome to my blog. Today I have an interesting card to share with you. I say interesting because I put it together with pieces that had already been cut and I didn't want to waste them. I had gotten a few card kits from Terri. She sends them out when I place an order. I ordered several times and received a kit with every order. In the kit you get the materials to make a full card and you get all the pieces to make a tiny one with directions so you can file it for future reference. I only needed one instructions one in the kits so I saved the other pieces. I ran across them today and thought I'd see what I could do with them and here's what I came up with. Please read on to see how I made today's card.

The base of my card is a folded half-sheet of Basic White card stock. It opens on the right and the fold I on the left.

The Designer Series Paper (DPS) is possibly retired. I couldn't find it in the catalog, though I didn't look all that hard for it.  I did have the pieces for a while so I wouldn't be surprised if it is retired. But there are other sheets of Soft Sea Foam DSP in the current catalog to substitute with what you see here. Anyway, these pieces measure1-3/4" x 2-1/4" (there are two on this card). I did cut two 2" x 2-1/2" pieces of Soft Sea Foam card stock for the layers behind them. I taped the pieces together and then I taped them to the front of the card in opposite corners.

The center piece of Basic White card stock was cut at 3-1/4" x 2-1/4" and was textured with an embossing folder I don't have and I believe it's retired too, it was in the kit. And the Soft Sea Foam layer was cut at 3-1/2" x 2-1/2" and was glued to Basic White textured piece. That Soft Sea Foam piece came in the kits. Other than the word pieces, that was it for what I had left over from the kits. I set that piece in the center of the card using Dimensionals. 

I die cut the flowers from the "Cheerful Daisies" set. I cut 2 sets of the flowers (they are on one die) and I cut 4 sets of the ferny leaves, all using Basic White card stock. I used Basic White card stock for the ferny pieces because I wanted to color them using my dark Soft Sea Foam Blends pen because I wanted  them to be a bit darker than the layered pieces, I wanted them to stand out. The flowers were glued together. I took my dark Lemon Lolly Blends pen and colored in the center of the flowers. I also colored on a scrap piece of Basic White card stock with the Lemon Lolly Blends pen so I could cut out some sort of circle pieces for the backs of each flower. I like the open holes in the flowers but I didn't like the background showing through. Plus I needed a solid piece so I could glue the flowers to the front of the card. 

The flowers were loosely set on the front of the card for placement of the ferny pieces. Then I glued the ends of the ferny pieces in place. The top two flowers went on next. 

The words are from the "Layering Leaves" set and were stamped using Soft Sea Foam ink. I set it up in my Stamparatus and stamped them two times so I could have very dark letters. I stamped them on the cute Basic White rectangle piece. I taped that to the larger Soft Sea Foam rectangle piece. I took my dark Soft Sea Foam Blends pen and with the belly of the nib, I went around the edges of the entire piece to darken it a bit so it would stand out more. The dies here are from the "Something Fancy" die set. I used Dimensionals on the left side and a little bit of glue on the right side and I set the piece in place on the front of the card. Before pressing down on it, I slipped the ferny piece under the word piece. The smallest flower was added with a little bit of glue on the two larger petals and the card was done.

This was a fun card to make and it was a challenge to use the pieces in front of me.

Thank you SO very much for taking your time to stop in and see today's friendship card,
Wanda


Tuesday, August 15, 2023

Timeless Arrangements, Thank You Card, Stampin' Up!

Hello and welcome to my blog. Today I have a quick and easy card to share with you that I found on Pinterest. My computer restarted and the page wasn't saved. So if you see a card that looks like this, please let me know so I can give the person credit. I did make a few minor changes from the original card. I changed the textured piece and the tiny flowers. Please read on to see how I made the card.

The base of the card is a folded half-sheet of Basic White card stock. This card opens on the bottom and the fold is on the top. 

A 4" x 5-1/4" piece of Basic White card stock was cut for the top layer. It was textured using the "Exposed Brick" embossing folder. 

The Designer Series Paper (DSP) is from the "Countryside Inn" 12' x 12" package. I cut it at 4" x 1-1/2". 

The scalloped piece along the right side of the DSP was cut using the die from the "Basic Borders" die set. I used Night of Navy for this. The original card had a different border. I didn't have that one so I just used what I had. I added tape to the back of the DSP on the right edge and set the die cut edge piece in place. Then I glued that to the front of the card.

The words are from the same "Timeless Arrangements" and were stamped using Night of Navy ink on a scrap piece of Basic White card stock. It was cut using the die from the "Timeless Arrangements" bundle.

Behind the words piece was cut using Boho Blue card stock and the die from the "Timeless Arrangements" bundle. I also die cut a single spring at the same time. The spring was glued to the back of the Boho Blue springs piece and then glued to the back of the word piece.

I set this piece in place on the front of the card using Dimensonals. A linen bow was tied and slipped under the upper left corner of the word piece.

The little flowers were snipped from another die in the same "Timeless Arrangements" bundle. I had used Nigh of Navy card stock for that. They were glued to the front of the card and a tiny little crystal rhinestone was added to the center of each one. 

The whole front panel was set in place on the front of the card base using Dimensionals and the card was done.

This was a very quick and easy card to make. I like the layout and I also like that it can be used for a number of other occasions.

Thank you SO very much for taking your time to stop in and see today's thank you card,
Wanda

Monday, August 14, 2023

Cheerful Daisies, Enjoy The Rhythm, Artistically Inked, Birthday Card, Stampin' Up!

Hello and welcome to my blog. Today's find is from the internet. You can see the original card here. The site is not secure but I took a chance. (always look for the padlock in the search bar to know it's a safe site, I look but don't always heed the warning!). Please read on to see how I made this card. 

The base of the card is a folded half-sheet of Basic White card stock.  A 3-3/4" x 5-1/2" piece of Crumb Cake card stock was cut for the front panel. On that panel I splattered Crumb Cake ink by flicking the tip of my marker on the edge of the cap. 

The music symbols are from the "Enjoy the Rhythm" set and were stamped using Crumb Cake ink. I would stamp the image and then stamp it again without adding more ink. I repeated this 5 times down the card. I started stamped the music about 1" from the top of the panel to about 1" from the bottom of the panel. I didn't have the music image that was used on the original card so I used what I had and made it work.  Kind of my motto for this year, "Make it work". And so far so good!  I did look in the Stampin' Up! catalog and there is no current music background stamp so another reason for this working out the way it did! After stamping the music on, I taped the panel to the front of the card. I just eyed the sides to make them as equal as I could.

Now off to the die cutting. There's quite a few pieces here. First I die cut two sets of the flowers. They were offset a bit and a dot of glue was added to the centers. I set them aside to dry. In the meantime I die cut the flower centers. I used the same dies as I did for the flowers but I just caught the flower centers. I fussy cut around them and set them aside.

The leaves were cut using Soft Sea Foam card stock. The center pieces to the leaves were saved because they will be added to the card. I cut three sets of leaves. 

Pecan Pie card stock was used for the ferny pieces, I cut three of them.

A double bow was tied using some linen thread.

The words are from the "Artistically Inked" set on a scrap piece of Basic White card stock using Pecan Pie ink. I cut the strip on the paper cutter and it measured about 3/8" wide and 4" long. 

Time to assemble the card. The flowers were added first using a Dimensional on each one.  The Pecan Pie ferny pieces were added next. Then the leaves were set in place. The tiny centers to those leaves were added.

The flower centers were added using Dimensionals. 

Next the bow was glued in place and the words were set over them using Dimensionals. I added a small Dimensional to the right and left end and one in just under the "B" in birthday. I set that in place and the card was done.

This was such a fun card to make and I was thrilled that I was able to stamp the music on it to give it a birthday feel. So pretty and so fun!

Thank you SO much for taking your time to stop in and see today's birthday card,
Wanda

Sunday, August 13, 2023

Delightful Daisies, Inked Botanicals, Birthday Card, Stampin' Up!

Hello and welcome to my blog. Today I have a card to share with you that I found on Pinterest. You can see the original card here. I clicked on the link and was able to see the materials list but not any measurements. So please read on to see how this card was made. It's actually pretty simple.

The base of the card is a folded half-sheet of Lost Lagoon card stock. The card opens on the right and the fold is on the left.

I cut a 4" x 5-1/4" piece of Very Vanilla and taped it to the inside.

On the front is a 2" x 5-1/2" piece of Designer Series Paper (DSP) from the "Inked Botanicals" 12" x 12" package. I cut a 2-1/4" x 5-1/2" piece of Copper Clay card stock for the layer. I taped the two pieces together and then set them in place on the center of the card base using Dimensionals.

The flowers were cut using the dies in the "Delightful Daisies" bundle. I used Very Vanilla card stock. I also die cut an extra set of leaves. I cut the leaves off from the largest flower. I glued the layers together on the flowers. The centers were stamped using Copper Clay ink and the large one was die cut and the other two were fussy cut. The centers were glued to each of the flowers with just a dot of glue right in the center of the piece. I needed to make sure I had some space on the large one for the words to slip under. 

The ferny pieces were die cut using Lost Lagoon and Pool Party card stock. I cut two of each.

To assemble the piece, I used Dimensionals behind the center of each of the flowers. A small one was used for the smallest flower. I just set it on the card front so I could see where the leaves would go. I glued the leaves, including the ferny ones in place and then removed the backing from the Dimensionals and set the piece in place on the front of the card. 

The words are from the "Delightful Daisies" set and were stamped using Copper Clay ink. I used my paper cutter to cut across the top part of the words and the rest was fussy cut. When I got to the "y", I made a "C" shape to the "E", this way it will fit under the flower center nicely. I added glue to the back of the piece and set it in place on the front of the card.

I didn't have the copper jute but I did have some retired copper wire ribbon so I used that instead. I tied a bow, "fluffed" it out and glued it in place. I also did not have the embellishments that were used so I took some crystal rhinestones and colored them with the "Copper Clay" Blends pen. It looks more like a root beer color than copper but it's still pretty. 

I thought this was a fun card to make and I'm pleased with the way it turned out.

Thank you SO very much for taking your time to stop in and see today's birthday card,
Wanda


Saturday, August 12, 2023

Dainty Delight, Days To Remember, Birthday Card, Stampin' Up!

Hello and welcome to my blog. I have an interesting card to share with you. I keep looking at it and hoping it will grow on me. I'm not sure what I'm not liking but it's not sitting well with me. I always share with you the good, the bad, and the ugly. I'm not to sure where this comes in but it's not under "good".  Perhaps you can improve on it. Maybe it will inspire you to find a way to make it prettier. I will share with you how I made today's card.

The base of my card is a folded half-sheet of Lost Lagoon card stock. I taped a 4" x 5-1/4" piece of Basic White card stock on the inside.

The Designer Series Paper (DPS) on the top of the card is from the "Masterfully Made" 12" x 12" package. I cut it at 3-1/2" x 4-3/4". I taped that to a 3-5/8" x 4-7/8" piece of Wild Wheat card stock. Then I taped the piece to the front of the card base.

I die cut the stem piece using the "Dainty Delight" bundle with Granny Apple Green card stock. I added a little dot of glue to the backs of each leaf and set it in place on the front of the card. I ended up having to pull up a couple leaves to slip in two flowers so you may want to wait on the gluing or just go ahead and pull up the two leaves you need.

The flowers were cut using the dies from the "Dainty Delight" bundle with Basic White card stock. I cut four of the ones that kind of look like dandelions and six of the daisy ones. I glued two of each together. On the dandelion ones I trimmed the bottom part up a bit. I set all the pieces on the stem to see where I want them to be placed. Once I decided what looked the best, I glued the dandelion ones in place under leaves and the daisy ones were set in place using Dimensionals. 

The words are from the "Days To Remember" using black Memento ink. I punched then out using the "Double Oval" punch. I also used that punch to make the scalloped oval layer behind it. I taped the words to the Granny Apple Green scalloped oval. Dimensionals were added to the back and the piece was set in place on the front of the card.

I thought the center of the daisies could use something so I took the little die from the set and cut them out using Lemon Lolly card stock. I used a dot of glue and set the centers in place. And the card was done.

This was an easy card to make but it needs something or something needs to be changed. 

Thank you SO very much for taking your time to stop in and see today's birthday card,
Wanda

Friday, August 11, 2023

Timeless Arrangements, Happiness Abounds, Friendship or Thank You Card, Stampin' Up!

Hello and welcome to my blog. Today I ran a cross a quick and easy card on Pinterest. There's supposed to be a video but there was no link. You can see the original card here and please read on to see how I made it.

I couldn't decide if the wording here was for a friendship card or for a thank you card. Either would work.

The base of the card is a folded half-sheet of Basic White card stock. This card opens on the bottom and the fold is on the top.

I cut a 2-3/4" x 4" piece of Basic White card stock for the top focal piece. I textured it using the "Exposed Brick" embossing folder. I glued it to a 3" x 4-1/4"piece of Basic Black card stock. And then that was taped to the front of the card.

The words are from the "Happiness Abounds" set and were stamped using black Memento ink on a scrap piece of Basic white card stock. 

The leaves pieces are from the "Timeless Arrangements" bundle and were die cut using Basic Black ink. I used the leafy looking die and the one that looks like buds. I glued both of them to the back of the word piece. I added Dimensionals to the back of the word piece and set them in place on the front of the card.

A few black embellishments were added to the focal piece and the card was done.

This was a super quick and easy card to make. I think I'd like to try this in some other colors too.

Thank you SO very much for taking your time to stop in and see today's card,
Wanda

Thursday, August 10, 2023

Cheerful Daisies, Birthday Card, Stampin' Up!

Hello and welcome to my blog. Today I have a sweet card to share with you that I found on Pinterest. You can see the original card here. There were no instructions on how to make it so please read on to see how I made it.

The base of my card is a folded half-sheet of Basic White card stock. This card opens on the right and the fold is on the left. I taped a 4-1/8" x 5-3/8" piece of Soft Sea Foam card stock to the front of the card. On top of that will be a 4" x 5-1/4" piece of Basic White card stock. I did not tape that piece on yet.

Next I took a 1/4 sheet of Basic White card stock and textured it using the "Exposed Brick" embossing folder. I cut two 1/2" strips from it and trimmed them to 5-1/4" long. I glued these strips on the left side of the piece of Basic White card stock. The left strip started at the left side about 1/2" in. And the space between the two strips is about 1/8".

The flower is from the "Cheerful Daisies" bundle and was die cut along with the detailed piece, leaves and ferny pieces using Basic White card stock. The center of the flower was colored in using a sponge dauber with Lemon Lolly ink. The ferny pieces (cut two) were colored in using the light Soft Sea Foam Blends pen and the other leaves were colored in using the dark Soft Sea Foam Blends pen. You need to save the center pieces and place them back inside. They are not colored, they are white. I used my silicone mat to glue them back together. It's a bit messy. I set it aside to dry.

The words were stamped next. You may want to make sure the words you use before you glue the strips down. You can always move them to give you more room. The words are from the same "Cheerful Daisies" set and were stamped using black Memento ink. 

Once the words were done I went back to the flower. I glued the detailed piece in place and made sure there was some Lemon Lolly ink on the center of that piece too. Dimensionals were added to the back and the piece was laid on the front (but not affixed) so I could see where the ferny pieces were to be placed. I glued the end of the stem in place on both ferny pieces. Then I glued down the other set of leaves. The backing was removed from the Dimensionals on the back of the flower and it was set in place on the front of the card.

I added a few retired embellishments to the front and the card was done. My embellishments are a bit dark and I'm thinking I might go over the flower center with some Crushed Curry ink.  And that was it.

This was a very simple and quick card to make. I love how subtle it is.  Just too sweet.

Thank you SO very much for taking your time to stop in and see today's birthday card,
Wanda

Wednesday, August 09, 2023

Cheerful Daisies, Birthday Card, Stampin' Up!

Hello and welcome to my blog. Today I have a card for you that I found on the internet. You can see the original card here. I did change it a bit because I didn't want to send a fun fold card to someone who would get confused on how to open it. Sometimes you just have to keep things simple. Please read on to see how I made this card.

The base of the card is a folded half-sheet of Night of Navy card stock. This card opens on the bottom and the fold is on the top.

A 4" x 5-1/4" piece of Basic White card stock was taped to the inside.

On the outside I took a piece of "Masterfully Made" Designer Series Paper (DSP) and cut it at 4" x 3" and a 4" x 1" piece. I taped the larger piece to the left and the strip to the right.

The daisies from the "Cheerful Daisies" bundle were die cut. I cut two sets of daisies and two sets of top detailed pieces. I glued the pieces together. 

The centers were stamped using Fresh Freesia ink. I did sneak in stamping of the center of the smaller flower. It should have been done before the top detailed piece was glued on.  The large centers were die cut and the smaller ones were fussy cut. I actually stopped typing to count the dies in the set thinking that the smallest one was missing but there was no small center die so I'm good! So where was I?  LOL Oh, I glued the centers to each flower. Before I set the flowers in place I set them on the front of the card to get the orientation right. I realized that the flowers on the bottom were cut apart from the group of three. Dimensionals were added to the back of the flowers and they were set in place on the front of the card.

The words are from the same "Cheerful Daisies" set and were stamped using black Memento ink on a scrap piece of Berry Burst card stock. I die cut them with a die from the same bundle. That piece was glued on top of the flowers and the card was done.

The original card opened with the smaller strip on the right. It's fun but not what I needed. Even without that, this was a very fun and easy card to make. And pretty too, huh?

Thank you SO very much for taking your time to stop in and see today's birthday card,
Wanda

Tuesday, August 08, 2023

Cheerful Daisies, Thank You Card, Stampin' Up!

Hello and welcome to my blog. Today I have a card I found on the internet. I had seen it several times but was unable to find where it came from until I started paying attention to cards and items scrolling by on Terri's site. It was a sample card made by someone at Stampin' Up! to promote the  "Cheerful Daisies" bundle.  I don't usually pay attention to what is scrolling by, I'm usually on a mission. Well, today's mission was to find where that card came from. I found it! I was happy about that but disappointed because I had no directions. So please read on to see how I made this card.

The base of the card is a folded half-sheet of Berry Burst card stock. This card opens on the right and the fold is on the left.

I cut a 4-1/2" x 3" piece of Berry Burst for the layer. On top of that layer is a piece of Designer Series Paper (DSP) from the "Bright & Beautiful" 6" x 6" stack. It was cut at 4" x 2-3/4".  I taped the DSP to the layer so it was a bit offset on the right side. Click on the photo and you can see the DSP hanging over the layer.

Next I die cut a Bubble Bath circle using the third largest circle from the "Layering Circles" die. How may times can you use the word circle in one sentence? A bit redundant but you get the idea! My high school English teacher would have a fit! Good thing blogs aren't graded! LOL Okay, back to the card. The next thing I die cut was the flowers. I cut the cluster of three and the top layers for each of those flowers using Basic White card stock. The centers of the flowers were colored in using my light Lemon Lolly Blends pen and light Lost Lagoon for the leaves. I also die cut 2 ferny branches using Basic White card stock and colored them in using the light Lost Lagoon Blends pen.

The top layers on the flowers were glued in place and then glued to the circle. The ferny leaves were tucked in place under the large flower.

The words are from the same "Cheerful Daisies" set using black Memento ink on a scrap piece of Lemon Lolly card stock. I trimmed it to measure 2-1/2" x 3/8".  I glued the piece in place across the flowers.

Dimensionals were added to the back of the circle and it was set in place on the front of the card, a bit to the left of center. I was just eyeing what I saw on Terri's site. It's close enough and it's PERFECT if you don't compare them!  LOL  But seriously, I am pleased with the way it turned out. Plus I do like this layout and may try it on a different card someday soon.

I did not add any embellishments because I didn't want to pay extra to mail the card.

Thank you SO very much for taking your time to stop in and see today's thank you card,
Wanda

Monday, August 07, 2023

Timeless Arrangements, Layering Leaves, Friendship Card, Stampin' Up!

Hello and welcome to my blog. Today I'm going to share a card with you that I found here while surfing the net. I thought it would be a fun and quick card to make, and it was! I actually made two with one going out in the mail in the morning. Please read on to see how I made the card, I did change it a little.

The base of my card is a folded half-sheet of Starry Sky. I chose that color because I'm a bit low on Night of Navy card stock and in less than a year this color will be retired, so I took my almost full package and decided that was the way to go! It's close to Night of Navy so all the colors blend in well.

Next I cut the Very Vanilla card stock to measure 4" x 5-1/4". You need two, one for the outside and one for the inside. On the outside piece I textured it using the "Exposed Brick" embossing folder. I glued that to the front of the card base and I taped the other piece on the inside.

Using the dies from the "Timeless Arrangements" bundle I die cut two of each in the following colors: Wild Wheat for the rounded bumps on a stem, Starry Night for the one with the pointed leaves on the side, and Poppy Parade for the one that looks like little flowers. There's no names for these flowers/buds, so I loosely described them. You will need two of each.

The words are from the "Layering Leaves" set and were stamped using Starry Night ink on a scrap piece of Very Vanilla card stock. I die cut them with a die from the "Timeless Arrangements" bundle. 

To put the focal piece together you first you glue or tape down the Wild Wheat ones. I used glue so I could move it around if needed. I just lined up the edge of the colored card stock pieces with the edge of the word piece. The Starry Sky ones were added next and the Poppy Parade ones were added last. 

After the pieces were added, Dimensionals were placed on the back and the piece was centered on the front of the card. 

Several crystal rhinestones were colored in using my Blends pen and they were set in place on the card and the card was done.

This was a very fun and super quick card to make.

Thank you for taking your time to stop in and see today's friendship card,
Wanda

Sunday, August 06, 2023

Fresh As A Daisy, Cheerful Daisies, Thinking of You Card, Stampin' Up!

Hello and welcome to my blog. Today I have a super quick and easy card to share with you. I was looking at something on my worktable and I found this card partly made. So I thought I'd finish what I started. Imagine that!!  LOL Please read on to see how I made this card.

The base of my card is a folded half-sheet of Basic White card stock. On top of that is a 4" x 5-1/4" piece of Designer Series Paper (DSP) from the "Fresh as a Daisy" 12" x 12" package. I had taped it to the card base. Now this is what I had found on my worktable.  

There was also the word piece. I was going to use it on the card I made yesterday but it was too big so I set it aside. Well, it just so happened to have fit nicely with this layout. The words are from the "Textured Floral" set and were stamped using Mossy Meadow ink on Basic White card stock. I die cut them using the largest die from the "Nested Essentials" set. I set the word place in the center of the card using Dimensionals.

The flowers are from the "Cheerful Daisies" bundle and were die cut using Basic White card stock. I cut all three layers. The centers were colored using Lemon Lolly ink before they top two pieces were put together. The pieces were glued together. Then they were set in place on top of the solid piece using Dimensionals. I slipped them in under and round the word piece with glue on the backs.

I die cut two of the ferny pieces using Garden Green card stock. A little bit of glue was added to the bottom end of the stem and slipped under the flowers.  And the card was done.

This was a super quick card to make. It was kind of fun finding the pieces on my worktable but the best part of it is, I used the pieces before they got ruined and I ended up with a finished card!

Thank you SO very much for taking your time to stop in and see today's thinking of you card,
Wanda