Friday, June 30, 2023

Layering Leaves, Around the Bend, Dainty Delight, Birthday Card, Stampin' Up!

Hello and welcome to my blog. Today I have a fun quick card to share with you. Please read on to see how it was made.

The base of my card is a folded half-sheet of Basic White card stock. This card opens on the right and the fold is on the left.

I cut a 3-3/4" x 5" piece of Basic White card stock for the top layer. Then I added some score lines to it. I set the piece on my scoring board and I scored it at 1/2" and 3/4" on the left, the long side. Remember you will  be turning this over so the bumpy part of the score lines will be on the front. I scored it about 1/2" down from the top and 1/2" from the bottom. Then I scored the bottom at 1/2" and 3/4" down. I stopped when the lines met the first ones I made and I stopped about 1/2" from the side. You might want to practice on a piece of scrap copier paper first. 

Next I die cut the cute little daisies from the "Around the Bend" bundle using Basic White card stock. I die cut 6 of them. I glued two together. I had to move the petals around a bit until I could get them to line up nicely to my liking. The centers of the flowers were done using a regular paper punch on a scrap piece of Lemon Lolly card stock. I glued them to the center of each flower. And the leaves are from the "Dainty Delight" bundle. I die cut three of them using Parakeet Party card stock. Granny Apple Green would work but I wanted to keep the colors light. I laid the flowers on the right side for placement. I needed to find some nice wording for the upper area.

The words are from the "Layering Leaves" set and were stamped using black Memento ink.

Now it was time to get the flowers affixed. I glued the top one down first with just a dot of mono glue. The center one was set in place using a Dimensional. And the third one was glued in place the same as the top one. I put a little bit of glue on a scrap piece of card stock and dipped the stem of the leaves in it and set them in place under the flowers.  And that was it, the card was done.

This was a very fun and quick card to make. I love the soft colors. This is another one of those versatile cards! Ya gotta love that!

Thank you SO very much for taking your time to stop in and see today's birthday card,
Wanda

Thursday, June 29, 2023

Fresh As A Daisy, Days To Remember, Birthday Card, Stampin' Up!

Hello and welcome to my blog. Today I have another quick card for you to make. I am looking ahead here at Christmas and hoping that Stampin' Up! will have some fun Designer Series Paper (DSP) that would work in that top layer area.  Can you imagine how many cards you can whip out for your holiday stash?  And how quick and easy you can get your holiday cards done at a low cost too? Today's card is a birthday card, please read on to see how this card was made.

The base of the card is a folded half-sheet of Basic White card stock. The layer on the top is a piece of Moody Mauve that was textured using the embossing folder from the "Stripes & Splatters" folder set. The folders are not as wide as the card stock, so I had to use it twice to make the design on the whole piece. With this one it's pretty easy to do that without any trace of a line from the first time through the Big Shot. I thought this fold set was a great deal.  After texturing the piece I glued it in place on the front of the card base.

The DSP is from the "Fresh As A Daisy" 12" x 12" package and was cut at 2-7/8" x 2-5/8".  It was taped to the upper part of a 3" x 4-1/4" piece of Basic White card stock.

I cut a 3/8" x 3"piece of Basic White card stock and taped it to the DSP, lining up the bottom edge with the bottom edge of the DSP. 

The ribbon (retired) was cut at 4-1/2" long and the ends were taped to the backside. I thought it looked two light so I taped another piece over the top of it for a double layer. I thought it was dark enough and really matched the color in the DSP.  I think this ribbon is More Mustard organza. There was no label on it anymore. Dimensionals were added to the back and centered on the front of the card base.

I stamped the words from the "Days to Remember" set using black Memento ink. I punched it using the "Double Oval" punch. And the Moody Mauve scalloped layer behind it was punched from the same punch. I taped the two pieces together. Dimensionals were added to the back and was set in place on the front of the DSP piece. And the card was done.

This was a fun card to make. It was super quick and easy too!

Thank you SO very much for taking your time to stop in and see today's birthday card,
Wanda

Wednesday, June 28, 2023

Fresh As A Daisy, Quiet Meadow, Sympathy Card, Stampin' Up!

Hello and welcome to my blog!  Today I have a sweet and simple sympathy card to share with you. I saw this card on Pinterest and used different wording. You can see the original card here. Please read on to see how the card was made.

The base of my card is a folded half-sheet of Boho Blue card stock. This card opens on the right and the fold is on the left. 

The Designer Series Paper (DSP) is from the "Fresh As A Daisy" 12" x 12" package. I cut it to measure 3" x 4". The Copper Clay layer behind it measures 3-1/4" x 4-1/4" and the Basic White layer measures 3-1/2" x 4-1/2". 

Next I took the cut DSP and stamped the words from the "Quiet Meadow" set using black Memento ink.

I taped the three layers together. Dimensionals were added to the back and the piece was centered on the front of the card base and the card was done.

This was a super quick, simple, and easy card to make. The DSP did all the work! It's such pretty paper. It can be used for a number of occasions. Happy little daisies!

Thank you SO very much for taking your time to stop in and see today's sympathy card,
Wanda

Tuesday, June 27, 2023

Zoo Crew, Around the Bend, Friendship Card, Stampin' Up!

Hello and welcome to my blog. I have another fun card to share with you using the "Zoo Crew" Designer Series Paper (DSP). There's SO many characters in this package that you can make a card a day for weeks! Please read on to see how I made today's card.

The base of the card is a folded half-sheet of Basic White card stock. I was going to use Basic Black and I don't know what happened. I guess I picked up the wrong piece and ended up with white on white. It is what it is and I still like it so I guess that makes it okay! LOL The card opens on the bottom and the fold is on the top.

I cut a 4" x 5-1/4" piece of Basic White card stock for the top layer. I textured it using one of the folders in the "Stripes & Splatters" set. These are not a full size embossing folder so I had to run it through my Big Shot twice to get it to cover the whole piece of card stock. I glued that in place on top of the card base. I prefer glue because I get a better surface contact than with tape. Had I used tape I could have removed it and switched to a black card base. 

Next I took a piece of DSP from the "Zoo Crew" set and using my Blender brush and Lemon Lime Twist ink I colored the piece. It measures 2" x 4". I cut a Basic Black piece for the layer that measures 2-1/8" x 4-1/8".  I taped the DSP to the layer and then I glued that in place on the front of the card about 5/8" up from the bottom and on each side.

The alligator was fussy cut from the "Zoo Crew" DSP. I set it aside. Next I die cut a 2-7/16" Basic White circle and I colored it using the Blending brush and Lemon Lime Twist ink. I also die cut a scalloped oval Basic Black piece using the next largest scalloped circle. I taped the two circles together and then I added the alligator using Dimensionals. 

The words are from the "Around the Bend" set and were stamped using black Memento ink. I masked off the word "there" under the "hello" because I prefer just a plain hello and both wouldn't fit in the oval. I punched out the word using the "Double Oval" punch. I also punched out a scalloped oval using Basic Black card stock and the same punch. I taped the two pieces together and added Dimensionals to the back.

I played around with the pieces until I finally liked where they ended up.

This was a very fun and quick card to make and I do like how it turned out. It's not just a friendship card, it could be used for a birthday card for children or adults. 

Thank you SO very much for taking your time to stop in and see today's friendship card,
Wanda

Monday, June 26, 2023

Let's Go Fishing, Best Family Ever, Days To Remember, Masculine Birthday Card, Stampin' Up!

Hello and welcome to my blog. Today I have another masculine birthday card for you. This could easily be converted to a Father's Day card if needed!  Please read on to see how I made this card.

The base of the card is a folded half-sheet of Very Vanilla card stock. It opens on the bottom and the fold is on the top.

I cut a 4-1/8" x 5-3/8" piece of Boho Blue card stock for the layer. On top of that I taped a 4" x 5-1/4" piece of Designer Series Paper (DPS) from the "Let's Go Fishing" 12' x 12" package. 

I took the third largest stitched square from the "Stylish Shapes" set using another piece of DSP from the "Let's Go Fishing" and I die cut 2 squares. Then I took a piece of Boho Blue card stock and cut the layers behind the DSP that measures 2-1/15" x 2-1/15". I taped those two pieces together and then taped them in the corners of the front of the card.

The rectangle was cut from the same "Let's Go Fishing" DSP and was cut at 2-1/2" x 4" and the Boho Blue layer was cut at 2-3/8" x 4-1/8".  Dimensionals were added to the back and the piece was set in place on the center of the card base.

I fussy cut three fish from another piece of DSP from the "Let's Go Fishing" package. I set them aside until the words were done.

The words are from the "Days To Remember" and "Best Family Ever" sets. They were stamped using Boho Blue ink on a scrap piece of Very Vanilla card stock. I die cut them using the second smallest stitched circle from the "Stylish Shapes" die set. Then I die cut the "Boho Blue" circle layer using the die from the "Layering Circles" die that was just a bit larger than the stitched one. I taped the two circles together. Dimensionals were added to the upper part and tape on the lower part and the piece was set in place on the upper corner of the rectangle piece.

Dimensionals were added to the back of the fish and they were set in place on the rectangle and the card was done.

This was a fun card to make and I do like how it turned out. It's exactly what was in my head! That doesn't happen very often!

Thank you SO very much for taking your time to stop in and see today's masculine birthday card,
Wanda

Sunday, June 25, 2023

Let's Go Fishing, Go To Greetings, Masculine Birthday Card, Stampin' Up!

Hello and welcome to my blog. Today I have a fun and easy masculine birthday card for you. Masculine cards are hard to come by in handmade cards.  I try to find fun sets that are versatile but I have to like the set too or I don't buy it because I know I won't enjoy playing with it and it will get shelved.  I did not buy the fishing bundle set this time around but I did order the "Let's Go Fishing" 12" x 12" Designer Series Paper (DSP).  Please read on to see how I made today's card.

The base of my card is a folded half-sheet of Very Vanilla card stock. This card opens on the bottom and the fold is on the top.

I cut a 5-1/4" x 2-1/8" piece of DSP from the "Let's Go Fishing" package and I taped it to the upper part of the card base. 

Next I took the sheet that was full of fish and I fussy cut a fish. The fish was taped to a Very Vanilla "Tailor Made Tags" die using Very Vanilla card stock. Then I took the next size larger tag from the set and die cut a Mossy Meadow one. I taped the two tags together. 

I set the tag on top of the front of the card for placement of the words. The words are from the "Go To Greetings" set and were stamped using Mossy Meadow ink.

Dimensionals were added to the back of the tags and they were set in place on the front of the card, centering it as much as I could by eyeing it and the card was done.

This was a super quick and easy masculine card. I can see making some Father's Day cards next year using these fish!

Thank you SO very much for taking your time to stop in and see today's masculine birthday card,
Wanda

Saturday, June 24, 2023

Zoo Crew, Go To Greetings, Friendship Card, Stampin' Up!

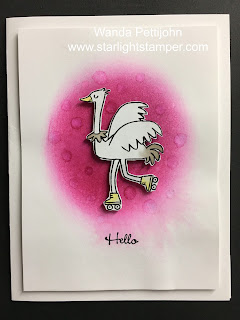
Hello and welcome to my blog. I have a fun card I found on Pinterest and I thought I'd give it a try. You can see the original card here. It's a fun and easy card to make too!

The base of the card is a folded half-sheet of Basic White card stock.  This card opens on the right and the fold is on the left.  I cut a 3-3/4" x 5"piece of Basic White card stock for the top layer. The original card does not have any layers.

I took that layer and I scrubbed on some "Melon Mambo" ink using my Blending brush. What I did next was I spritzed on some water but it didn't have much of an effect except for running on the bottom part (which looks kind of cool) and making tiny little does, plus warping my card stock. So once it dried I took my aqua painter brush and just moved the bristles around in a circle that lifted some color a bit. So it mostly gave the background some large dots. I liked the look so I went with it.

Next I fussy cut the bird from one of the sheets of critters in the "Zoo Crew" 12" x 12" package of Designer Series Paper (DPS).  

Then I set the bird on top of the colored area to see where the words would go. The words are from the "Go To Greetings" set and were stamped using black Memento ink.

I added Dimensionals to the back of the bird. I had to trim some down for the neck and legs but I needed to have some behind them for stability. I set the bird in place on the center of the card above the words. And the card was done.

Not only is it cute and fun but it was quick and easy too!

Thank you SO very much for taking your time to stop in and see today's friendship card,
Wanda

Friday, June 23, 2023

Zoo Crew, Very Best Occasions, Birthday Card, Stampin' Up!

Hello and welcome. I found a fun card on Pinterest that I thought would make a perfect birthday card for a child or an adult.  I had a child in mind when I was putting this card together. You can see the original card here.

The base of the card is a folded half-sheet of Lemon Lime Twist card stock. The card opens on the right and the fold is on the left. 

I cut a 4" x 5-1/4" piece of Basic Black card stock for the layer and then a 3-3/4" x 5" piece of Basic White card stock for the top layer. I did texture it using the "Painted Texture" embossing folder. I glued that to the Basic Black piece.

Next I cut a 2" x 3-5/8" piece of Designer Series Paper (DSP) from the "Zoo Crew" 12" x 12" package and I glued it to the Basic White textured piece. 

A 5-1/2" piece of black ribbon (mine is retired) was taped to the back of the layered piece and then taped to the card base.

For the circles I used the "Layering Circles" die set and die cut a Basic Black circle and a Basic White circle. I used the 2-1/8" and 2-7/16" circle dies. Before taping the circles together I had fussy cut the racoon from a piece of the "Zoo Crew" DSP and I colored it's mask using the dark Petal Pink Blends pen. I set the little critter on top of the circle to see where the words should go. Then I stamped the words from the "Very Best Occasions" set using black Memento ink. The circles were taped together and Dimensionals were added to the back. Then that was set in place on the front of the card.

I added Dimensionals to the back of the racoon and set it in place. I had also cut out some balloons from the same DSP. They were chopped off when the sheet was originally cut so I salvaged the balloons and popped them up on top of the other balloons using Dimensional pieces. 

A 4" x 5-1/4" piece of Basic White card stock was added to the inside and the card was done.  Cute isn't it? See why I just had to make it?

Thank you SO very much for taking your time to stop in and see today's birthday card,
Wanda

Thursday, June 22, 2023

Pansy Patch, Lasting Joy, Birthday Card, Stampin' Up!

Hello and welcome to my blog. I have a fun card to share with you today. Please read on to see how it was made.

The base of the card is a folded half-sheet of Basic White card stock. This card opens on the bottom and the fold is on the top.

I took a piece of Highland Heather card stock and used the "Deckled Rectangles die set to cut it out. And I did the same with a piece of Basic White card stock for the center layer. The Basic White layer was textured using the "Timeworn Type" embossing folder. I glued the Basic White card stock to the Highland Heather piece and then taped that to the card base.

Next I die cut the flower pieces from the "Pansy Patch" bundle using Gorgeous Grape, Highland Heather and Crushed Curry for the flower. Granny Apple Green and Garden Green was used for the leaf. I glued the pieces together. Dimensionals were added to the back and the piece was set in the upper left corner of the two layered piece.

The words are from the "Lasting Joy" set and were stamped on a scrap piece of Basic White card stock using Gorgeous Grape ink. It was then die cut using the ribbon ends die from the "Stylish Shapes" die set. Dimensionals were added to the back and the piece was set in place on the lower right. And the card was done.

This was a fun card to make. It's got a very clean look to it. This card can be used for several other occasions.

Thank you SO very much for taking your time to stop in and see today's birthday card,
Wanda

Wednesday, June 21, 2023

Zoo Crew, Go To Greetings, Thinking of You Card, Stampin' Up!

Hello and welcome to my blog. I hope you find some inspiration in today's card. I found this fun layout on Pinterest and I thought I'd work with what I had to try to recreate it. I used the only fox I had on yesterday's card so I opted for the alligator. You can see the inspirational card here. Please read on to see how I made this card.  There are no instructions on the inspirational card so I had to wing it.

The base of my card is a folded half-sheet of Basic White card stock. I cut a piece of Lemon Lime Twist for the layer and it measured 3-3/4" x 5". 

I cut a 3-5/8" x 4-7/8" piece of Basic White for the top layer and I textured it using the "Painted Texture" embossing folder. I glued that to the Lemon Lime Twist piece. Dimensionals were added to the back and the piece was set in place on the front of the card base.

Next I fussy cut the alligator from a piece of Designer Series Paper (DSP) "Zoo Crew" package. I added Dimensionals to the back and set it aside.

The circle is from the "Stylish Shapes" die set and I used the second largest one. I added Dimensionals to the back and set it aside.

The words are from the "Go To Greetings" set and were stamped using Lemon Lime Twist ink. I used the ribbon die from the same "Stylish Shapes" set to cut it out.

The strip of DSP is from the "Stargazing" 12" x 12"package and it measured 1" x 4". I taped it about 3/8" from each side and about 3/4" up from the bottom. 

Next the circle was set in place and then the alligator.

The words were added with Dimensionals and I did double up on them on the right side. If I hadn't they would have been drooping on that side.  And the card was finished.

I thought it was a fun card to make and I really do like this layout. I'm hoping I can use it again sometime soon.

Thank you SO much for taking your time to stop in and see today's thinking of you card,
Wanda

Tuesday, June 20, 2023

Layering Leaves, Zoo Crew, Friendship Card, Stampin' Up!

Hello and welcome! Today I have an "interesting" card to share with you.  As you know, I share the good, the bad, and the ugly with you.  This is not what was in my head. The only thing that was in my head was the fox on the scooter in a circle. The rest just happened and I'm not all that pleased with it.

I was trying to use some scraps for the background that matched the color of the fox or his bike and this is what I had on hand. Then I didn't know what to do with it because the pieces weren't large enough so I ended up cutting them at 3-1/2" x 5/8" (three of them) and the Basic Black background was cut at 3-3/4" x 7/8". I taped the pieces together and set them aside.

The base of the card is a folded half-sheet of Basic White card stock. It opens on the bottom and the fold is on the top.

The three strips were taped to the front. I taped the two side ones first and then the center one.

I fussy cut the fox from the "Zoo Crew" 12" x 12" piece of Designer Series Paper (DSP). I die cut two Basic White circles from the "Layering Circles" set using the 2-1/8" each. Before cutting the second one I stamped the words from the "Layering Leaves" set using Black Memento ink.  And the Basic Black scalloped circles are just a bit larger. The 2-1/2" scalloped circle die was used here, it's the 5th largest one from the set. The circles were taped together and then taped to the front of the card.

Dimensioanls were added to the back of the fox and it was set in place on the other circle.

I had some enamel elements (retired) and I set them in place on the front of the card. I was going to color some pearls using the Cajun Craze Blends pen but I had these and thought I'd just use them. I have so many things leftover and retired and I need to use them up.  Whatever works on your card, right?  And that was it. 

This was a quick card to make but it could use something!!  A lot of something!  LOL

Thank you SO much for tolerating this "interesting" card,
Wanda

Monday, June 19, 2023

Go To Greetings, Fresh As A Daisy, Birthday Card, Stampin' Up!

 Hello and welcome to my blog. Today I have a fun card for you. I found it on Pinterest but I did change it a bit. You can see the original card here.

The base of my card is a folded half-sheet of Basic White card stock. I cut a 4" x 5-1/4" piece of Boho Blue card stock and textured it using the "Painted Texture" embossing folder.  I glued it to the card base. 

Then I took a piece of Designer Series Paper (DSP) from the "Fresh as a Daisy" 12" x 12" package. I cut it to measure 3-1/2" x 2-3/4" and I cut a Basic White layer for it that measured 3-3/4" x 3". I taped the two layers together and set them aside.

Next I cut the side strip of DSP from the upper part of the piece I cut with the flowers on it. It measured 1-3/4" x 3-1/2" and the Basic White layer behind it measures 2" x 3-3/4".  I taped the two layers together. I glued this layer to the left side of the card about 1/8" from the top, side, and bottom edges.

Before adding Dimensionals to the daisy layer piece I wrapped some linen thread around it a couple of times and tied a bow. I set it in place on the top of the card base.

The words are from the "Go To Greetings" set and were stamped using Copper Clay ink. I die cut them using the die from the "Stylish Shapes" set. I set it in place across the linen thread using Dimensionals and the card was done.

This was a very quick and easy card to make. It can be used for a number of occasions too!

Thank you SO very much for taking your time to stop in and see today's birthday card,
Wanda

Sunday, June 18, 2023

Countryside Inn, Lasting Joy, Birthday Card, Stampin' Up!

 Welcome to my blog. Today I have a quick and easy card for you to make. I thought I'd work on something quick because I seem to be running late the last few days. I have plans for other cards that are not quite as quick and have more layers. I do so love cards with lots of layers. Keep checking back or sign up on the right sidebar to get daily updates. Yes, daily! Please read on to see how I made this card. 

The base of my card is a folded half-sheet of Basic White card stock. This card opens on the bottom and the fold is on the top.

I cut a 4" x 5-1/4" piece of Night of Navy for the layer. Then I cut a 303/4" x 5" piece of Basic White for the top layer. I textured it using the "Painted Texture" embossing folder.  I glued it to the Night of Navy piece. As I have stated in the past, I like to glue the textured pieces because tape doesn't seem to make enough contact to stay put but glue will stay.

After the layers were glued and taped together I cut a piece of Designer Series Paper (DSP) from the "Countryside Inn" 12" x 12" package at 2" x 3-3/4" and I glued it to the top of the textured piece about 1/2" from the edge of the white piece.

Next I stamped the words from the "Lasting Joy" set using Night of Navy ink on a piece of Basic White card stock. I die cut it using the 2-1/8" circle die from the "Layering Circles" set.  I made sure I die cut the words towards the bottom of the circle.

Then I stamped the Night of Navy flowers using the images from the "Lasting Joy" set. For the leaves I stamped off once and then on the circle piece.

I didn't have any current ribbon but I did have some Night of Navy ribbon. I cut two 2" trips and I taped them to the back of the circle. Then I snipped the ends.  The circle was then set in place on the front of the card using Dimensionals.

And for the final touch I colored some crystal rhinestones using my dark Night of Navy Blends pen and set them in place on the front of the card and the card was done.

I do like how it turned out. It's quick and simple with a little touch of elegance.

Thank you SO very much for taking your time to stop in and see today's birthday card,
Wanda

Saturday, June 17, 2023

Fresh as a Daisy, Lasting Joy, Thank You Card, Stampin' Up!

Hello there! I found this fun and easy card here at "Heartwarmers from Vicki".  I made one of her other cards a few days ago and when I saw this one I knew I had to make one too. This background paper screams "don't cover me up."  It's so pretty and when Vicki added just the little word layers it was just enough. The pretty flowers still take over the card. It's perfect!

The base of the card is a folded half-sheet of Boho Blue card stock. This card opens on the bottom and the fold is on the top. 

The Designer Series Paper (DSP) measures 4" x 5-1/4" and was taped on top of the card base.

I cut a 4" x 5-1/4" piece of Basic White card stock and it was taped to the inside.

The words are from the "Lasting Joy" set and were stamped using Copper Clay ink on a 2-1/8" x 5/8" piece of Basic White card stock.  The bottom part of the word piece was taped to a 2-3/4" x 5/8" piece of DSP from the same package.  It's even from the same sheet. This piece could have been 1/2" wide instead, it would look better. The word piece was put in place using Dimensionals. I made sure to add them were the two pieces meet to hold them together too. It's best to be on the safe side, right?  And the card was done.

This was a super simple and quick card to make. These flowers are SO pretty. I have one more piece and I will probably use it to make another card like this.

Thank you SO very much for taking your time to stop in and see today's thank you card,
Wanda

Friday, June 16, 2023

Grassy Grove, Days to Remember, Masculine Birthday Card, Stampin' Up!

Hello. Today I have a masculine birthday card to share with you.  I find it difficult to find masculine cards let alone stamp sets. The "Grassy Grove" set is great to make masculine cards. Today's card was actually pretty easy to make too. REALLY! Please read on to see how the card was made.

The base of the card is a folded half-sheet of Basic White card stock. This card opens on the bottom and the fold is on the top.

I cut a 4" x 5-1/4" piece of Basic White card stock and textured it using the "Painted Texture" embossing folder. I took my Blending Brush and lightly scrubbed on some Lost Lagoon ink. I also took the Blending Brush and colored the edges, much like we used to do using sponges. I taped that to the front of the card base.

Next I cut a 2-3/4" x 2-3/4" piece of Designer Series Paper (DSP) from the "Fresh as a Daisy" 12" x 12" package. I taped that to a 2-7/8" x 2-1/7" piece of Lost Lagoon card stock. 

The focal piece is a 1-3/4" x 4" piece of Basic White card stock and the layer behind it is a 1-7/8" x 4-1/8" piece of Lost Lagoon card stock.

I took the Basic White piece and the first thing I did was I stamped the tree line at the bottom. Then I stamped the tips of the double pine tree stamp, both using Shaded Spruce ink.

I took my Blending Brush and I scrubbed on Daffodil Delight all over the piece. I had more ink in some areas and less in others. It just kind of happens.

Then added some Crushed Curry ink. Followed by some Cajun Craze ink.

The upper part of the sky was colored in using Misty Moonlight. I didn't like how airy the ground area looked so I added a little Shaded Spruce ink with my Blending Brush.

I taped this piece to the Lost Lagoon layer.

Dimensionals were added to the back of the embossed layer and that was placed on the front of the card. Then the focal piece was taped over the top of that.

The words are from the "Days to Remember" set using Lost Lagoon ink on a scrap piece of Basic White card stock. I punched it out using the "Double Oval" punch. The Lost Lagoon scalloped oval is from the same "Double Oval" punch. I taped the ovals together and then taped in place on the upper right area of the card.  And the card was done.

This was a very fun card to make and I am pleased with the way it looks.

Thank you SO very much for taking your time to stop in and see today's masculine birthday card,
Wanda

Thursday, June 15, 2023

Grassy Grove, "Fresh as a Daisy, Darling Details, Birthday Card, Stampin' Up!

Hello! I'm glad you stopped in to see today's card. Please read on to see how I made it.

The base of the card is a folded half-sheet of Boho Blue card stock. I cut a 4" x 5-1/4" piece of Basic White card stock and taped it to the inside. 

Next I took the pretty background from the "Fresh as a Daisy" 12" x 12" package of Designer Series Paper (DSP).  This piece was cut from a sheet that has quite a few images on it.  I wasn't sure what to do with this piece. I loved the looks of it but didn't know where I was going to go with it. I took out my "Grassy Grove" bundle and was going to die cut a Basic Black forest piece but it didn't quite fit with the background DSP. It needed to be a dark background like it was night out for the front to be black. So I took a piece of Crumb Cake card stock that measured 4" x 5-1/4" and die cut the piece from the "Grassy Grove" bundle. Now foreground was lighter. I was going to sponge on some green in the trees, brown for the trunks and maybe some more green for the grass but I decided to leave it. 

I added some glue to the die cut piece and stuck it to the DSP. Then I taped that to the card base. I was going to add a 4-1/8" x 5-3/8" piece of Basic White behind the Crumb Cake/DSP layer but I thought the Boho Blue in the sky would pop better without it.

The words are from the "Darling Details" set and were stamped using Boho Blue ink. I punched them out using the "Double Oval" punch. I also punched out the scalloped oval from the same punch using Boho Blue card stock. I taped the ovals together. Dimensionals were added to the back and the piece was set in place on the front of the card.

I think this would make a great masculine card. This would also make a nice sympathy card too. It's got a calm feel to it.

Thank you SO very much for taking your time to stop in and see today's birthday card,
Wanda

Wednesday, June 14, 2023

Fresh as a Daisy, Days to Remember, Birthday Card, Stampin' Up!

Welcome! It's great to have you here.  I have a quick and easy card to share with you today. I found it at "Heartwarmers From Vicki".  Here's the link to her blog. There is no direct link to this card but it was posted on June 13, 2023 if you want to go scrolling for it. I only changed the word piece. Hers is a Basic White rectangle with "Happy Birthday" stamped on it in Daffodil Delight ink.  Please read on to see how I made the card.

The base of my card is a folded half-sheet of Basic White card stock. This card opens on the right and the fold is on the left.

I cut a 4" x 5-1/4" piece of copier paper to tape the Designer Series Paper (DSP) on. I like to have a piece that is the size I need so I can just add the DSP to the top and I know it's the right size for the front of the card.

The DSP is from the "Fresh as a Daisy" 12" x 12" package. I cut the daisies from a sheet that has several other images on it. The striped piece is also from that same sheet. I cut it to measure 4" x 1-1/4".  After cutting it from the sheet it already measured 4".  Same with the Daisy piece, it also measured 4".  

I taped the striped piece down at the bottom of the piece of copier paper. Then I taped the daisy piece on and it did overlap a bit but it's better than coming up short. 

The 3/8" x 4" Moody Mauve piece is from the same "Fresh as a Daisy" package and from the same sheet. It's actually the backside of the striped piece. I taped the strip to the front of the cards where the two pieces overlap.

Next I taped the whole thing to the card base.

The words are from the "Days to Remember" set and were stamped using black Memento ink. I punched them out using the "Double Oval" punch. I taped them to the Moody Mauve scalloped oval punch that I punched out using the same punch. I taped the two ovals together. Dimensionals were added to the back and the piece was set in place on the front of the card. And the card was done.

It's kind of sad that there were only two pieces of DSP with these flowers on it. Click here to see the card I made with it a few days back. More like 10 days back! It's such pretty DSP!

Thank you SO very much for taking your time to stop in and see today's birthday card,
Wanda

Tuesday, June 13, 2023

Quiet Meadow, Fresh as a Daisy, Days To Remember Birthday Card, Stampin' Up!

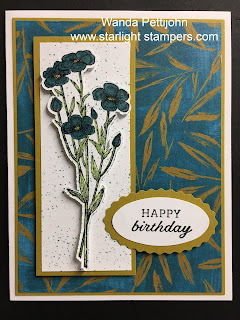
Welcome to my blog. Today I have a quick and easy card to share with you. I was trying to figure out what to do with a busy piece of Designer Series Paper (DSP) and I thought I'd use it as a background and see where I can go with it.  And this is what I ended up with. It's got a bit of an oriental feel to it to me. Please read on to see how the card was made.

The base of the card is a folded half-sheet of Basic White card stock. 

I cut a 4" x 5-1/4" piece of Wild Wheat card stock for the layer. I taped the two pieces together and then taped them to the card base.

Next I stamped the flower from the "Quiet Meadow" set and fussy cut it out. Usually I color first and then fussy cut in case I make a mess of it I wouldn't have wasted any time fussy cutting.  But I took a chance and lucked out. I colored the flowers in using the light Lost Lagoon Blends pen. The center of the flowers was colored in using the dark Daffodil Delight Blends pen. And the leaves and stems were colored in using the light Granny Apple Green Blends pen. I took my Wink of Stella pen and colored over the flowers to give them a little sparkle. I added Dimensionals to the back and set the piece aside.

Then I proceeded to make the two layers that the flower piece will sit on. The Wild Wheat piece measures 1-7/8" x 4-1/2" and the Basic White piece measures 1-3/4" x 4-3/8".  Before taping the two layers together, I took the Basic White piece and added some color to it. I took a sponge and my Lost Lagoon ink pad and lightly tapped on some color. I wanted the spotted look and that's what I got. Dimensionals were added to the back of the layered piece and it was set in place on the front of the card. By eyeing it, I tried to make it equal on the bottom, left, and the top.  

The flowers were then set in place and then the words. The words are from the "Days to Remember" set and were stamped using black Memento ink on a scrap piece of Basic White card stock. They were punched out using the "Double Oval" punch. And on a scrap piece of the Wild Wheat card stock I punched out the scalloped oval. I taped the two ovals together. Dimensionals were added to the right side of the oval and a little bit of snail tape to the left side and the words were set in place.  And the card was done.

I think this layout and colors toned down the business of that DSP.  Mission accomplished.  But wait, there's more.  There's one more piece of this DSP in the package!!!  Yikes!!  Do I just bow out and make another card like this one or to I challenge myself to come up with something else?  Maybe even something better?  Hmmm. I guess we will both have to wait and see!  LOL

Thank you SO very much for taking your time to stop in and see today's birthday card,
Wanda

Monday, June 12, 2023

Dainty Delight, Best Family Ever, Thank You Card, Stampin' Up!

Hello there! I'm glad you stopped by to see today's thank you card. I found it on Pinterest. You can see the original card here. I did have a little bit of trouble with the measurements they gave so I had to improvise on my card.

The base of the card is a folded half-sheet of Crumb Cake card stock. This card opens on the right and the fold is on the left.

I cut my piece of Crumb Cake card stock for the focal point at 4-7/8" x 3-1/8". This is where the mistake was made that I didn't catch until after I had the two layers glued together. This piece should have been cut at 4-1/2" x  3-1/8" and the Basic Black layer was to be cut at  4-5/8" x 3-1/4". I used an old 1-3/8" circle punch to round the corners. I've purchased too many corner rounders to just have them retired after a few years and I got tired of buying them. So I just use a circle punch and make do. I had rounded the corners on both layers and also on the folded card base.

The flowers from the "Dainty Delight" set were stamped using Versa Mark ink and head embossed with black embossing powder. I heated it from the back side so the little bits of black in areas away from the stamped image stuck. 

Then I colored in the flowers and leaves using Blends pens. I used Granny Apple Green, Daffodil Delight, Pumpkin Pie, Highland Heather and Berry Burst. I used the dark pen of each color.

The words are from the "Best Family Ever" set and were stamped with Versa Mark and white embossing powder on a scrap piece of Basic Black card stock. I snipped the left side and cut the right side straight. I taped the piece in place.

The glued layered piece was set in place on the front of the card base using Dimensionals. I moved my focal piece over to the left so the top, left, and bottom were all about the same distance apart. The original card had the piece centered. Because the measurements were wrong I couldn't do that. 

Pearls were added to the front and the card was done.

This was a very fun card to make and it did go together quickly.

Thank you SO very much for taking your time to stop in and see today's thank you card,
Wanda

Sunday, June 11, 2023

Playing in the Rain, Days to Remember, Birthday Card, Stampin' Up!

Hello there! I have a fun card to share with you today. I think the "Playing in the Rain" set is a lot of fun to work with and even though I have new stuff to play with I still go back to this set and a few others I had before the new stuff came. I found this card here on Pinterest. I had to guess on the measurements of the pieces. 

The base of the card is a folded half-sheet of Basic White card stock. It opens on the right and the fold is on the left.  

I cut a 4" x 5-1/4" piece of Crushed Curry card stock and before I taped it to the card base, I die cut the second largest scalloped circle from the "Layering Circles" die set. I cut it from the middle of the Crushed Curry piece. That way no one will notice it's not a whole trimmed quarter sheet. 

Next I cut a 3-7/8" x 5-1/8" piece of Basic White and I used the "Artistic Mix" stencil and Crushed Curry ink with my Blending Brush and I scrubbed on the ink.

A Basic White circle was die cut using the 3rd largest die from the "Layering Circles" die set. I taped the two circles together and then I trimmed off about 1/4". Dimensionals were added to the back and the piece was set in place on the front of the card.

The cute turtle is from the "Playing in the Rain" set and was stamped on a scrap piece of Basic White card stock using black Memento ink. I colored it in using the following Blends: light Lemon Lolly, light and dark Old Olive and light Pumpkin Pie. After coloring I fussy cut the little guy out. I added Dimensionals to the back and set him in place on the circle.

The words are from the "Days to Remember" set and were stamped using black Memento ink on a scrap piece of Basic White card stock. Dimensionals were added to the back on the left side and the piece was set in place on the front of the card. And the card was done!  Cute, huh?

This was a very fun, quick, and easy card to make. 

Thank you SO very much for taking your time to stop in and see today's birthday card,
Wanda

Saturday, June 10, 2023

Zoo Crew, Darling Details, Birthday Card, Stampin' Up!

Hello! I'm so happy to share today's card with you. I found a fun layout on Pinterest and I went with it. Please read on to see how I made this card.

The base of the card is a folded half-sheet of Boho Blue. It opens on the right and the fold is on the left.

I cut two 4" x 5-1/4" pieces of Basic White card stock. One was taped to the front and one was taped to the inside.

Next I cut a piece of Boho Blue card stock that measured 4-1/2" x 1-1/4". I taped it to the front of the card about 3/4" from the edge of the card base. 

Then I cut a piece of Designer Series Paper (DSP) from the in colors 6" x 6" stack. I cut one at 1" x 4" and I taped it to the top of the Boho Blue strip about 1-1/2" from the edge of the card base.

The square piece was cut at 2-1/4" x 2-1/4" and was taped about 1-1/4" from the edge of the card base.

The largest stitched circle from the "Stylish Shapes" set was used to cut the Boho Blue circle and the next size smaller was cut using a piece of Basic White card stock. I used my blending brush and scrubbed on some Boho Blue ink to give that background a bit of color. I taped the two circles together and set them on the front of the card using Dimensionals.

Then I fussy cut the armadillo from the "Zoo Crew" DSP. And by the way, this is the first armadillo card I ever made!  LOL I set the armadillo in place using some small Dimensionals.

The words are from the "Darling Details" set using Boho Blue ink. I die cut them with the die from the same "Stylish Shapes" set. I set it in place using tape on the end that sits on the circle and a Dimensional on the other end. And the card was finished.

This was a fun card to make and this is a fun layout to play with.

Thank you SO very much for taking your time to stop in and see today's birthday card,
Wanda


Friday, June 09, 2023

Playing in the Rain, Best Family Ever, Birthday Card, Stampin' Up!

Hello! Today I have a fun fold card to share with you. I found it on Pinterest and made a few changes to use current papers. You can see the original card here.  It's too bad that when Stampin' Up! carries a stamp set over to the next catalog that they don't add the Designer Series Paper (DSP) too or even create a new one to go with the set. But I did manage to find a piece of DSP that I thought would pair perfectly with this little guy! Please read on to see how the card was made. (I did find an error in the instructions on the original card and I had to cut a new sheet. I will make sure I give you accurate measurements).

The base of the card is a folded half-sheet of Boho Blue card stock. This is such a pretty color, isn't it? The fold is on the left.

Next I cut the inside piece using Basic White card stock. It measures 5-1/4" x 8" and is scored at 4" and 6". Then it's folded valley in the middle (like you would normally fold a card and the other score is a mountain fold. 

Then I cut a piece of DSP from the "Fresh as a Daisy" 12" x 12" package. I taped it using removable tape because I wanted to keep the Boho Blue card stock that will need to be used for the focal piece. I used the largest scalloped die from the "Layering Circles" die set. Once I cut it I pealed half of it back the DSP and glued it in place. I figured it would be easier to get the glue bottle in there than the tape runner and then I did the other half.

I took a piece of Basic White card stock and the 2-11/16" circle die. Before taping it to the scalloped Boho Blue scalloped circle I took my Blending Brush and I scrubbed on some Boho Blue ink. 

The bunny is from the "Playing in the Rain" set and was stamped using black Memento ink on a scrap piece of Basic White card stock. I fussy cut it out. I also stamped the bunny on a scrap piece of the same DSP and I fussy cut the shirt out. I glued it in place on top of the bunny. Then I set the bunny in place on the circles piece using Dimensionals.

On my card I forgot to add the strips where the two right areas are, between the 4" and 6" scores. After I realized it I will be adding the inside one but the one behind the bunny will have to just be missing. Which is too bad because it would add a lot to the strip/panel. So as I was tying this I had become obsessed with the idea of not having that strips on the inside pieces. So what I did was I took the strip and set it across the panel. I took the die and lined it up, then I taped it down with post it tape and die cut it. I glued the piece in place and I was much happier. If you look close at the scalloped area you can see that it was pieced in. I think it would have bothered me all day had I not figured out this way to fix it. LOL

And I had a little issue with the piece. While cutting the scalloped circle my tape stuck too tightly to the DSP and tore it a little. It was in the flower area and might have passed for a flower petal but the texture wasn't right. So I decided to add my knot there. 

The words are from the "Best Family Ever" set and were stamped using black Memento ink. I die cut them using the die from the "Stylish Shapes" set. I set the words in place using Dimensionals and the card was done.

This was a fun card to make. I'm not a big fan of fun folds but I did have fun (for the most part! LOL) making this one. And I am very pleased with the way it turned out. I think it would be more fun if the bunny was on a spring so it wobbled!

Thank you SO very much for taking your time to stop in and see today's birthday card,
Wanda

Thursday, June 08, 2023

Layering Leaves, Country Side Inn, Thinking of You Card, Stampin' Up!

Today I have a quick and easy card for you to make. It uses one of my favorite layouts. I use this one quite often when I have small pieces of Designer Series Paper (DSP) left over that are too big to recycle.  Please read on to see how you can make a card like this.

The base of the card is a folded half-sheet of Basic White card stock. The layer on top of that is a 4" x 5-1/4" piece of Boho Blue card stock.

I cut a piece of Basic White card stock that measured 3-1/8" x 4-1/4".  The DSP was cut at 3" x 3" and taped to the upper part of the Basic White layer. It's from the "Country Side Inn" 12" x 12" package.

The words were added next. They are from the "Layering Leaves" set and were stamped using Night of Navy ink.

I took some white ribbon I had and wrapped it around the front of the piece to the back and taped the ends on the back with scotch tape. I slipped the ribbon, still on the spool under the ribbon on the front and tied a knot and then I snipped the ribbon. You waste less ribbon this way. Dimensionals were added to the back and the piece was set in place on the front of the card. And that was it. 

This is a fun layout and easy to do. A nice way to use some of that busy DSP too!

Thank you SO very much for taking your time to stop in and see today's thinking of you card,
Wanda

Wednesday, June 07, 2023

Zoo Crew, Color & Contour, Wanted to Say Dies, Birthday Card, Stampin' Up!

Hello! I've got a fun card to share with you today. It does involve some fussy cutting but it's so worth it. Please read on to see how I made today's card. 

The base of my card is a folded half-sheet of Basic White card stock. This card opens on the bottom and the fold is on the top.

I cut a 4" x 5-1/4" piece of Designer Series Paper (DPS) from the "Les Shoppes" 12" x 12" package. I taped it to the front of the card base. 

Next I die cut the scalloped rectangle using the die from the "Colors & Contour" bundle. I took my markers and flicked on some splats of color. I used Daffodil Delight, Petal Pink, Cajun Craze, and Coastal Cabana. I could have added some Granny Apple Green, like the colors in the banner but I thought there was enough color and not a lot of room for more without it looking muddy.

I used the die from the retired "Stitched Rectangles" die set but you can make that space by using the square Die from the "Stylish Shapes" die set and moving it down as you form the opening. I set this piece on top of the DSP using Dimensionals.

I fussy cut the elephant from the "Zoo Crew" 12" x 12" DSP package and I colored it using the light Gray Granite Blends Pen.  The banner was already colored. But what I did was I fussy cut another banner from an elephant that had been cut off from the design sheet. I set it in place on top of the other banner using pieces of Dimensionals. It doesn't show up as popped up in the photo but it is. I set the elephant aside.

Next I die cut the words and background using Basic Black for the words and Crushed Curry for the background. I used double-sided sticky sheet for the words so they were stickers and easy to place on top of the background piece. I set the words in place using Dimenisonals on the middle parts.

Then the elephant was set in place and the card was done. 

This was fun and even with the fussy cutting it was pretty quick. It wasn't what was in my head though. I had the card orientated so it opened on the right. I had a scalloped Crushed Curry circle die cut and a Basic White circle taped to it that the elephant was going to go on but it was just too much white. I pushed the pieces aside and the card turned sideways and that is how I got the idea to add the elephant to the left and while looking for words I saw the "Wanted to Say" dies and you know the rest!

Thank you SO very much for taking your time to stop in and see today's birthday card,
Wanda


Tuesday, June 06, 2023

Go To Greetings, Delightfully Eclectic, Thank You Card, Stampin' Up!

Hello!  I'm so happy to see you here today. I have a quick and easy card to share with you. The Designer Series Paper (DSP) seems to have taken up most of the designs on the card so there's very little stamping.  It's fun to do that every now and then.  Less stamps to clean up, right?  LOL Please read on to see how I made this card.

The base of the card is a folded half-sheet of Crushed Curry card stock. I cut a 4" x 5-1/4" piece of Daffodil Delight card stock and I taped it to the front of the card.

Next I cut a piece of DSP from the "Delightful Eclectic" 12" x 12" package that measures 3-3/4" x 5". I taped that to the Daffodil Delight piece.

Then I cut another piece of the same DSP, this image is on the other side of the first piece. It measured 1-3/4" x 3-3/4" and I taped it to a piece of Crushed Curry that measures 2" x 4". I added Dimensionals to the back and I set it in place on the left side of the card.

I fussy a flower from that same DSP. Dimensionals were added to the back and the flower was set aside.

The words are from the "Go To Greetings" set and were stamped using black Memento ink. I punched them out using the "Double Oval" punch. I also punched out the Crushed Curry scalloped oval from the same punch. I taped the ovals together. Dimensionals were added to the right side and a bit of tape to the left side. 

I lined up the flower and the word piece to see what looked most pleasing to the eye and I set them in place.

A 4" x 5-1/4" piece of Basic White card stock was added to the inside and the card was done.

So quick and so easy! It's got such a fresh summer cheery feeling to it.

Thank you SO very much for taking your time to stop in and see today's thank you card,
Wanda

Monday, June 05, 2023

True Beauty, Darling Details, Days To Remember, Stampin' Up!

Hello! I'm happy you found your way here today. I have quick and easy card for you to see and maybe make. Please read on to see how you can make this card.

The base of the card is a folded half-sheet of Basic White card stock.

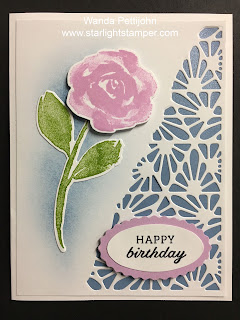
I took a 4" x 5-1/4" piece of Basic White card stock and die cut the image using the die from the "Darling Details" bundle. I did use double sided sticky sheet on the back of my card stock. I wasn't in the mood to do a lot of gluing. Plus it's easier to make it into a sticker than to glue. And quicker too!

Next I added the Boho Blue Luster Paper behind it. I had removed part of the sticky sheet backing for the Boho Blue piece and then added glue to the back of it, exposed the rest of the sticky part on the Basic White piece and set the piece in place on top of the card base.

Then I too a scrap piece of Basic White card stock and stamped the stem of the flower using Granny Apple Green ink and the flower using Fresh Freesia ink. They were from the "True Beauty" set. I die cut them with the matching dies.

The words are from the "Days To Remember" set and were stamped using black Memento ink on a scrap piece of Basic White card stock. I punched them out using the "Double Oval" punch. I also punched out the scalloped oval from the same punch using Fresh Freesia card stock. I taped the two ovals together. I added Dimensionals to the back and set the piece in place on the front of the card.  And the card was done.

This was a very fun and quick card to make. And yes, it was easy too!  This card can be used for a number of occasions. You know how much I love versatile stamp sets!

Thank you SO very much for taking your time to stop in and see today's birthday card,
Wanda

Sunday, June 04, 2023

Masterfully Made, Days to Remember, Birthday Card, Stampin' Up!

Hello!  I have a super easy and quick card for you to see today. I just love finding Designer Series Paper (DSP) that is easy to work with.  This one doesn't get much easier! Please read on to see how I made today's card.

The base of the card is a folded half-sheet of Basic White card stock. The card opens on the right and the fold is on the left.

I cut a 4" x 5-1/4" piece of Lost Lagoon card stock and taped it to the front of the card base.

Next I took a piece of DSP from the "Masterfully Made" 12" x 12" package and I cut it at 5" x 3-3/4".  I taped that to the Lost Lagoon piece.

The words are from the "Days to Remember" set and were stamped using black Memento ink  on a scrap piece of Basic White card stock. I punched them out using the "Double Oval" punch.

Then I punched out the scalloped oval using the same punch on a scrap piece of Lost Lagoon card stock. 

The two ovals were taped together. Dimensionals were added to the back and the piece was set in place.  And the card was done. No frills!!  Just the DSP speaking for itself. And this one had a lot to say!! Isn't it fun? It's like it's popping off the page. 

This card can be used for a number of occasions. I'd love to make a get well card with it, it's so bright and cheery!

Thank you SO very much for taking your time to stop in and see today's birthday card,
Wanda

Saturday, June 03, 2023

Go To Greetings, Fresh As A Daisy, Thank You Card, Stampin' Up!

Hello! Today I have a quick and easy card for you. I didn't take a good angled photo but the white part on top of the green opens up and that's where you add your sentiment. Please read on to see how I made this card. 

The base of the card is a 1/4 piece of Basic White card stock. It's just a flat single piece. On top of that is a 4" x 5-1/4" piece of Garden Green card stock and that was taped to the 1/4 Basic White piece.

I cut a 9" x 3-1/4" piece of Basic White card stock that was folded in half. I taped the piece to the Garden Green piece.

Next I die cut the scalloped rectangle piece using Crushed Curry card stock and the die from the "Color & Contour" bundle.

Then I cut a 2-1/8" x 3-5/8" piece of Designer Series Paper (DSP) from the "Fresh As A Daisy" 12" x 12" package. I taped that to the Crushed Curry piece. Then I taped that to the Basic White piece.

The words are from the "Go To Greetings" set were stamped using black Memento ink on a scrap piece of Basic White card stock.  I punched out the oval using the "Double Oval" punch. I used the same punch to punch out the Garden Green scalloped oval. I taped the two ovals together. Then I set them in place on the front of the card using Dimensionals and the card was done.

This was a very quick and easy card to make. I'm not overly fond of this layout but you can save some money on card stock by using Basic White for the base layer and adding your colors on top of that. It's different and maybe that's not why I'm very fond of it. I'm not big on change!!! Never have been! But it really was fun to make!

Thank you SO very much for taking your time to stop in and see today's thank you card,
Wanda

Friday, June 02, 2023

Days to Remember, Darling Details, Fresh As A Daisy, Birthday Card, Stampin' Up!

Hello! Today I thought I'd try another card using the images from the "Fresh As A Daisy" 12" x 12" package of Designer Series Paper (DSP).   

This piece was a bit trickier to work with because it was short on the top and bottom. So what I did was I worked the piece in so the edges barely show. Please read on to see how I made the card.

The base of my card is a folded half-sheet of Basic White card stock. The card opens on the right and the fold is on the right.

I cut a 4" x 5-1/4" piece of Fresh Freesia card stock for the layer. I chose Fresh Freesia instead of Bubble Bath because it made the DSP image pop. 

I die cut the cute rectangle from the "Darling Details" bundle using a piece of Basic White card stock. I had not used this die cut before so I wasn't sure what I was going to get from it. In the future I will be cutting my card stock at 3-3/4" x 5" and lining up the die so it's equal around all edges and I'll tape it down well with some post it tape so it won't move when die cutting.  

The DSP from the "Fresh As A Daisy" package measured 4" x 4".  I trimmed the sides a bit so it measured 3-5/8" x 4".  The top and bottom don't cover all of the rectangle well so what I did was I glued one side of the DSP to the back of the rectangle. I used glue so I could slide the piece up and down a bit so I could get it evenly on top and bottom.  Then I glued the other side. 

Next I cut a Bubble Bath piece of card stock that was just a bit smaller than the rectangle piece, it measured 3-5/8" x 4-7/8". If the card stock sticks out some, trim it shorter before affixing to the back of the rectangle piece. Once it's the right size, tape the DSP piece to the Bubble Bath piece.

Then I taped the whole thing to the card base.

The words are from the "Days to Remember" set and were stamped on a scrap piece of Basic White card stock using black Memento ink. I punched it out using the "Double Oval" punch. I also used the same punch to punch out the scalloped oval. I used a scrap piece of Fresh Freesia card stock for that. I taped the words to the scalloped oval and I set the piece in place using Dimensionals. And the card was done.

This was a fun card to make and I was glad I was able to work the DSP to make it look like it fit! Don't look too close! LOL

Thank you SO very much for taking your time to stop in and see today's birthday card,
Wanda

Thursday, June 01, 2023

Go To Greetings, Fresh as a Daisy, Thank you Card, Stampin' Up!

Hello! Today I have a fun, quick, and easy card for you to make. All you need is some Designer Series Paper (DSP), a stamp and some complementary card stock. Please read on to see how I made this card.

The base of my card is a folded half-sheet of Wild Wheat card stock. The card opens on the right and the fold is on the left.

I cut the floral image from a sheet in the "Fresh as a Daisy" 12" x 12" DSP package. There's several designs on the one sheet plus some smaller ones I'm not sure how I will be using but I'll be sure to share it with you once I figure that out.

After cutting it from the sheet, I realized that the piece didn't fit on the front of the card evenly, so I cut a strip of Basic White card stock and set it on the left side and decided that looked just hideous. SO used the edge die from the "Darling Details" bundle and a piece of Basic White card stock.  I used just a tiny amount of tape on the back of the DSP piece so I could work with the edge to get it just the right size to look even all around. Then I taped the edge down more securely and then the whole piece was taped to the front of the card base. Wasn't that strip the perfect touch?  I need to keep that idea in mind for future images that are not wide enough!

The words are from the "Go To Greetings" set and were stamped using black Memento ink on a scrap piece of Basic White card stock. I punched them out using the "Double Oval" punch. I also used the same punch for the scalloped layer behind it. I used Early Espresso card stock for that piece. I set it in place using a couple of Dimensionals and the card was done.

Like I said it was a fun, quick, and easy card to make. It leans a bit more into the fall colors, which I'm not ready for yet. It just seems like the snow just left here not too long ago.  

Thank you SO very much for taking your time to stop by and see today's thank you card,
Wanda