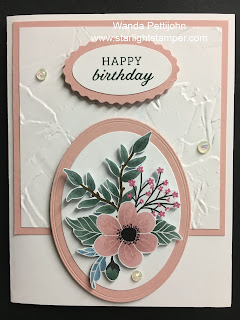
The packet has all the pieces you need. I took the half-sheet of Basic White card stock and folded it in half. The card opens on the right and the fold is on the left.
I took the 4" x 4" piece of Blushing Bride piece of card stock and I glued the textured 3-3/4" x 3-3/4" Basic White piece. This piece was pre-textured too. The texture is from the "Painted Texture" embossing folder. Then I taped the piece to the front of the card on the upper end.
Then I took the two ovals in the kit and taped them together. I added Dimensionals to the back and set it in place on the lower part of the card.
The packet had the Designer Series Paper (DSP) flowers from the "Awash in Beauty" 12" x 12" package. I fussy cut it and set it on the flower using Dimensionals. I'm not sure if Dimenisonals came with the packet but if they were meant to be set up higher on the card, then Dimensionals would be included. She remembers everything you need (except tape and words).
The words are from the "Days to Remember" set and were stamped using Evening Evergreen ink. I punched them out using the "Dual Oval" punch. I took a scrap piece of Blushing Bride card stock and punched out the scalloped oval from the same punch. I taped the two ovals together. I added Dimensionals to the back and set them in place on the upper part of the card.
The little gems/embellishments were in the packet and I set them in place on the front of the card. And my card was done. I think it could be used for a number of occasions.
Thank you SO very much for taking your time to stop in and see today's birthday card,
Wanda


1 comment:
I follow Terri Gaines. She has great ideas and I have CASED many of her ideas. This card is lovely! That is one of my favorite embossing folders and such pretty flowers!
Post a Comment