Sunday, April 30, 2023

Forever Fern, Best Day, Birthday Card, Stampin' Up!

Hi there. I'm so happy you found you way to this page. I have a fun and easy card to share with you. Plus it's very versatile. You could use this card for a number of other occasions. I found a card on Pinterest and I thought I would give it a try with the materials I had. You can see the original card by clicking here. Please read on to see how I made this card.

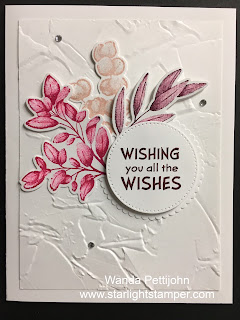
The base of the card is a folded half-sheet of Basic White card stock.  I took a 5" x 3-3/4"piece of Basic White card stock and textured it using the "Painted Texture" embossing folder. I glued the piece to the front of the card base, centering it as much as I could by eyeing it.

Next I stamped the flowers from the "Forever Fern" set using Blushing Bride, Merry Merlot, and Melon Mambo ink.  I die cut each one using the die from the "Forever Fern" bundle. Then I colored them in using my Wink of Stella pen.

The words are from the "Best Day" set and were stamped using Merry Merlot ink. I die cut them using the third smallest stitched die from the "Stylish Shapes" die set. And the scalloped layer behind it was made using the 2" scalloped circle die from the "Layering Circles" die set. I set the word piece on top of the scalloped piece using Dimensionals. Then I glued that to the front of the card.

After clipping the ends on the stamped pieces, I added a bit of glue to the bottom area of each piece and slipped them between the two circles.

I added a few rhinestones to the front of the card and the card was done.

It was a fun card and I could see myself making one for a wedding or anniversary as well as a thinking of you or get well.  Even a Mother's Day card!  It's very versatile.

Thank you SO very much for taking your time to stop in and see today's card,
Wanda

Saturday, April 29, 2023

Forever Fern, Go To Greetings, Framed Florets, Thinking of You Card, Stampin' Up!

Hello. I'm glad you found your way here. I have a fun and quick card to share with you. I found it on Pinterest. You can see the original card here. Please read on to see how you can make one yourself!

The base of the card is a folded half-sheet of Starry Sky card stock. This card opens on the right and the fold is on the left, 

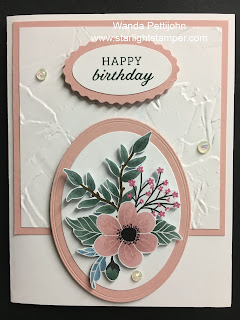
I took a 4-3/4" x 3-1/2" piece of Orchid Oasis card stock for the top layer. The Basic White piece on top of that measures 4-5/8" x 3-3/8".  I textured it using the "Painted Texture" embossing folder. I glued it to the Orchid Oasis piece.

Next I stamped the images from the "Forever Fern" set using Starry Night in on the larger image and Orchid Oasis on the smaller one. It's kind of hard to tell the difference in the colors but they are a little different.  These were stamped on a piece of Basic White card stock that measured 3-3/4" x 4".  I die cut them using the oval from the "Framed Florets" bundle. 

Then I die cut another oval on a 3-3/4" x 4" piece of Basic White card stock so I could have the frame.  If you're really good at stamping you could die cut this piece first and then stamp on the oval and not have to use a second piece of Basic White card stock.  

The words are from the "Go To Greetings" and were stamped using Starry Sky ink on a 1/2" x 3"piece of Basic White card stock.  I trimmed the piece on each end. 

A 3/8" x 3" piece of silver foil card stock was cut for the layer under the words. I glued the words to the silver piece and then trimmed the ends. I added Dimensionals and set the piece in place on the front of the card.

I tied a bow and glued it to the bottom part of the words. Then I added a few crystal rhinestones to the front.  A 4" x 5-1/4"piece of Basic White card stock was added to the inside and the card was done.

This was a very fun, quick and easy card to make. I really liked this set and I'm sad it's going to be retiring.  I will probably hang onto it for a while longer, until I realize I don't use it at all anymore and then I'll remove it from my shelves.

Thank you SO very much for taking your time to stop in and see today's thinking of you card,
Wanda

Friday, April 28, 2023

Best Day, Dainty Delights, Birthday Card, Stampin' Up!

 Hello! Today I have a quick and easy card for you to make that will work for a number of occasions.  Pick the occasion you need and let's begin!

The base of my card is a folded half-sheet of Basic White card stock. This card opens on the right and the fold is on the left.

I cut a 5-1/8" x 3-7/8" piece of Rich Razzleberry card stock for the layer. Then I cut a 5" x 3-3/4" of Basic White card stock and textured it using the "Painted Texture" embossing folder. 

A 5-3/4" x 2-5/8" piece of "Dainty Delights" Designer Series Paper (DSP) was cut and glued to the bottom of the textured Basic White piece.

I found a strip of Rich Razzleberry card stock in my recycling so I took it for a divider piece. It is 1/4" wide and trimmed to 3-3/4" long. Though I trimmed it after I glued it in place on the textured piece. Once the glue was set I glued the piece to the large Rich Razzleberry piece and then I taped that to the card base.

The words are from the "Best Day" set and were stamped using Rich Razzleberry ink. I die cut them with the 3rd smallest stitched circle from the "Stylish Shapes" die set. And I die cut a circle using a die from the "Layering Circle" set that was just a bit larger than the stitched circle. I taped the two circles together. Dimensionals were added to the back and the piece was set in place on the front of the card. 

I added a few gold rhinestones to the card and it was finished. I just thought the upper part of the card needed something more than just texture.

This was a fun, quick and easy card to make and you can make it for almost any occasion you need, Mother's Day, Get Well, Thinking of You, Thank you, and Sympathy.  It's very versatile.

Thank you SO very much for taking your time to stop in and see today's birthday card,
Wanda


Thursday, April 27, 2023

Go To Greetings, Dainty Delights, Dainty Flowers, Thank You Card, Stampin' Up!

Welcome back! I have something SO fun to share with you today. This is one of my most favorite layout and I use it a lot when I have tiny images. Please read on to see how I made this card.

The base of my card is a folded half-sheet of Fresh Freesia card stock. It opens on the right and the fold is on the left.

The layers from the bottom up go as follows. The Basic White piece was cut at 3-1/2" x 4-5/8". The Rich Razzleberry piece was cut at 3" x 4-1/8".  And the Designer Series Paper (DSP) from the "Dainty Delight" 12" x 12" package was cut at 2-7/8" x 4".  

I took the DSP and the Rich Razzleberry piece and added a tiny bit of tape to the area where I think the circle is going to go. I needed make sure the two pieces aren't going to shift. Then I took a 1-1/4" circle punch and dropping the piece into the punch as far as it will go, centering it as well as I can by eyeing it and then punching through both pieces.  Then I took a 1-3/8" circle punch and the punched piece of DSP and before punching a ring from the circle of the DSP, I added a piece of scrap copier paper for stability and I punched out the ring. If you don't add the copier paper your DSP will get pinched in the punch and ruin the outer edge of the DSP. And that won't be very pretty! Trust me on that! Been there, done that.  And now you can tape the DSP to the Rich Razzleberry pieces together.

Dimensionals were added around the circle and then I took another piece of DSP from the same "Dainty Delights" package, the dotted piece that measured about 2" x 2" and I set it in place on the Dimensionals. 

Next the piece was added to the Basic White piece using Dimensionals and a little bit of tape on the back of the 2-1/2" x 2-1/2" piece of DSP. Then that piece was added to the card base.

The words are from the "Go To Greetings" set using Mossy Meadow ink. I punched it out using the "Double Oval" punch. I took a scrap piece of Rich Razzleberry card stock and punched out the scalloped oval using the same punch. I was going to try to punch the piece from the Rich Razzleberry layer but the space on the punch between the oval and the scalloped oval is questionable and I may have ruined the piece because you have to try to get it up so I opted to play it safe, plus I had some scraps in my tote. I taped the word oval to the scalloped oval. Dimensionals were added to the back and the piece was set in place on the front of the card.

The cute little flower is from the "Dainty Delight" bundle. I die cut two flowers and I glued them together at the center. I added a small Dimensional to the back and set it in place inside the circle. I had an embellishment from one of the kits I had gotten at Terri's Stamp-a-Stack and I set it in place on the center of the flower. I colored it using my light Rich Razzleberry Blends pen. The dark pen might have been better but I just left it as it was because it was already on the flower.

I cut a 4" x 5-1/4" piece of Basic White card stock and taped it to the inside of the card and the card was done.

Isn't it a fun card? Don't you just love it that you can feature smaller images using this layout? I sure do!

Thank you SO very much for taking your time to stop in and see today's thank you card,
Wanda

Wednesday, April 26, 2023

Two-Tone Flora, Go To Greetings, Birthday Card

Hello! I'm happy you are here to see today's card. I found it on Pinterest and I thought it was so pretty that I'd give it a try myself. I thought it would be quick and easy too.  I ended up making it more difficult than it needed to be.  I found the card here.  It's a sped up video but there is a link to see the whole process. Please read on to see how I made this card.

The base of the card is a folded half-sheet of Basic White card stock. I cut a 4" x 5-1/4" piece of Basic White card stock and textured it using the "Painted Texture" embossing folder and then I glued that to the front of the card base. 

Next I stamped the flowers from the "Two-Tone Flora" set using Highland Heather for the solid part and Gorgeous Grape for the details.  And the other flower is the one I struggled with, I stamped the detailed image using Flirty Flamingo ink and then the sold part with the same color and the details got lost. I tried a couple of times but no luck. Then I thought I'd do the detail again and then stamp with Blushing Bride ink. ICK! I didn't like the color combo. So I ended up stamping off on the solid part once and then over the detailed image and I was much happier with it.  

The leaves were stamped using Granny Apple Green and all the pieces were die cut using the matching dies in the "Two-Tone Flora" bundle.

The words are from the "Go To Greetings" using Highland Heather ink.  I cut them out on the paper cutter. The piece was 5/8" wide and 2-1/4" long.

To assemble the piece. I glued the leaves down first. Then the Highland Heather flower and then the Flirty Flamingo flower. The words were slipped in and then glued in place. And that was it. So if you don't have any color issues like I did, your card should go together pretty fast.

This was a fun card to make and even with the color issue, I did have fun making it.

Thank you SO very much for taking your time to stop in and see today's birthday card,
Wanda


Tuesday, April 25, 2023

Dainty Delight, Lovely & Lasting, Thinking of You Card, Stampin' Up!

Hello there! I'm so happy you are here to see today's fun and easy card. I found it on Pinterest. You can see the original card here. There are no instructions on how it was made so I had to wing it. Please read on to see how I made this card, with a few changes. 

The base of the card is a folded half-sheet of Basic White card stock.  The card opens on the right and the fold is on the left.

I cut a 4" x 5-1/4" piece of Basic White and I textured it using the "Painted Texture" embossing folder. I glued that to the front of the card.

Next I stamped the flowers image from the "Dainty Delight" set using black Memento ink. I die cut them with the matching die. Then I colored them in with my markers. I used Real Red, Garden Green, Granny Apple Green (on the stems) and So Saffron.  After coloring I added Dimensionals to the back but I didn't set it in place yet.

The words are from the "Lovely & Lasting" set (soon to retire) and they were stamped using black Memento ink. I die cut them with the third smallest stitched die in the "Stylish Shapes" die set. I added Dimensionals to the back.

The stitched rectangle was die cut from a piece of Basic White card stock, I had used the third largest in the "Rectangle Stitched Framelits" die set. I glued this piece to the embossed piece. I was going to stamp my words on it first but they were too large so that is why I die cut them.

Next I set the words on top of the card along with the flowers for placement. When I had them where I thought they looked best, I removed the backing from the Dimensionals and I set the two in place on the front of the card. 

I tied a white bow (because that was the only color I had that would work) and I glued it to the bottom of the flower stems. And the card was done.

Even with the changes, I think it turned out well. I do like how it looks. This card can be used for a number of occasions. I LOVE versatile stamps!

Thank you SO very much for taking your time to stop in and see today's thinking of you card,
Wanda

Monday, April 24, 2023

Forever Fern, Go To Greetings, Fancy Flora, Friendship Card, Floating Circle Technique, Stampin' Up!

Hello! I'm happy you are here to see today's interesting card. I've wanted to play with the "Floating Circle" technique for a while now. I did a floating circle before but never like this one. You can see the one I made a while back by clicking here. Please read on to see how I made this card.

The base of the card is a folded half-sheet of Basic White card stock. The card opens on the right and the fold is on the left.

I cut a piece of Basic White card stock to measure 5" x 3-3/4".  And I cut the Starry Sky layer at 5-1/8" x 3-7/8".  I set these two pieces aside.

You will need a window sheet for this technique. I die cut it using the 2-11/16" die from the "Layering Circles" die set. It's the second largest one in the set.

Next I cut strips of Designer Series Paper (DSP) from the "Fancy Flora" 6" x 6" package at 1/4" each. I just randomly picked up the strips and set them in place on the circle using mono glue. I started in the center and worked my way out. To keep the spaces even between the strips, I set a toothpick down and butted the edge of the glued strip next to it. I waited a few seconds for the glue to set and then continued with the strips until the circle was filled.  Then I took a scissors and trimmed around the circle, cutting off the ends of the strips. Small Dimensionals were added to the back where the strips were so they wouldn't show through the window sheet. I set the piece aside.

Then I took a piece of Basic White card stock and die cut the leaves from the "Forever Fern" bundle. I trimmed off the bottom two leaf clusters because the piece was way to large. I glued the piece to the circle and I set it aside to set up.

The words are from the "Go To Greetings" set and were stamped using black Memento ink. I did set the circle on the piece for placement to see where the words would go.

Once the words were stamped I set the circle in place. The Basic White piece was taped to the Starry Sky piece and that was taped to the card base and the card was done.

This was a fun technique and a whole lot easier to do than the previous one. I like this technique much better.

Thank you SO very much for taking your time to stop in and see today's friendship card,
Wanda

Sunday, April 23, 2023

Petal Park, Go To Greetings, Thank You Card, Stampin' Up!

Hello! Today I am going to share with you a quick card (quicker if you have the dies). It's an easy one to make. Please read on to see how you can make it yourself.

The base of the card is a folded half-sheet of Mango Melody card stock. This card stock will be retiring soon. I did like the color but my ink pad kept getting thick and had a funny color on top of the crust it formed. Same with my Rich Razzleberry, maybe that's why they are retiring that color too.  Anyway, I have lots of card stock to use up but this layout will work with any of your Designer Series Paper (DSP) and matching inks, so what's stopping you from making it?  The "Petal Park" stamp set?  Well, there's lots of other flowered sets you could use. You must have one in your inventory!! Anyway, my card opens on the right and the fold is on the left.

Two pieces of Basic White card stock were cut at 4" x 5-1/4", one for the front and one for the inside.  I taped the inside piece in place. I like to do that right away so when I'm done with the front I'm done with the card. Not that it's a lot of effort to tape the piece to the inside after working on the front, it's just nice to have it done when you're done with the front.

I took a 1-1/4" x 5-1/4" piece of DSP from the "Dandy Designs" package I got during this year's Sale-a-Brations and I taped it to the other piece of Basic White card stock.

I took a scrap piece of Basic White card stock and I stamped the flowers using Mango Melody ink. Then I used black Memento ink and stamped the detailed images. I made two sets of flowers. The flowers come with three of them on one stamp, which is kind of nice, though it does go with the big leaf background image in the set. Then I fussy cut the flowers. The leaves were stamped using Granny Apple Green ink and black Memento for the details. I fussy cut them too. 

Next I punched out the scalloped oval using a scrap piece of Mango Melody and the "Double Oval" punch.

The words are from the "Go to Greetings" set and were stamped on a scrap piece of Basic White card stock using black Memento ink. I punched them out with the same punch. It's a "double" punch so you get both ovals.  Nice, huh? I taped the ovals together, Dimensionals were added to the back and the piece was set in place on the Basic White piece with the DSP on the right.  I didn't press down on the Dimensionals, I needed to have them loose for when I slipped the flowers under, I wanted to make sure they would go under.  Then I added the two leaves. After the leaves were added I pressed down on the oval to make sure it was set in place.

Dimensionals were added to the Basic White piece and it was set in place on the top of the card base and the card was done.

As I look at it, I think the center of the flowers could use something, so I may add some pearls or other embellishments I find. I was trying to keep it simple and mailable with a single stamp. Adding firm embellishments will cause the card to be non-machinable and cost more to send. So I will be searching for something that is not thick or higher than the word piece.

This was a fun card to make and I think it could be used for a number of occasions.

Thank you SO very much for taking your time to stop in and see today's thank you card,
Wanda

I took the flowers and added a bit of tape to the back and slipped them under the oval. 

Saturday, April 22, 2023

Butterfly Brilliance, Art Gallery, Dainty Flowers, Thinking of You Card, Stampin' Up!

Hello. I'm so happy you are here to see how today's card was made. Yesterday I made a card with a butterfly from the (retiring) "Butterfly Brilliance" bundle.  Well, I had die cut two because the piece of card stock I used had just enough room to make another one, so I did! I set it aside for a future card and it usually doesn't happen that quickly but the future was today!! Please read on to see how this quick and simple card was made.

The base of my card is a folded half-sheet of Basic White card stock. It opens on the right and the fold is on the left.

I cut a 1-1/2" x 4-1/2" piece of Designer Series Paper (DSP) from the "Dainty Flowers" 12" x 12" package. Then I cut a 1-3/4" x 4-3/4" piece of Fresh Freesia card stock for the layer. I taped the two layers together and then it was taped to the left side of the card. I eyed it so it was pretty equal on the top, left and bottom of the card base.

Next I cut a larger piece of DSP from the same package. It measured 2-3/4" x 4" and the Fresh Freesia layer behind it was cut at 3" x 4-1/4". I taped the two layers together. Dimensionals were added to the back and the piece was set in place on the front of the card. 

The butterfly was colored with Wink of Stella and then set on the front of the card using a small Dimensional.

The words are from the "Art Gallery" set and were stamped on a scrap piece of Basic White card stock using black Memento ink. I die cut them using the stitched rectangle die from the "Rectangle Stitched Framelits" set. Oh, when I stamped the words, I did mask off the "I'm" before the thinking of you" on the stamp. I didn't want that on the card. I set the word piece in place using Dimensionals and I did double up on the Dimensional on the left side so the word piece was level.  And the card was done.

This is a super quick and easy card to make and can be used for a number of occasions.

Thank you SO very much for taking your time to stop by and see today's thinking of you card,
Wanda

Friday, April 21, 2023

Butterfly Brilliance, Days to Remember, Color & Contour, Birthday Card, Stampin' Up!

Hi there! I'm happy to see you here today. I have a fun, sweet and easy card to share with you. I found it on the internet, you can see the original card here but the site is not secure and I don't feel comfortable sending you to an unsecured site. I'm not sure why the owner of the side didn't secure it but it's up to you if you want to go see it. I did make a couple of small changes but for the most part my card is the same. Please read on to see how I made this card. Oh and there are no instructions on that link that tell you how to make the card. So here's how I made it:

The base of the card is a folded half-sheet of Basic White card stock. I cut a 3-1/2"x 5-1/4" piece of Basic White for the back layer. You could just add strips of Basic White card stock for the edges but the whole piece gives the front more stability.

Next I cut the Designer Series Paper (DSP) from the "Dainty Flowers" 12" x 12" package, it measured 5-1/4" x 3-1/4".  

The Fresh Freesia scalloped edge at the bottom was created using the die from the "Color & Contour" die set on a strip of card stock that measured 1-1/2" before die cutting.  I also die cut a 3/8" x 5-1/4" strip of Fresh Freesia for the front because I didn't have any ribbon left (yes, I actually used something up, the hoarding is starting to subside  - maybe-  LOL).  

I die cut the butterfly from the "Butterfly Brilliance" bundle using a scrap piece of Basic White card stock.

The words are from the "Days to Remember" set and were stamped using Mossy Meadow ink on a scrap piece of Basic White card stock and then punched out using the "Dual Ovals" punch. 

To assemble the card I took the DSP and taped it to the Basic White piece, leaving about 1/8" of card stock showing on the top and bottom.

Then I taped the scalloped Fresh Freesia piece to the bottom. I left just a little bit of card stock showing between the dots/stitch marks on the piece. You do not what this whole piece to be no more than 5-1/4" wide.

The strip was glued on next. The original card had the bottom edge of the ribbon butted up against the bottom of the DSP. Since I didn't have any ribbon, I decided to add the strip above the DSP to let it show a bit.

The butterfly was set in place using a Dimensional and the words were set in place using a couple of Dimensionals. And the card was done.

I thought it was such a pretty card and I do like how it turned out. Oh, the other change I had made was with the words, and I'm sure that's something you would do too, making the card suit your needs. It's a fun, quick and easy card to make.

Thank you SO very much for taking your time to stop in and see today's birthday card,
Wanda

Thursday, April 20, 2023

Artistically Inked, Fancy Flora, Birthday Card, Stampin' Up!

Hello! Did you ever go looking on the internet for one thing and find something else?  Oh and then forget the one thing you were looking for in the first place?  That really describes me! LOL  But it's okay, what I found today was a pretty card that I thought I'd try out. I have LOTS of Designer Series Paper (DSP) in the "Fancy Flora" 6" x 6" stack so I was more than willing to give this card a try. You can see the original card here

Please read on to see how the card was made.

The base of the card is a folded half-sheet of Crumb Cake card stock. This card opens on the right and the fold is on the left.

I cut a 2" x 5" piece of Evening Evergreen card stock for the strip behind the DSP. The DSP was cut at 2-3/8" x 4-1/4" and was taped to the Evening Evergreen piece. I do recommend taping the Evening Evergreen piece down first and then the DSP on top.

Next I die cut the circle using two circle dies from the "Layering Circles" die set. I used the 2-1/8" die and the 1-5/8" die on a piece of Soft Succulent card stock. I used some post it tape to hold the circles together so I could die cut them both at the same time. I set the circle/ring in place on the front of the card using small Dimensionals.

The words are from the "Artistically Inked" set and were stamped using Evening Evergreen ink. I die cut them using a rectangle die from the "Rectangle Stitched Framelits" set. I added Dimensionals to each end and one where the "T" is in birthday so the piece wouldn't sag too much.

A bow was tied using two pieces of linen twine/thread and glued in place.  A 4" x 5-1/4" piece of Basic White card stock was added to the inside and the card was done. 

Can you see why I wanted to make one? I just love the looks of this card. And it didn't take long at all to make!

Thank you SO much for taking your time to stop in and see today's birthday card,
Wanda


Wednesday, April 19, 2023

Dainty Flowers, Days to Remember, Birthday Card, Stampin' Up!

Hello1 I'm so happy you are here to see what I was up to today. Please read on to see how I made this card.

The base of my card is a folded half-sheet of Basic White card stock. The card opens on the right and the fold is on the left.

I took some scrap pieces of Designer Series Paper (DSP) from the "Dainty Flowers" 12" x 12" package. The strip on the left side measures 4-7/8" x 1-1/8" and the Pear Pizzazz layer behind it measures 5" x  1-1/4".  I taped the two layers together and then taped them to the left side of the card about 1/4" from the top, fold and bottom.

Next I took another piece of DSP from the same package that measures 3-7/8" x 2-3/4". The Pear Pizzazz layer behind it measures 4" x 2-7/8".  I taped those two layers together. Dimensionals were added to the back and the piece was set in place on the front about 5/8" from the top, bottom and right edge. 

The flower in the center of the card was fussy cut from the same package of DSP. It was set in place using Dimensionals.

The words are from the "Days to Remember" and were punched out using the "Dual Oval" punch. The scalloped oval is from the same punch using a scrap piece of Pear Pizzazz card stock. I taped the two ovals together. Dimensionals were added to the back and at the very bottom of the oval, the Dimensionals were doubled up because the height wouldn't be right. And the piece was set in place on the front of the card. And the card was done.

This was a very fun card to make, even with the fussy cutting of the flower cluster. I like the way it turned out and it was fun to use up some more scraps of DSP.

Thank you SO very much for taking your time to stop in and see today's birthday card,
Wanda

Tuesday, April 18, 2023

Go To Greetings, Hues of Happiness, Thank You Card, Stampin' Up!

Hello! Are you ready to clean up some scraps from your workroom?  I sure am. I found some and put them together to make today's card.

The base of the card is a folded half-sheet of Basic White card stock. The card opens on the right and the fold is in the left.

The Designer Series Paper (DSP) on the left strip is a scrap from the April 2019 Paper Pumpkin kit. I layered it with a piece of Mint Macaron.  The strip measures 4-7/8" x 1". and the Mint Macaron piece was cut at 5" x 1-1/8".  I taped the two pieces together and then taped them to the front of the card about 1/4" from the bottom, top and fold.

The larger rectangle piece is also from the same kit but can be easily accomplished by using your Blending Brush and some Mint Macaron ink and a little SO Saffron ink. Add some tiny Mint Macron dots on the piece and you have your own! That piece measures 4-1/4" x 3" and the Mint Macaron layer was cut at 4-3/8" x 3-1/8".  I taped those two layers together and Dimensionals were added to the back and that piece was set in place on the front of the card about 1/2" from the top and bottom and 3/8" from the right edge.

Next I punched out the leaves from the "Bough" punch using Mint Macaron card stock.

The flower is from the "Hues of Happiness" DSP package and was fussy cut. Dimensionals were added to the back. I set the leaves where I wanted them and added the flower piece. The flower has an enamel dot in the center.

The words are from the "Go To Greetings" set and were stamped using black Memento ink. They were punched out using the "Dual Oval" punch. The Mint Macaron layer was punched from the same "Dual Oval" punch. Those two pieces were taped together. Dimensionals were added to the back and then set in place on the front of the card.  And the card was done.

Isn't it fun when you can use up some pieces you have sitting around and make a fun card with them too?

Thank you SO very much for taking your time to stop in and see today's thank you card,
Wanda

Monday, April 17, 2023

Playing in the Rain, Give it a Whirl, Birthday Card, Stampin' Up!

Hello there! I'm happy you are here because I want to share with you a fun card I made. This card has three different images that move through the round opening while you turn the wheel on the right. It was a fun card to make but I did need to see a video on how to put one together since I'd never made one of these before with this new die set. You can see the video here. There's some chit chat and showing of products at the beginning. If you want to avoid all that you can start at the 4:45 time stamp. You can see that video by clicking here

After watching the video I got out the items I needed to begin. First I took a folded half-sheet of Basic White card stock for my base.

Next I die cut the Designer Series Paper (DSP) from the "Rain or Shine" 12" x 12" package. This die has the half circle on the right.

Then I die cut the large scalloped circle that the images will be stamped on. I set the die back on top and traced around the openings so I knew where I could stamp and where I shouldn't stamp.  I followed the video on how to make a circle for the large scalloped circle so the piece twirls better. The two pieces were put together with a brad. I had stamped and colored my images before I added the brad. 


Then I die cut the circle on my DSP piece for the front of the card. There's a scalloped circle die in the set too, I cut one from Basic White card stock for the border around the circle on the DSP. I glued that scalloped ring in place with mono glue.  

I set the large scalloped piece on the back making sure I could see the brad through the tiny hole in the DSP that the die created. The brad kind of stuck to the opening because of the mono glue, which was nice, then I knew I had it on right. 

I followed the instructions on adding the circle to the front of the card by adding a couple of Dimensionals to that small circle on the back. Once the spinning circle was in place than the front DSP piece was added using Dimensionals. The video showed two on the top and two on the bottom. I ended up lifting the piece a bit after it was on and slipping one more on each side below the spinning scalloped circle. 

I decorated the front and added the black arrow (from a die in the set) and the card was done.

It's a fun card and now that I know how to put it together I plan on looking though my stamps to see what will fit in that window and have some more fun! I added a video (I usually don't do that, so I hope it works)

Thank you SO very much for taking your time to see today's whirling birthday card,
Wanda

Sunday, April 16, 2023

Days to Remember, Awash in Beauty, Birthday Card, Stampin' Up!

Hello! I'm so happy to share this card with you today. I had gotten a packet from Terri at one of her Stamp a Stacks and I had set it aside to put together at a later time. Well, it's a later time and here's the finished card (finally!). 

The base of the card is a folded half-sheet of Basic White card stock. On top of that is a 4-1/4" x 3" piece of Granny Apple Green card stock and Basic White layer. The Basic White piece measures 4-1/8" x 2-7/8".  The piece was textured using the "Painted Texture" embossing folder. Terri had already textured, nice, huh? The piece was centered on the card base and set in place using Dimensionals.

The flower is from the "Days to Remember" 12" x 12" package of Designer Series Paper (DSP). I did have to fussy cut that myself. Dimensionals were added to the back. 

The leaves were punched using the "Bough" punch and Granny Apple Green card stock. I set the leaves on the textured piece and then set the flower on top. The Dimensionals on the flower will hold the leaf piece in place. 

The words are from the "Days to Remember" set and were stamped using black Memento ink. And then they were punched out using the "Dual Oval" punch. The scalloped oval was also punched from the same punch and a scrap of Granny Apple Green card stock. I taped the ovals together, added Dimensionals on the back and the piece was set in place on the front of the card. 

A fun gem cut embellishment was added to the center of the flower and the card was done.

This was a fun card to make and a super easy layout. I can see myself using this layout for other cards. Can you see the cute little turtle or bunny from the "Playing in the Rain" set in place of the flower and leaves?  Lots of options for that space!

Thank you SO very much for taking your time to stop in and see today's birthday card,
Wanda

Saturday, April 15, 2023

Best Family Ever, Stylish Shapes, Anniversary or Wedding Card, Stampin' Up!

Hello! I'm happy you are here today. I have a fun card that uses some scraps! Who doesn't love using up scraps? Please read on to see how to make one of your own!

The base of my card is a folded half-sheet of Basic White card stock. I had started out with a half-sheet of Cherry Cobbler but the piece really looked like it needed a white border so I went with Basic White for the base and a 4" x 5-1/4" piece of Cherry Cobbler for the layer. I did texture that layer using the "Painted Texture" embossing folder (pssst, the folder is NOT retiring, yay!!). I glued the Cherry Cobbler piece to the Basic White piece.

Next I took a piece Designer Series Paper (DSP) scrap from the "Awash in Beauty" 12" x 12" package. My piece measured 4-1/8" x 3-1/4".  You can use smaller pieces too, this was just how "tall" my piece was. I think if it were a bit shorter it might look better but I had no idea how to work this into a card so I winged it. I took that piece of DSP and cut it into 1-3/8" strips.  

Next I took a piece of Mossy Meadow card stock and I taped the DSP strips to it leaving about 1/8" space between them. To make the spaces even, I often cut a strip of card stock the width I need and I set it along the edge of the first piece I lay down and then add the next piece with that strip sitting in between as a guide. Then I trimmed the Mossy Meadow piece of card stock. It measured 4-1/2" x 3-1/2" when I was done. Now that I know those measurements I can make future cards with ease. Oh, one thing to remember is to keep the strips of DSP in order so they still for a picture when you tape them down. Dimensionals were added to the back and it was set in place on top of the Cherry Cobbler piece.

The words are from the "Best Family Ever" set and were stamped on a scrap piece of Basic White card stock. I die cut them using the die from the "Stylish Shapes" set. They were set in place using Dimensionals. 

The bow was sitting on my worktable. It was from a packet that Terri had sent me in a thank you gift package.  She even ties them for you before she packages them up! I used a dot of mono glue and slipped it slightly under the corner of the word piece. And the card was done.

This card design could be used for a number of other occasions as well as birthday. Fun, pretty and versatile too. Plus you get to use up scraps!

Thank you SO very much for taking your time to stop in and see today's card,
Wanda

Friday, April 14, 2023

March 2023 Paper Pumpkin Alternative Card, Birthday Card, Stampin' Up!

Hello! I'm happy you are here to see today's card. I thought I'd take my latest Paper Pumpkin kit out. I don't buy them very often but Stampin' Up! was promoting the anniversary of Paper Pumpkin with a peek of what was in it. I loved the vase with the flowers and the wording so I just had to order it. It's too bad they don't give us a peek each month.  It would help me to decide to purchase it or not but that's not how the member ship runs. So I just purchase when I want. Anyway, let's look at how I made today's card.

I took one of the pre-printed half-sheets of card stock in the kit. I chose the gold foiled polka dot one. 

Then I took the multi colored piece with the gold foil border and added Dimensionals to the back and set it in place on the center of the card.

Next I took the gold "happy" from the kit and cut up some Dimensionals and added them to the back and that piece was set across the foil bordered piece. 

I punched some Shaded Spruce leaves using the "Bough" punch, I added a little bit of glue to the stem and slid them under the foil bordered piece.

The words are from the Paper Pumpkin kit and were stamped using black Memento ink. The kit came with Polished Pink but I opted for something darker.  The piece the "birthday" was stamped on is also from the kit. I taped it in place just below the foil bordered piece and the card was done.

This was a fun card and easy too. I love it when everything is all cut out for you. I say that as I'm looking at some totes I have that I actually cut out all the pieces to cards, did all the coloring and yet there they sit!! The mystery of Wanda!!! LOL

Thank you SO very much for taking your time to stop by and see today's Paper Pumpkin alternative card,
Wanda

Thursday, April 13, 2023

Days to Remember, Awash in Beauty, Birthday Card, Stampin' Up!

Hello. I have a fun card to share with you today. I call it a fun card because I had gotten a card packet from Terri after I had placed an order. She's always giving some fun gift when you order. She has a LOT of fun techniques on her blog, check it out when you have time, you won't be disappointed. Well, about this card. I had received a packet a while back and didn't do anything with it. It got misplaced in my workroom. I ran across it today and I thought I'd take the pieces and make a card with them. This isn't the card that the packet was having me make. I went in another direction with it because I didn't know what to do!  Gotta save the paperwork too. I'm sure it's on my worktable someplace! Maybe! LOL  So here's what I came up with and I'll tell you how I put it together.

The packet has all the pieces you need. I took the half-sheet of Basic White card stock and folded it in half. The card opens on the right and the fold is on the left. 

I took the 4" x 4" piece of Blushing Bride piece of card stock and I glued the textured 3-3/4" x 3-3/4" Basic White piece. This piece was pre-textured too. The texture is from the "Painted Texture" embossing folder. Then I taped the piece to the front of the card on the upper end.

Then I took the two ovals in the kit and taped them together. I added Dimensionals to the back and set it in place on the lower part of the card.

The packet had the Designer Series Paper (DSP) flowers from the "Awash in Beauty" 12" x 12" package. I fussy cut it and set it on the flower using Dimensionals. I'm not sure if Dimenisonals came with the packet but if they were meant to be set up higher on the card, then Dimensionals would be included. She remembers everything you need (except tape and words).

The words are from the "Days to Remember" set and were stamped using Evening Evergreen ink. I punched them out using the "Dual Oval" punch. I took a scrap piece of Blushing Bride card stock and punched out the scalloped oval from the same punch. I taped the two ovals together. I added Dimensionals to the back and set them in place on the upper part of the card.

The little gems/embellishments were in the packet and I set them in place on the front of the card. And my card was done.  I think it could be used for a number of occasions.

Thank you SO very much for taking your time to stop in and see today's birthday card,
Wanda

Wednesday, April 12, 2023

Sentimental Park, Celebrating You, Wedding Card, Stampin' Up!

Hello! I'm so happy you came here to see this pretty wedding card and how it's made. I found it on Pinterest and of course I changed some things. You can see the original card here (if you promise not to compare!). Please read on to see how the card was made.

The base of the card is a folded half-sheet of Basic White card stock. This card open son the right and the fold is on the left.

I took a 4-1/4" x 5-1/2" piece of Basic White card stock and textured it using the "Pretty Flowers" embossing folder. I glued that piece on the front of the card base.

Next I took a 2-3/4" x 5-1/2" piece of vellum, and using my mono glue I affixed it to the right side of the card. 

Then I took a 1/4" x 5-1/2" strip of Basic White card stock and glued it over the edge of the vellum. 

The words are from the "Celebrating You" set and were stamped using Smoky Slate ink. You can also use Versa Mark and silver embossing powder if you like. I love the way the embossing powder looks, especially the silver but I don't like working with it so I opted for the ink instead. After stamping I die cut the words with the die from the "Sentimental Park" die set. 

Next I die cut a bunch of flowers from the same die set using Basic White card stock and vellum. I also used the "Bough" punch for the larger leaves. I punched four of them and a couple of them I cut down but I did save the leaves to tuck in here and there.

I took a piece of silver cord and wrapped it twice around my spread fingers. Then I twisted it to form a figure 8. I used a glue dot to hold that in place on the front of the card.  I set the word piece on top of it using Dimensionals. Try not put Dimensionals on it where it will touch the cord. Mine is a bit bumpy because I didn't think about that when I was slapping on the Dimensionals all over the place (I tend to use way too many Dimensionals).

Now for the flowers and leaves. I added the top left white one first and then worked down and around from there. I've stuck leaves and single leaves in here and there too. Just randomly place the flowers and leaves, it will look pretty any way you do it.

And for the final touch, pearls were added to the center of the flowers and a couple on the upper right side of the card. And your card is done. 

I think this would be a card you'd bring to the wedding with you instead of mailing because of all of the Dimensionals and pearls giving it too much height (over 1/4" and you have to pay more in postage and over 1 ounce you have to pay more too!)

This was a very fun card to make and nothing beats white on white!

Thank you SO very much for taking your time to stop in and see today's wedding card,
Wanda

Tuesday, April 11, 2023

Best Family Ever, Awash in Beauty, Birthday Card, Stampin' Up!

Hello! I'm SO happy to share today's card with you. It's quick and easy. Please read on to see how you can make one for yourself!

The base of the card is a folded half-sheet of Basic White card stock. This card opens on the bottom and the fold is on the top.

I cut a 4" x 5-1/4" piece of Basic White card stock and textured it using the "Pretty Flowers" embossing folder. I set that piece in place on the front of the card using Dimensionals.

Next I fussy cut the flower cluster from the "Awash in Beauty" 12" x 12" package of Designer Series Paper (DSP).  I was in the mood for some fussy cutting. There were a lot of ins and outs on the piece but it was SO worth it. I did snip between the flower and leaf on the right and a leaf on the left so it would fit over the planter. The planter was made by taking another piece of DSP from the package and using the largest stitched circle die from the "Stylish Shapes" set I cut a circle and then I cut it in half. I slipped the flower over the half circle and I added Dimensionals to the back. I made sure I added some where the two pieces meet to hold it all together. I set the piece in place on the front of the card and off to the right.

The words are from the "Best Family Ever" set and were stamped using Mossy Meadow ink. I die cut them using the ribbon ends die from the same "Stylish Shapes" set. I set the words in place using Dimensionals on the left and a little glue on the right. And the card was done.

It's quick, easy and pretty too!  This card could be used for a number of other occasions.  Which is a good thing because I have more of that DSP to use up!

Thank you SO very much for taking your time to stop in and see today's birthday card,
Wanda

Monday, April 10, 2023

Go To Greetings, Rain or Shine, Thank You Card, Stampin' Up!

Hello! I hope you're having a scrappy day!  I grabbed some Designer Series Paper (DSP) scraps and headed to my worktable to magically turn them into a card. Not into just a card, but a card I would like! Magic helps there!! LOL Please read on to see how I made today's card.

The base of the card is a folded half-sheet of Basic White card stock. The card opens on the bottom and the fold is on the top.

The DSP on the sides is from the "Rain or Shine" 12" x 12" package and they measure 4-1/4" x 1-3/8".  I taped them to the front of the card base.

Then I took another piece of DSP that is from the same "Rain or Shine" package and it measured 4-1/4" x 3-1/4". I cut a 4-1/4" x 3-1/2" piece of Old Olive card stock for the layer. I taped the DSP to the Old Olive piece and taped it to the front of the card, centering it as much as possible by eyeing it.

I used the second largest stitched oval from the "Stylish Shapes" set on a piece of Basic White card stock. I used my Blending Brush and scrubbed on some Flirty Flamingo ink.  Then I die cut a scalloped circle from the "Layering Circles" die set that was just a bit larger than the stitched circle. I used Old Olive card stock for that. I taped the Basic White circle to the Old Olive circle. I set it in place on the front of the card using Dimensionals.

Does the bunny look familiar?  Well, it was from a couple days ago. I had used him on the matchbook candy holder. I rescued him from the recycling bin (yes, I went dumpster diving!!! LOL). I just didn't want to see him being recycled before his time. So the rescued bunny was set in place on top of the circle with some fresh tape on the Dimensionals.

The words are from the "Go To Greetings" set and were stamped using black Memento ink. I punched them out using the "Dual Oval" punch. Then I punched the scalloped oval from the same punch using Old Olive card stock. I taped the two ovals together. Dimensionals were added to the back and the piece was set in place on the upper part of the card. And the card was finished.

This was a fun card to make. I'm happy with the colors and thrilled that I was able to make a card from some scraps I had.

Thank you SO much for taking your time to stop by and see today's thank you card,
Wanda

Sunday, April 09, 2023

Sentimental Park, Friendship Card, Stampin' Up!

Hello. Thank you for coming here today's card. Read on and see how it's made.

The base of my card is a folded half-sheet of Rich Razzleberry card stock. My card opens on the right and the fold is on the left. 

I cut two pieces of Basic White card stock at 4" x 5-1/4" each. One was taped to the inside and the one on the front was textured using the "Painted Texture" embossing folder and was glued to the front of the card.

I cut a 3" x 4" piece of Basic White card stock for the focal piece. The DSP on that focal piece was cut at 2-1/4" x 3-3/4" from the "Dainty Flowers" 12" x 12" package. I cut that piece into three 3/4" strips. I taped the strips to the Basic White piece. Dimensionals were added to the back and that piece was set in place on the front of the card base.

The words are from the "Sentimental Park" set and were stamped using black Memento ink. I die cut them with the die from that bundle. I set it in place on top of the DSP strips. Some pearls were added to the word piece and the card was done.

This was a quick and easy card to make. It's always fun to use scraps of DSP and make a pretty card. 

Thank you for taking your time to stop in and see today's friendship card,
Wanda

Saturday, April 08, 2023

Playing in the Rain, Rain or Shine, Matchbook Easter Candy Holder, Stampin' Up! Weekend Project

Hello!  I'm glad you are here to see today's matchbook candy holder. I have made a lot of these in my time. They make great little gifts so read on to see how this one was made.

The base of the matchbook is a 2" x 6-1/2" Basic White piece. I scored it on the long side at 1/2", 3-1/4" and 3-1/2".  All scored fold inward.

Next I cut some Designer Series Paper (DSP) from the "Rain or Shine" 12" x 12" package. The long front piece measures 3" x 2" and is scored 1/4" at the top. I glued it to the front of the holder. Make sure you get the sky at the top!! Yup, you're right, I didn't pay attention (as usual!). And the bottom piece was cut at 1/2" x 2".  Don't glue it down yet.  It is recommended you use glue here because tape could cause the DSP to lift off at the top. 

The bunny candy is made by the Ghiradelli company and the bottom of it is placed inside the holder, all the way down to the fold. Then I stapled the matchbook flap at the bottom with the candy in between. When stapling, make sure you staple backwards. Meaning, make the bumps of the staples in the front and the smooth part on the back. This makes it so it has a nicer look plus you don't have to concern yourself if the staple should come loose and the end could possible poke someone or get caught on clothing. Now with the bumps in the front you will take that 1/2" x 2" piece and glue it over those bumps. 

Tuck the top part of the matchbook cover into the bottom where the staple is.

I typed the "Happy Easter" on my computer using the BlacklightD font at size 16. I trimmed it on my paper trimmer and glued it in place on the bottom of the holder. 

The bunny is from the same "Rain or Shine" DSP package and was fussy cut out. I set him in place using Dimensionals and the holder is done. You can embellish it with more items such as ribbons or pearls, buttons or whatever you think looks fun.  These are great to give out at any season or occasion. As long as you can find a candy in a wrapper like this you can make it into a matchbook candy holder.

Thank you SO very much for taking your time to stop in and see today's Easter candy holder,
Wanda


Friday, April 07, 2023

Dainty Flowers Go To Greetings, Thinking of You Card, Stampin' Up!

Hello. I'm so happy to share this pretty find with you. I saw it on Pinterest and I just had to make one.  You can see the original card here.  Please read on to see how the card is made.

The base of the card is a folded half-sheet of Basic White card stock. This card opens on the bottom and the fold is on the top. 

The Designer Series Paper (DSP) is from the "Dainty Flowers" 12" x 12" package.  There are two sheets of each design in the package. I took the sheet with the flowers in an oval and down the center are some pretty flowers. Those are the ones that are used in this card. I put the full sheet in my paper cutter and cut it at 4-7/8". I set the cut off piece (on the left of my cutting blade) aside and took the larger piece and cut the flowers on the other side at 2". I did trim the top off that piece a bit so more of the flowers would show. Then I cut that 2" strip of flowers to 3" long.

Also in the same package is the pretty Blushing Bride designed background. I put that in my paper trimmer and cut a 1" strip. I cut two 3" pieces off that 1" strip. These pieces are then taped to a 4-1/2" x 3-1/4" piece of Basic White card stock. Then that was taped to a 4-5/8" x 3-3/8" piece of Blushing Bride card stock. Dimensionals were added to the back of the piece and it was set in place on the card base.

The words are from the "Go To Greetings" set and were stamped using Blushing Bride ink. I die cut them using the stitched ribbon die from the "Stylish Shapes" die set. I set the words in place using Dimensionals and the card was finished.

Pretty, isn't it? I knew you'd like it as much as I did. I just had to make one. I also love the layout and may try that using other DSP.

Thank you SO very much for taking your time to stop by and see today's thinking of you card,
Wanda


Thursday, April 06, 2023

Playing in the Rain, Rain or Shine, Friendship Card, Stampin' Up!

Hello! I'm happy you are here to see how I made today's friendship card. It's quick and easy too!

The base of my card is a folded half-sheet of Basic White card stock. I cut a 5-1/2" x 1-3/4" piece of Designer Series Paper (DSP) from the "Rain or Shine" 12" x 12"package. I taped it to a 5-1/2" x 2" piece of Mango Melody card stick (soon to be retiring color) and I taped it to the left side of the card, leaving about 1/4" between the layers and the fold.

The floral image paper is from the same "Rain or Shine" package and was cut at 3-1/4" x 3" and taped to a 3-1/2" x 3-1/4" piece of Mango Melody card sock. And that piece was taped to the front of the card about 1/4" from the bottom and the right edge. 

I used the 1-7/8" circle die from the "Layering Circles" set on a piece of Basic White card stock for the top circle and the scalloped circle was cut using the 2-1/12" scalloped circle in the same die set. I taped the two circles together. Dimensionals were added to the back and the piece was set in place on the center of the squarish layer.

For the words I used the "Dual Oval" punch and punched out the scalloped piece. The words are from a Stamp-a-Stack I'd been to and I don't know what set they were from. If you know, please tell me so I can add that to my post. They had been stamped using Smoky Slate ink. They were punched out using the same "Dual Oval" punch. I taped the two pieces together. Dimensionals were added to the back and the piece was set in place on the front of the card.

The adorable bunny is from the "Rain or Shine" package and was fussy cut out because I didn't buy the matching die set. But he didn't take all that long to cut so I was okay with that.  Dimensionals were added to the back and he was set in place on top of the circle.  And the card was done.

It's cute, quick, easy and not to mention bright and cheery too!

Thank you for taking your time to stop in and see today's friendship card,
Wanda

Wednesday, April 05, 2023

Best Day, Birthday Card, Stampin' Up!

 Hello. I'm happy you are here to see today's cute birthday card. This kitty is just adorable stuffed into a cupcake liner! Please read on to see how I made today's card.

The base of the card is a folded half-sheet of Mint Macaron card stock. I cut a 4" x 5-1/4" piece of Basic White card stock for the inside and a 3-7/8" x 5-1/8" piece of Basic White card stock for the outside.

On the bottom of the piece for the front I cut a 3-7/8" x 1-3/4" piece of Designer Series Paper (DSP) from the "Dandy Designs" 12" x 12" package. I taped it to the bottom of the Basic White piece. I also taped a 5/16" x 3-7/8" strip of Mint Macaron card stock along the upper edge of the DSP. 

The words are from the "Best Day" set and were stamped using Mint Macaron ink.  After stamping them I think they should have been stamped in Granite Gray or even Basic Black. The green is a bit too light. Once the words were stamped I taped the piece to the front of the card.

Next I stamped the cat from the same "Best Day" set using black Memento ink. I fussy cut it out. Then I colored it using my Blends Pens. I used light Blushing Bride for the cupcake liner and I colored the dots in using my light and dark Mint Macaron Blends Pen. The cat was colored in using light and dark Granite Gray Blends Pens. The bow, balloon and part of the hat was colored in using the Dark Mint Macaron pen and the rest of the had was colored in using the light Mint Macaron pen.  The eyes were colored in using the light Granny Apple Green pen and the nose was colored in using the light Flirty Flamingo. On all of the dark Mint Macaron areas I colored over them using my Wink of Stella pen.

I die cut a stitched circle from the "Stylish Shapes" die set using Basic White card stock. I used the second largest circle in that set.  And for the scalloped edge circle I used one from the "Layering Circles" die set that was just a bit larger than the stitched circle. I taped the two layers together and added Dimensionals to the back. I set it in place on the front of the card. Dimensionals were added to the back of the cat piece and it was set in place on top of the circles.  

For a final touch I added three "Polished Dots" (retired) to the front of the card. You can find whatever embellishments work best for your card. You can even color in some pearls using your Blends Pens!

I just love this kitty and I think the card is perrrrfect for adults and kids alike! (you can groan if you want!! LOL)

Thank you SO very much for taking your time to stop in and see today's birthday card,
Wanda

Tuesday, April 04, 2023

Framed Florets, Dainty Flowers, Birthday Cards, Stampin' Up!

Hello. I'm so happy you are here today. I have another quick card to share with you. I have mixed feelings with this card. The Fresh Freesia color is retiring, which is kind of sad because it's such a pretty color. On my card I used the last of my Fresh Freesia colored ribbon. That came with mixed emotions. It was sad to see it gone but yet I actually used up a spool of ribbon! Please read on to see how this card was made.

I took a folded half-sheet of Basic White card stock. This card opens on the right and the fold is on the left.

I cut a 4" x 5-1/4" piece of Designer Series Paper (DSP) from the "Dainty Flowers" 12" x 12" package. And I cut another piece from the same package for the bottom part of the card that measured 4" x 2-1/2". I taped that to the bottom part of the floral piece of DSP.

The Fresh Freesia ribbon was cut and the ends were taped to the back of the DSP piece. The ends on the back of mine are pretty short because I needed something for the front of the card. I really wanted a bow but I didn't have enough ribbon.

After the ribbon was taped down (I used snail tape) I glued the piece to the front of the card base. I chose glue because my ribbon ends were so short that I didn't want the tape to give way.

The word are from the "Framed Florets" set and were stamped using Fresh Freesia ink on a piece of Basic White card stock. I die cut them using the third largest stitched circle in the "Stylish Shapes" die set. Then I die cut a scalloped circle just a bit larger than the stitched circle using a piece of Fresh Freesia card stock. I taped the two circles together. Dimensionals were added to the back and the piece was set in place on the front of the card to the right, pretty much centering the circle over the ribbon.

I took the small piece of ribbon that I had left and I folded it in half at an angle. I added a dot of glue and slipped it under the circle and the card was done.

I do like the looks of the card, it's soft and soothing looking.

Thank you SO very much for taking your time to stop in and see today's birthday card,
Wanda

Monday, April 03, 2023

Go To Greetings, Thank You Card, Dainty Flowers, Stampin' Up!

Hello there. I'm happy you are here to see today's super quick card. Are you ready for a card that takes very little time to make?  Well, I hope so because this one is quick, easy and pretty too!  I found it on Pinterest but the link just led to the blog and not to the exact post. I looked around a bit to see if I could find it but it took too much time so I just went ahead and did it how I thought it was done. You can see the original card here.

The base of the card is a folded half-sheet of Basic White card stock. The card opens on the bottom and the fold is on the top.

I cut a 5-1/2" x 4-1/4" piece of Designer Series Paper (DSP) from the "Dainty Flowers" 12" x 12" package and I taped it to the front of the card.

Next I took the largest stitched circle in the "Stylish Shapes" die set and cut out a flower cluster from one of the sheets in the same package. 

Some linen thread was tied around the front of the card and a bow was made. Then the circle was set in place over the thread and off to the left using Dimensionals.

The words are from the "Go To Greetings" set and were stamped using Mossy Meadow ink. I punched them out using the "Dual Oval" punch. I set the piece in place using a Dimensional on the right and a bit of double-sided tape on the left. And the card was done. I think it took me longer to write this up and get it posted than it did to make the card. It will probably take me longer to put the stuff I used away too!  LOL  We know I rarely put my stuff away!!

Thank you SO very much for taking your time to stop in and see today's super quick thank you card,
Wanda


Sunday, April 02, 2023

Framed Florets, Dainty Flowers, Birthday Card, Stampin' Up!

Good day to you! I'm very happy you are here to see how today's card is made. It's quick and easy too! I found it on Pinterest and you can see the original card here.

The base of my card is a folded half-sheet of Basic White card stock. My card opens on the right and the fold is on the left. 

I cut a 4" x 5-1/4" piece of  (soon to retire) Rich Razzleberry card stock and before I taped it to the card base, I die cut the butterfly from the center using the "Butterfly Brilliance" bundle. 

Next I cut a piece of Designer Series Paper (DSP) from the "Dainty Flowers" 12" x 12" package to measure 3-7/8" x 5-1/8".  I taped that on top of the Rich Razzleberry piece.

Then the oval was die cut using a die the "Framed Florets" bundle on a piece of Basic White card stock. I saved the oval from the center for a future card (adding to the stack of other ovals LOL). I set the oval in place using small Dimensionals. 

The butterfly was set in place using a small Dimensional that I had cut in half so it wouldn't show.

Taking my Rich Razzleberry ink I stamped the words from the "Framed Florets" set on a scrap piece of Basic White card stock. I die cut them using the 2-1/8" circle die from the "Layering Circles" set. Then the circle was set in place using Dimensionals, making sure that none were place where they would touch the oval.

I tied a bow and glued it in place and the card was done.

I thought it was a pretty card. Quick, easy and pretty too! Can't ask for more than that!!!

Thank you SO very much for taking your time to stop by and see today's birthday card, 
Wanda

Saturday, April 01, 2023

Around the Bend, Fancy Flora, Butterfly Brilliance, Thank You Card, Stampin' Up!

Hello. I'm so happy to share with you this super easy, quick and versatile card with you today. Please read on to see how it was made.

The base of my card is a folded half-sheet of Basic White card stock. This card opens on the right and the fold is on the left.

I found the Designer Series Paper (DSP) already cut sitting on my worktable. It measured 2" x 5".  I cut a piece of Evening Evergreen card stock at 2-1/4" x 5-1/4" for the layer behind it. I taped the layers together and set them aside.

Next I cut a 2" x 5-1/4" piece of Basic White card stock and textured it using the "Painted Texture" embossing folder. I glued that piece on top of the card base and then I glued the layered piece on top of that. The layered piece overlapped a bit and that is why I glued that piece on. The textured piece I always glue because of the areas where the tape gaps and I know I won't get a solid contact. Glue never fails, even if it's just a few dots. I usually draw a line around the area with the tip of the glue bottle. 

The words are from the "Around the Bend" set and were stamped using Evening Evergreen ink. I die cut them using the third smallest stitched circle in the "Stylish Shapes" die set.  And the Evening Evergreen layer was cut using the 1-7/8" circle die from the "Layering Circles" die set. I taped the two layers together and set them in place on the front of the card.

The card looks so plain so I thought I'd bring in a butterfly from the "Butterfly Brilliance" bundle. I die cut it using Basic White card stock.  Then I set it in place on the front of the card using a small Dimensional and the card was done.

This card has kind of a somber look to it and would make a wonderful sympathy card. This has to be one of my favorite images in the "Fancy Flora" 6" x 6" DSP package. And isn't it nice when you can use a piece of DSP that is laying around and turn it into a nice card?

Thank you SO very much for taking your time to stop in and see today's thank you card,
Wanda