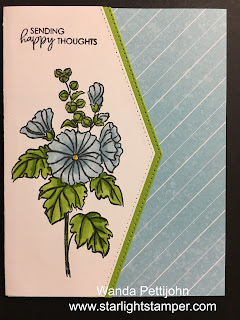
First I took a folded half-sheet of Basic White card stock and using the die from the "Basic Borders" die set I cut the right front side off 2-1/4" on the bottom and top edge and centering the point at 2-3/4" (the center point of the card edge).
I took a 5-1/2" x 2" piece of Granny Apple Green card stock and cut the piece to match the Basic White edge. I used the piece I had cut off as a guide for the die to line up and I cut it on my Big Shot. Now keep in mind here, I had no idea where I was going with this card. I just knew I wanted the right side to have that pointed edge with a pointed edge layer.
My "Beautifully Happy" set was still sitting out (imagine that! LOL). I stamped the larger flower cluster from that set using black Memento ink. Then I colored in the flower using both the light and dark Balmy Blue Blends pens. And I colored in the leaves, buds and stems using the Granny Apple Green Blends pen. And for the center of the large flower I used the light Daffodil Delight Blends pen.
The words are from the same set and were stamped using black Memento ink.
Once the words were stamped I glued the Granny Apple Green piece to the back of the card front.
Next I cut a 4-1/4" x 5-1/2" piece of Designer Series Paper (DSP) from the "Country Floral Lane" 12" x 12" package. I had purchased that DSP for some Valentine's Day cards and thought I would be adding it to the pile of DSP I wouldn't be using again. But I see there's lots I can still do with that DSP that is beyond Valentine's Day! So expect a few more card using some of that DSP. I also needed a 4-1/4" x 5-1/2" piece of Basic White card stock to support the DSP. I did cut that just a hair shorter all around. To do that I just cut the piece on the inside of the line on my paper cutter. That's a hair in my book. Then I glued the DSP to the Basic White piece. I figured if the DSP hung over too much I'd just trim it but after gluing it to the inside of the card it was just fine. I opted for glue because I knew I'd have some wiggle room to move it around a bit to get it straight. I closed my card the right side was hanging over a little bit so I took it to my paper trimmer and cut it off and that was it. The card was done and for not knowing where I was going with it, I got to a destination I was happy with.
Thank you SO very much for taking your time to stop in and see today's thinking of you card,
Wanda


Hi Love your card and the use of the dsp and dies I haven't used yet. TFS and inspiration.
ReplyDeleteWhat a FUN layout to your card today.
ReplyDeleteMight have to give this a try.....THANKS for sharing.
Love the combination of the colors. I have that dsp but haven't really gotten into that package yet. And I have the border dies and haven't used them. Time to drag them out. Great card!
ReplyDelete