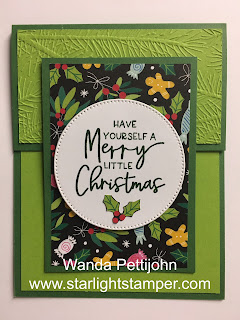
Saturday, December 31, 2022

Wildflower Path, Peaceful Moments, Sympathy Card, Stampin' Up!

First of all, can you believe it's New Years Eve? The year seemed to fly by but yet it seems like Christmas eve (only 7 days ago) seems like it was longer than that.  I'm not sure why. I think I need to be more boring in 2023 so my days seem long and not fly by!  Do you think that would work?  LOL

So, I still had my "Peaceful Moments" set out but I thought I should look at my other sets sitting on the shelf collecting dust because I had been busy with the fall and Christmas stamp sets I got in the last mini catalog. I have a number of them to play with before I order some new stuff. Plus the Sale-a-Bration sets. UGH!  Those poor ignored sets will just be sitting there until they retire. LOL But for now I'll play with what I can until my order arrives. I'm making a quick, easy and simple card because I have a few things I want to get done before I settle in for the night waiting for the ball to drop. It's just some snacks and watching "Fawlty Towers" this year.

And here's how I made today's card. The base of the card is a folded half-sheet of Basic White card stock. This card opens on the right and the fold is on the left. 

I cut a 4" x 5-1/4" piece of Polished Pink card stock for the layer.

Then I cut a 3-3/4" x 5" piece of Basic White card stock for the focal piece.

I stamped the stem of the flower from the "Wildflower Path" set using Old Olive ink. I actually used Granny Apple Green but I stamped over it using Old Olive. Being able to stamp over it you need to use your Stamparatus or Misti. And if you don't have either you can take one of your thinner stamp cases and make your own. 

Next I set up the Stamparatus to stamp the larger flowers. I stamped them using Polished Pink ink. And then there's another stamp to make the darker part of the flower, again using Polished Pink ink.

The words are from the "Peaceful Moments" set and were stamped using black Memento ink. The layers were taped together and then taped to the card base and the card was done.

This was a fun, quick and easy card to make.

Thank you SO much for taking your time to stop in and see today's final card for 2022!
Wanda

Friday, December 30, 2022

Peaceful Moments, Framed Florets, Happiness Abounds, Sympathy Card, Stampin' Up!

I noticed my stash of sympathy cards was a bit low so I thought I'd make one for today's post. This is a pretty simple, quick and easy card to make. It's kind of on the line of yesterday's card, with the same measurements for the side strip.

The base of my card is a folded half-sheet of Basic White card stock. This card opens on the right and the fold is on the left.

4" x 5-1/4" piece of Basic White card stock and textured it using the "Painted Texture" embossing folder. 

Then I cut a 1-1/2" x 5-1/4" piece of Designer Series Paper (DSP) from the Hues of Happiness 12" x 12" package. I chose the flowers with the dark background because I thought it would stand out better with the lighter colors I was working with. Next I cut a 1-3/4" x 5-1/4" piece of Basic White card stock for the layer behind the DSP and the last layer is a piece of Pool Party card stock that was cut at 2" x 5-1/4". I taped these layers together and glued them to the piece of embossed Basic White card stock. The edge of the layers is about 1/4" from the edge of the textured piece.

The words are from the "Peaceful Moments" set and were stamped using black Memento ink on a piece of Basic White card stock. I die cut them using the framed oval from the "Framed Florets" bundle. I also die cut the same oval piece using Pool Party card stock.

I fussy cut the flower and leaves and I was now ready to assemble the card.

I set the word piece in place using glue. Then I glued in place the white oval frame and on top of that I glued the Pool Party oval frame so all I was left with was a Pool Party solid oval. I'll save that for some other project (maybe).  

The flower was set in place using Dimensionals. A couple of dots of glue were added to the back of the leaves and they were slipped under the flower.

The whole piece was then glued to the card base and the card was done.

It's a very quick, simple and easy card to make and I do like this layout.  Now let's hope I don't need to use this card in the new year!

Thank you SO very much for taking your time to stop in and see today's Sympathy card,
Wanda

Thursday, December 29, 2022

Hand-Penned Petals, Fitting Florets, Get Well Card, Stampin' Up!

Today's card came from Pinterest. There's several options there and this is one I chose because I was in a pinkish mood!  The pin shows you how to get a lot of pieces from one 12" x 12" sheet of Designer Series Paper (DSP). I did have this flower cut from a sheet so I thought I'd use it. I still had to fussy cut around it but it didn't take long because there wasn't a lot of tough edges. You can see where this card came from by clicking here

The base of the card is a folded half-sheet of Basic White card stock. 

The DSP was cut at 5-1/2" x 1-1/2". The Basic White layer behind it was cut at 5-1/2" x 1-3/4" and the Blushing Bride layer was cut at 5-1/2" x 2".  I taped those three layers together and then taped them to the center on the front of the card.

The square was cut next. I used Basic White card stock and cut it at 2-3/4" x 2-3/4".  And the Blushing Bride layer behind it was cut at 3" x 3". 

After fussy cutting the flower from the "Fitting Florets" 12" x 12" DSP package. I added Dimensionals behind it. I set it on top of the Basic White square to see where the words would go.

The words are from the "Hand-Penned Petals" set and were stamped using black Memento ink.  Before stamping them, I masked of the word "friend" under the "feel better".  

I taped the Basic White square to the Blushing Bride square and set it in place on the front of the card using Dimensionals. I used small Dimensionals on the upper and lower part of the square, I didn't want them to touch the horizontal layers.

The flowers were added and the card was done.

This was a fun and quick card to make. I really like how the DSP just makes the perfect focal piece.

Thank you SO very much for taking your time to stop in and see today's get well card,
Wanda

Wednesday, December 28, 2022

Grassy Grove, Wildflower Path, Masculine Birthday Card, Stampin' Up!

The day after Christmas is my hubby's birthday. I forgot to share with you the card I made for him. It's a quick and easy card, which is what I needed during the holidays!

The base of the card is a folded half-sheet of Starry Sky card stock. This card opens on the bottom and the fold is on the top.

I cut a 4-1/8" x 5-3/8" piece of Basic Black card stock and die cut the forest from the "Grassy Grove" bundle. Before I cut it I added the larger deer to the center and cut both at the same time. That piece from the center is just big enough for the deer. No wasted card stock there!

Two pieces of Basic White card stock were cut at 4" x 5-1/4". One is for the inside and the other is for the background. I taped the one in place on the inside. And the background one was colored in using my Blending Brush and Starry Sky ink over the whole piece. Then I scrubbed in some Evening Evergreen ink from the middle down.  Now there's some blotchy spots on my background. I was trying to speed up the coloring and I pushed down too hard on my brush and it left some really dark spots.  Most of the big ones were on top under the trees so you can't see them but there's some in the middle. I think they kind of look like far off trees or dark shrubs.  Either way it still looks good. I don't think you can really ruin a background like this. 

I took the forest trees piece and added glue. Then I set it over the background piece. I made sure I didn't have glue all the way to the edge because my Basic White background piece is smaller and that would have made a mess. Once I got the background and forest piece glued together, I set it on the front of the card using Dimensionals.

Then the deer was glued in place.

The words are from the "Wildflower Path" set and were stamped on a scrap piece of Very Vanilla card stock using Evening Evergreen ink. The piece was trimmed close to the words. It measured 1-1/2" x 2-3/8".  I scrubbed on some Starry Night ink that was still on my brush, I needed to tone down the vanilla because it was too bright. I set the words in place using Dimensionals and the card was done.

This was a fun and quick card to make and hubby thought it was very nice.

Thank you SO much for taking your time to stop by and see today's masculine birthday card,
Wanda

Tuesday, December 27, 2022

Awash in Beauty, Friendship Card, Stampin' Up!

Today's card was a fun and quick card to make. I was planning on making a different card but I turned the card stock to the side and next thing I know I was creating my own card!  LOL  So here's how I made it:

The base of my card is a folded half-sheet of Basic White card stock. This card opens on the bottom and the fold is on the top. I cut a 4" x 5-1/4" piece of Basic White card stock and textured it using the "Painted Texture" embossing folder. I glued it on the front of the card base.

Then I stamped the words on a piece of Basic White card stock. I set the lacy looking oval die over the area I wanted to stamp so I knew where the words would go because I needed them up higher in the oval so I could add the flowers. I stamped the words using Evening Evergreen ink. Then I die cut them using the lacy looking oval. Once die cut I glued the outer part of the oval, the lacy frame part onto the front of the card, trying to center it as much as I could by eyeing it. Then I glued the word piece in place.

Next I die cut the textured oval using Polished Pink card stock. I added Dimensionals on the back and set it in place on top of the lacy oval.

The flower is from the "Awash in Beauty" 12" x 12" package of Designer Series Paper (DSP).  I fussy cut the flower and the leaves. I set the flower in place on the oval with glue on the part where it touches the oval and Dimensionals on the upper part of the flower. Then the leaves were tucked in by added a little bit of glue to their backs and slipped under the flower.

Four crystal rhinestones were added to the large lacy oval and the card was done.

This is a very quick and easy card to make. I do like how it turned out.

Thank you SO very much for taking your time to stop in and see today's friendship card,
Wanda

Edited on 12-28-22 I mistakenly stated the flower was from "Fitting Florets" when it was actually from "Awash in Beauty?" I apologize for any confusion.

Monday, December 26, 2022

Framed Florets, Birthday Card, Stampin' Up!

When I ordered the "Framed Florets" set/bundle there was also the "Framed & Festive" set that came with it or was promoted with it. It was filled with Christmas wording. I was glad that this bundle has other words and flowers with it because I REALLY like the oval die cut frames. SO I plan to make cards using these ovals and work in some of my other sets and Designer Series Papers (DSP). I believe this set is a buy early sneak peak from the upcoming January mini catalog. I found this card on Pinterest. You can see the original card here

The base of my card is a folded half-sheet of Basic White card stock. This card opens on the right and the fold is on the left.

I cut a 4" x 5-1/4" piece of Soft Succulent card stock for the layer. Before I taped this piece to the front of the card I die cut the leaves and "sprigs" from the center.

Next I took a 3-7/8" x 5-1/8" piece of Basic White card stock and I textured it using the "Painted Texture" embossing folder. I glued that on top of the soft Succulent piece.

Next I die cut both oval frames from the set. I saved the center of the largest one for the wording. Had I been smart I would have stamped the wording first and then die cut it but I die cut first and then I had to set up the wording and try to get it straight. I glued the larger oval frame down first and then the center with the words went next an then the single oval frame went on top of the first frame. The original card shows the top oval set in place using Dimensionals. I forgot to do that.  It still looks nice and it's only noticeable if you compare them. 

The larger "sprig" type leaves were added using glue. Then the three smaller ones were added. 

One small flower was glued in place and the other two were set in place using Dimensionals.

A pearl was added to the center of each flower and the card was done.

I thought it was a pretty card. Subtle and elegant looking.

Thank you SO much for taking your time to stop in and see today's birthday card,
Wanda

Sunday, December 25, 2022

Snowman Magic, Penguin Place, Christmas Card, Stampin' Up!

Merry Christmas. I usually show the Christmas card I sent out in December but I didn't make them all the same this year. I used some I posted here and some I had left over from last year.  And today I made my last Christmas card for the year. I chose a simple one because I don't have much time to play today!

The base of my card is a folded half-sheet of Very Vanilla card sock. My card opens on the right and the fold is on the left. 

I took a piece of Designer Series Paper (DSP) from the "Lights Aglow" 6" x 6" stack and cut it to 5" x 2". Then I took a piece of Soft Succulent card stock and cut a layer measuring 5-1/4" x 2-1/4" and I taped the DSP to the layer and I taped those two pieces to the front of the card about 1/4" from the top, left and bottom.

The "Lights Aglow" package has some fun pieces in it. One was the circle of snowflakes. I cut it to measure 3" x 3".  I thought about putting a greeting inside but decided I wanted to play with the "Snowman Magic" set one last time.  Though I probably could play with that one until January 3rd when it retires, it's a winter set, not so much Christmas.  We'll see!!

I die cut two snowmen, one for the front and one for the back. I die cut the face and saved the nose. I took my Basic Black marker and colored where the eyes and mouth would be on the solid snowman. Then I colored the nose using my Pumpkin Pie marker. The arms were die cut and colored using the Bronze Blends pen. I glued the arms to the solid snowman and then glued the other snowman on top. I added the nose.

The had and scarf were die cut. I used Basic Black for the hat and Daffodil Delight for the scarf. I also cut a very thin strip of Daffodil Delight for the band on the hat. I glued the band in place and then glued the hat to the snowman's head. I glued the scarf in place.

I set the square piece in place on the front of the card using Dimensionals. Then I added the snowman using Dimensionals as well. 

The words are from the "Penguin Place" set and were stamped using Soft Succulent ink.

I die cut 6 snowflakes and glued them in place on the front of the card. A crystal rhinestone was added to the center of each one and the card was done.

This was a fun card to make and kind of sad that I'm done making Christmas cards for the year.

I wish you all a very Merry Christmas and I appreciate you stopping in to see what I've made each day,
Wanda

Saturday, December 24, 2022

Merriest Frames, Framed & Festive, Christmas Card, Stampin' Up!

It's Christmas Eve.  WOW did that ever come fast. This whole month has flown by. I have a Christmas card to show you today and one more tomorrow and them I will be playing with my other sets until I order the new stuff!  I always love getting new stuff!!

The base of my card is a folded half-sheet of Basic White card stock. This card opens on the bottom and the fold is on the top.

I cut a 3-7/8" x 5-1/8" piece of Basic White card stock and textured it using the "Painted Texture" embossing folder. I glued that to the front of the card. I prefer glue because I know it will hold the piece better than tape will. Tape will only stick on the areas that are raised on the back. Glue will hold better in those areas. 

I die cut two ovals from the "Merriest Frames" die set using Basic White card stock. I stamped the words in the oval from the larger oval. I used Pool Party ink and the words from the "Framed & Festive" set.

The framed oval was glued to the textured piece and the word oval was glued to the center.  Then I took the other oval frame I die cut and added Dimensionals behind it. I set it in place on top of the first larger oval.

Poinsettia petals and leaves were die cut using Basic White card stock. I glued the two poinsettia flower parts together. Then the center of the poinsettia was added. This piece was glued onto the oval and the die cut leaves were slipped under. I had added a lot of glue so I knew slipping the leaves under would hold. 

I had a red embellishment and I added it to the center of the poinsettia. 

I thought the upper part of the poinsettia was sagging too much so I stacked two Dimensionals and I set it in place under the poinsettia.  And the card was done.

This was a fun card to make. I do like the white on white look.  Though I was thinking I should have used Real Red for the words instead of Pool Party but it is what it is. I like it so that's what counts!

Thank you SO very much for taking your time to stop in and see today's Christmas card,
Wanda


Friday, December 23, 2022

Framed & Festive, Sweetest Christmas, Santa Express, Christmas Card, Stampin' Up!

I'm sure the majority of you have all of your Christmas cards done by now. I have but I'm still playing with the holiday stamp sets because I don't have anything new to play with yet. I will be placing my order on January 4th and then in the meantime I will still have to play with what I have.  How horrible is that?  LOL  

Today's card was fun and easy. I took a folded half-sheet of Basic White card stock and cut off 2-1/4" on the front. I put that piece in my scrap tote because I won't be using it for this card.

Next I cut a 1-3/4" x 5-1/4" piece of Shaded Spruce card stock for the layer on the left side. And I added a 1-1/2" x 5" piece of Designer Series Paper (DSP) from the "Santa Express" 12" x 12" package. The two pieces were taped together and then taped to the front flap.

A 3" x 3" piece of Basic White card stock was cut for the focal panel and a 3-1/4" x 3-1/4" piece of Shaded Spruce was cut for the layer. Before taping them together  I stamped the words from the "Framed & Festive" set using Shaded Spruce ink. Actually I used Garden Green and then realized the card stock is Shaded Spruce.  Because I used my Stamparatus for my words I was able to just clean the stamp and ink it with Shaded Spruce and stamp over the Garden Green.  No one will ever know!! I love using the Stamparatus! 

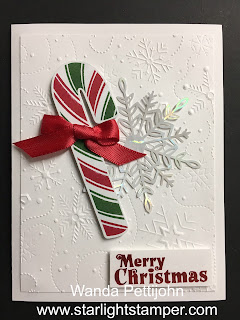
The candy cane is from the "Sweetest Christmas" 12" x 12" DSP package and was die cut using a matching die. I do not have the DSP or the die, my candy cane was from a kit I had received from Terri. I had used the candy canes for other cards and I wanted to see if I could use them up. I have one left and two days before Christmas!!  I may just make another card like this and use it next year. So back to the card. I added Dimensionals behind the candy cane being careful not to get any where it could stick the card shut.

I set the stamped square piece in place using Dimensionals on the left side only. I didn't want to tape the card shut. 

Then the candy cane was added. On the upper left part of the candy cane I stacked two Dimensionals so the thickness would be the same as the candy cane on top of the focal square. That part of the candy cane seemed to need a bit more support and doubling the Dimensionals did the trick. 

And for the final touch, I tied a bow and affixed it to the candy cane and the card was done.

Now I'm off to bake some pies for Christmas eve!  SO much still to do!

Thank you SO very much for taking your time to stop in and see today's Christmas card,
Wanda

Thursday, December 22, 2022

Merriest Frames, Framed & Festive, Christmas Card, Stampin' Up!

Since I still had the "Merriest Frames" dies sitting out (like I ever put anything back right away!!LOL) I thought I'd try and make wintry looking Christmas card and here's what I came up with.

The base of the card is folded half-sheet of Real Red card stock. This card opens on the right and the fold is on the left.

I cut a 4-1/8" x 5-3/8" piece of Designer Series Paper (DSP) from the "Painted Christmas" 12" x 12" package.  I taped that to the front of the card.

Then I die cut the Basic White framed piece using the "Merriest Frames" die and then I textured it with the matching embossing folder. I taped that to the front of the card on top of the DSP. I only used tape in the rectangle area and not the foliage.

The words are from the "Framed & Festive" set and were stamped using Real Red ink on a piece of Basic White card stock. I die cut it with the die that was in the "Merriest Frames" set. I taped that in place.

Then I die cut a poinsettia from the dies in the "Merriest Frames" set. I glued them all together and I set the flower in place using a Dimensional. I added a  red embellishment to the center. I'm not sure where it's from but it's probably retired. You can always use the dark Real Red Blends Pen and color a small pearl. I was going to do that until I found this red embellishment and I figured I'd just use it because I need to use up some of the stuff sitting around here.  

A 4" x 5-1/4" piece of Basic White card stock was added to the inside of the card and the card was done.

I am happy with the way it turned out, it was exactly what I had in mind when I started making it.

Thank you SO very much for taking your time to stop in and see today's Christmas card,
Wanda

Wednesday, December 21, 2022

Framed & Festive, Merriest Frames, Christmas Card, Stampin' Up!

Today's card was found on Pinterest (you can see the original here) and I thought I would make one since the "Merriest Frames" die set will be retiring. I have not played with it much and am sad about it because it's SO beautiful. The die cut has a folder that the piece fits in and textures it.  How cool is that?  Here's how I made the card:

The base of the card is a folded half-sheet of Cherry Cobbler card stock. I cut a 4" x 5-1/4" piece of Basic White and taped it to the inside.

Then I die cut the gold foil framed piece from the "Merriest Frames" die set. After I die cut it I set it up in the matching embossing folder textured it. Then I glued it to the front of the card base. 

I took a scrap piece of Cherry Cobbler and I stamped the words from the "Framed & Festive" set using Versa Mark. Then I sprinkled gold embossing powder over them and heat set it. I die cut it with the matching rectangle die in the set. I glued it to the center of the gold embossed frame. 

There's also poinsettia leaves and centers in that set. I die cut both large and small poinsettias in Cherry Cobbler and I cut two centers using the gold foil card stock. I glued the centers to the poinsettia flowers. Then I added a crystal rhinestone to the center of each. I colored the rhinestones using my dark Daffodil Delight Blends pen. I added Dimensionals to the back of the flowers and I set them in place on the front of the card. And the card was done.

This is a very quick and simple card and yet VERY elegant.

Thank you SO much for taking your time to stop in and see today's Christmas card,
Wanda

Tuesday, December 20, 2022

Sweetest Christmas, Very Best Occasions, Christmas Card, 2022 Stampin' Up!

Today's card is a super quick and easy one.  It's too bad I didn't think of this one earlier this month, I could have sent out all the same cards and saved lots of time too!  But it is what it is and today's card is simple. Read on to see how you can make it.

The base of the card is a fold half-sheet of Basic White card stock. This card opens on the bottom and the fold is on the top.

The Designer Series Paper (DSP) is from the "Sweetest Christmas" 12" x 12" package and it was cut at 5-1/4" x 2".  You can get a lot of pieces from one sheet if you're planning on making a card using this layout. I taped the DSP to the left side of the card.

Then I cut a 2-1/2" x 2-1/2" piece of Basic White for the word piece. The words are from the "Very Best Occasions" set and were stamped using black Memento ink. A 2-3/4" x 2-3/4" piece of Real Red card stock was cut for the layer. I taped the Basic White piece to the Real Red piece and added Dimensionals to the back and set the piece in place on the front of the card.

After looking at the card I thought it could use a little more color so I colored the leaves in using my Garden Green marker. And for the berries I used my dark Blends Pen on some tiny crystal rhinestones and set them in place where the berried were stamped on the image. And the card was done.  See, I told you it was quick and easy!

Thank you SO very much for taking your time to stop in and see today's Christmas card,
Wanda

Monday, December 19, 2022

Framed & Festive, Boughs of Holly, Merriest Moments, Christmas Card, Stampin' Up!

Here is another card kit I had received from Terri. I changed it a little. You can see her link to the card kits here

The base of the card is a folded half-sheet of Basic White card stock. This card opens on the right and the fold is on the left. 

The Designer Series Paper (DSP) is from the "Boughs of Holly" 12" x 12" package. It was cut at 5-1/2" x 2".  There was a 5-1/2" x 2-1/4" piece of Evening Evergreen card stock for the layer in the kit. I taped the two pieces together and then taped them to the front of the card about 1/4" from the fold.

Next I put the poinsettia together. There were two pieces in the kit, a small and a large. I added the pretty rhinestones that were included. I put Dimensionals behind it and set it aside.  

The Basic White circle was in the kit and I cut an Evening Evergreen circle and taped the two together. I added Dimensionals to the back of it and set the circle in place on the front of the card. Then I added the poinsettia. I added some glue to the two leaves that were in the kit and I slid them under the flower.

The words are from the "Framed & Festive" set and were stamped using black Memento ink. I was going to use Evening Evergreen ink but it's SO dark that it would look black anyway so I played lazy and just used the black that was sitting in front of me. I stamped the words on a piece of Basic White card stock and I trimmed them to 3/8" x 2". And then I cut a layer that measured 1/2" x 2-1/8" and I taped the two layers together. I added Dimensionals to the back and I set the words in place on the front of the card about 1/2" from the bottom edge and 1/4" from the right edge of the card and the card was done.

This was fun to make. I love card kits because all of the cutting is done for you.  Such a deal. Kind of like Paper Pumpkin, stamping with little effort or supplies!

Thank you SO much for taking your time to stop in and see today's Christmas card,
Wanda

Sunday, December 18, 2022

Penguin Place, Sweetest Christmas, Christmas Card, 2022 Stampin' Up!

This is what happens when you make it up as you go. I share them all with you.  After adding the leaves I started to like the card a little more. But it's not what I was expecting when I started.

The base of my card is a folded half-sheet of Basic White card stock. This card opens on the right and the fold is on the left. 

I had gotten the strips of Designer Series Paper (DSP) from Terri in a kit as a thank you for placing an order. I had received several kits. The DSP is from the "Sweet Christmas" 12" x 12" package. In the candy cane kit I was sent had three strips of DSP. Since I used a couple of candy canes on two other cards, I thought I would make a card from her kit. But I got lost along the way (LOL) and went a different route. I had taken those three strips of DSP for the kit cards and I taped them to a piece of Basic White card stock that measured 5-1/2" x 3". I cut the piece in half at 2-3/4" and I flipped it around. Then I taped those two pieces to a 5-1/4" x 3-1/4" piece of Really Red card stock and then that was taped to the front of the card, lining up the top, left and bottom equally as possible by eying it. 

The words are from the "Penguin Place" set and were stamped using Garden Green ink. And after stamping I began die cutting the circles. I used the smallest circle in the "Layering Circles" for the words and the next largest one in Real Red for the layer. Then I die cut the largest circle in the set using Real Red card stock and I used the next size smaller circle on a piece of Basic White card stock. I taped the circles together, added Dimensionals behind them and set them aside. 

The candy canes are from the same "Sweetest Christmas" DSP package.  I had received mine already die cut. I taped the two together after arranging them to where I thought they looked the best. Then I added Dimensionals behind them. Then I had to remove some Dimensionals because I didn't pay attention to where they hung over the circle.  

I set the large circle in place on the front of the card, centering it on the right . Then I set the word piece in place.

Next the candy canes were set in place. I added the bow that came in my kit. And the leaves are from another kit I was sent. I had them sitting out and thought the candy canes could use something behind them since that area was so open and bright looking.  And that was it.

Not one of my favorites! And this is what you get when you make it up as you go with nothing in mind.

Thank you SO very much for taking your time to stop in and see today's Christmas card,
Wanda

Saturday, December 17, 2022

Penguin Place, Sweetest Christmas, Christmas Card, Stampin' Up! 2022

Well, since I took a candy cane from the kit that Terri sent me it shorted me a candy cane for one of the cards. SO today I took another candy cane from the kit and made this card. 

The base of the card is a folded half-sheet of Garden Green card stock. The card was cut in half on the short side so after it was cut it measured 4-1/4" x 11".  I scored it at 5-1/2" and folded it. 

I cut part of the front off at 3-1/4". This piece will be used for the top layer.

I cut a 4" x 5-1/4" piece of basic White card stock and taped it to the inside of the card.

Then I cut a 2" x 4" piece of Designer Series Paper (DSP) from the "Santa's Express" 12" x 12" package. I taped that to the top part of the card.

A 3" x 4" piece of Basic White was cut for the front panel. I textured it using the pine branches folder in the "Wintry 3D" set. I glued that piece to the Garden Green piece I had cut off. Then this piece was taped to the front of the card. Make sure you only tape the upper part so you don't tape the card shut.

The words are from the "Penguin Place" set and were stamped using Poppy Parade ink. I die cut them with the smallest circle die in the "Layering Circles" die set and then took the next larger one and die cut a Real Red circle. I taped the circles together and added Dimensionals to the back. I set it aside.

The candy cane was added using Dimensionals on the back and I also added a Dimensional to the Real Red bow. 

The word piece was set in place and the card was done.

This is a very quick and easy layout to play with and a fun card to make. 

Thank you SO very much for taking your time to stop by and see today's Christmas card,
Wanda

Friday, December 16, 2022

Sweetest Christmas, Santa's Delivery, Christmas Card, Stampin' Up! Fall 2022

I had been whining because I had regrets about not getting the "Sweet Candy Canes" bundle. I thought they were cute but I had made my shopping choices and just couldn't fit it into my budget. When I had placed my order with Terri, I had received a fun packet. It's something she sends out when you order. A fun little perk. And the best one for me. Lo and behold my packet had the candy canes, along with other card stock to put together a card she has designed for you to follow along on her website. Sometimes I follow and sometimes I don't.  Today I didn't, though I do like her designs. I found this one on Pinterest and took the candy cane and card stock and got to work putting it together with the materials I had. You can see the original card here. Though there are no instructions on how to make it if you click through the link on Pinterest. So read on to see how I made the card.

The base of the card is a folded half-sheet of Basic White card stock. This card opens on the right and the fold is on the left. I cut a 3-7/8" x 5-1/8" piece of Basic White card stock for the top layer. I textured that layer using the snowflake folder from the "Wintry 3D" embossing folder set. I had to emboss it twice because these folders are not as wide as the standard ones.  But I got it to look pretty seamless! Plus when you add things to the top of it, it makes it more difficult to spot where you joined the two. I glued this to the card base.

The snowflake is from another kit Terri had sent. I am looking forward to putting that kit together too. I have several of them sitting here to be put together. I just need to find some extra time (in December???) to work on them. It's not like it's all that difficult, everything is all cut for you.  Anyway, I glued the center of the snowflake to the right side of my card. I had to switch my card around because the candy cane I wanted went the opposite direction so I just switched up things.

After gluing the snowflake in place I stamped the words from the "Santa's Delivery" set. I used Real Red ink. I had set it up in my Stamparatus and I stamped over it twice and it got a bit darker than I wanted. I trimmed the words to 2" x 3/4".  I added Dimensionals to the back and set it aside.

Next I took the candy cane that had been precut for me and I took some red ribbon that I had and made a bow. Then used a couple small glue dots to hold the bow onto the candy cane. Dimensionals were added to the back and the candy cane was set in place on the left side of the card. The words were added to the bottom right and the card was finished.

I do like how it turned out. It's colorful and festive looking.

Thank you SO much for taking your time to stop in and see today's Christmas card,
Wanda


Thursday, December 15, 2022

Framed & Festive, Christmas Card, Stampin' Up! 2022

Today I thought I would play with some circles. I wasn't sure where I was going with it but this is what I ended up with.

The base of my card is a folded half-sheet of Basic White card stock. This card opens on the right and the fold is on the left.

I cut a 4" x 5-1/4" piece of Garden Green for the background and I die cut the largest stitched circle die from the "Stylish Shapes" set from the center of the piece. I cut the circle in half.

Then I die cut a circle using the largest die from the "Layering Circles" die set and the "Painted Christmas" 12" x 12" package of Designer Series Paper (DSP). I cut the circle in half. Then I taped it to the Garden Green circle halves.

The words are from the "Framed & Festive" set and were stamped using Garden Green ink. I die cut them using the third largest stitched circle in the "Stylish Shapes" die set. And I die cut a Garden Green scalloped circle from the "Layering Circles" die set. I taped those two pieces together. I added Dimensionals to the back and set the piece aside.

To assemble the card I taped the Garden Green background piece down and then the Basic White piece on top.

The half circles were taped about 1/4" from the edges. And the word piece was set on top. After putting it together the back looked so bare so I took my Real Red marker and flicked on some color. I probably should have textured the Basic White piece in stead because I didn't like the looks of the red on it and I had to mask my circles so I didn't get Real Read on them.  I could take it apart and replace the Basic White piece with a textured piece but I'm leaving it because I show you all my cards, the good the bad and the ugly!!! This one is not good!!! LOL

Thank you SO very much for taking your time to stop in and see today's Christmas card,
Wanda

Wednesday, December 14, 2022

Penguin Place, Tea Holder and Saying, Stocking Stuffer, Weekend Project, Stampin' Up!

Today I thought I would make a tea holder gift for a friend to put in a bag I have for her for Christmas.  It's fun to make and easy too. And here's how you can make your own.

I took a piece of Designer Series paper (DSP) from the "Santa's Express" 12" x 12" package. I cut it 3-1/4" x 8-1/4".  Then I scored it at 2-3/4" and 5-1/2". Fold the score lines inward.  Don't worry if you didn't score them perfectly, you can fold the right over the center and then the left or vice versa, one way will look better than the other. Pick the one that looks better on the outside.

Next you're going make the pocket. You have three sections. On the third section, the one on the right end, mark the right edge 1" from the bottom corner. Then you're going to cut from that mark to the top of the score line. This will create a diagonal pocket for the tea bag to be tucked in. Before you glue the pocket, set your tea bag inside so you can see how much distance you have between the bottom of the tea bag and the bottom of the pocket. Glue the side and bottom of the pocket, gluing as close to the edge as possible.  I made another one a while back, you can see here to get an idea of what I mean about the pocket. Set the piece aside to set up.

Next you can print out the words for the back or you can leave it plain. You can cut and paste the words and print them on your printer

 On Christmas Day

At half-past three,

Have yourself a cup of tea.


I’ll think of you,

You’ll think of me,

Sitting around the Christmas tree.

For my font I used Liberation Serif and set it to 10pts. You can adjust yours to whatever font you'd like and adjust the size accordingly. You just want to make sure it will fit on the back of the tea holder. I printed mine out on Basic White card stock.   I cut my words to 1-1/2" x 2-1/8". I sponged the edges of mine using Evening Evergreen ink.

There is a reason for the space between the wording. It's so you can read the poem on the back with the belly band in the middle. Now I glued mine without thinking about that belly band. Duh! But once the band is removed the words will show just fine. It was just nicer to see them with the band on.

So now lets make the band. You will be taking a piece of card stock. I used Evening Evergreen and I cut a 1/4" strip that was 11" long. There's no scoring here. You are going to take one end of the strip and place it near the center of the front of the holder. Then wrap the band around the holder and meet back in the front. It should overlap at least 1/4" so you can glue it together. Snip the piece and then glue it while it's still on the holder. Be careful not to get glue on the holder or the band won't come off.

And for the design. You can find greetings or an image to stamp or die cut. I chose to use the penguin from "Penguin Place".  I punched the penguin out using the matching punch and Basic Black card stock. Then I punched out the belly. I glued the belly to the body. Then I stamped the eyes using black Memento ink. The beak was stamped using Crushed Curry ink and the feet were punched using Crushed Curry card stock.  I stamped the hat and scarf using Evening Evergreen ink. I wasn't happy with it because it looks black. I fussy cut them and glued the hat, scarf and feet in place. 

Next I die cut a stitched circle from the "Stylish Shapes" dies. I used the third largest one for my background. I used my Blending Brush and brushed on some Evening Evergreen on the edges and then scrubbed some on the circle to tone it down. Then I added some glue to the center area of the band and set the circle in place. I set a few stamping blocks on top to weight it down while the glue setup.

And that was it.  These are fun to make and easy too. These make great stocking stuffers.

Thank you SO much for taking your time to stop by and see today's stocking stuffer,
Wanda


Tuesday, December 13, 2022

Framed & Festive, Christmas Card, 2022 Stampin' Up!

I found today's card on Pinterest.  I thought it was so pretty, though I did mine the quicker way! You can see the original card here

The base of the card is a folded half-sheet of Basic White card stock. This card opens on the bottom and the fold is on the top.  

I took a 4-1/8" x 5-3/8" piece of Designer Series Paper (DSP) from the 2021-2023 In colors 6" x 6" stack. I used Evening Evergreen.  I always forget I have these little stacks. I buy them when they come out and I hardly use them. I may have to rethink my purchasing in the future, especially when they retire too quickly.

Next I cut a 3-3/4" x 5" piece of Basic White card stock and textured it using the pine branches embossing folder in the "Wintry 3D" pack. There is a snowflake one in the set too. These are not as wide as the standard folders so I had to emboss it twice. I embossed half the sheet at time.

I took a piece of DSP from the "Fitting Florets" 12" x 12" package and die cut the flowers. On the original card, the flowers were stamped and colored in. That's where I made mine quicker. I didn't feel up to coloring today. There's SO many more things that need to be squished into each day in December and where I can save a few minutes is always a good thing. 

Then I die cut the oval from the "Framed Florets" die set using Basic White card stock. 

The words are from the "Framed & Festive" set and were stamped using black Memento ink and were trimmed to 3/8" wide.

Now I was ready to assemble.

I taped the Evening Evergreen DSP to the front of the card.  Then the embossed piece was glued in place.

The plain oval was glued in place and then the textured frame was set in place using Dimensionals.

Dimensionals were added behind the flowers and they were set in place on the center of the oval piece.

The words were trimmed and cut apart. Then the "Merry" was glued to the upper part of the oval and the "Christmas" was glued to the lower part, plus a small Dimensional was added to the part that hangs over. It needed to be more stable, it sort of flopped downward.  And that was it.

This was a fun and quick card to make. I like this layout and am thinking of making some birthday cards using it. I just love these frames in the set.

Thank you SO very much for taking your time to stop in and see today's Christmas card,
Wanda

Monday, December 12, 2022

Framed & Festive, Christmas Card, 2022 Stampin' Up!

I saw today's card on Pinterest and thought I'd give it a try. I have a sinking feeling I am going to need to make a few more Christmas cards to send out. So I'm going to be ready for them. You can see the original card here

The base of the card is a folded half-sheet of Soft Succulent card stock. This card opens on the right and the fold is on the left. 

I cut a 2" x 5" piece of Designer Series Paper (DSP) from the "Fitting Florets" 12" x 12" package. I taped it to the front of the card base on the left.

Then I die cut a Basic White oval using the die from the "Framed Florets" die set. 

And I die cut the flowers from the "Fitting Florets" DSP. There's a die that matched the flowers.

The words are from the "Framed  & Festive" set and were stamped using Evening Evergreen ink on a piece of Basic White card stock.  I took my Blending Brush and scrubbed on some Evening Evergreen to tone it down a bit. It was just too bright and it took away from the frame it came out of.

Now to assemble the card.

The ring of the die cut oval has Dimensionals added to the back of it. I set it in place on the lower right side of the card. Then I taped the word piece inside.

The flowers were set in place using Dimensionals on the outer side and a bit of glue on the oval frame.

I used a "Gold Swirls" embellishment on the bottom of the word piece and I added a 4" x 5-1/4" piece of Basic White card stock on the inside and the card was done.

This card was fun and easy to make. I like the colors and I'm ready if I need to send it out. Or I have a start on next years cards!!! LOL

Thank you SO very much for taking your time to stop in and see today's Christmas card,
Wanda

Sunday, December 11, 2022

Framed & Festive, Celebrate Everything, Christmas Card, Stampin' Up! 2022

Today I finished getting my Christmas cards made, addressed, sealed and ready to mail  Then I remembered I had one more so I ran to my workroom and whipped up a quick card and here it is. It was quick to make and simple to do.

The base of the card is a folded half-sheet of Garden Green card sock. I cut the sheet in half on the short 8-1/2" side so when I was done cutting it measured 4-1/4" x 11". I folded it in half at 5-1/2".  Then I cut it off at 8". The piece I cut off was used on the front so don't lose it.

Next I cut a 4" x 5-1/4" piece of Granny Apple Green for the inside layer and a 2-1/4" x 4" piece for the top part of the card. I textured the top part using the branches image from the "Wintry 3D" embossing folder set. I glued that piece to the upper part of the card. 

Then I cut a 2-3/4" x 4" piece of Designer Series Paper (DSP) from the "Celebrate Everything" 12" x 12" package. I taped it to the Garden Green piece I cut off.  I also cut a 2-3/4" x 4" piece of Basic White for the inside but I set it aside for now. 

The words are from the "Framed & Festive" set and were stamped using Garden Green ink. I die cut them with the second largest stitched circle die in the "Stylish Shapes" die set. I set in place on the DSP using Dimensionals. Then I set the DSP layered piece in place using Dimensionals at the top only or you'll tape your card shut.

I added tape to the back of the Basic White 2-3/4" x 4" piece and lined it up on the backside of the front piece and closed the card gently. I did it gently incase it ended up crooked. Mine did but it was easy to straighten out and I knew it was in the right place.

I thought the word piece looked a bit bare. So I fussy cut the holy and berries from a scrap piece of the same DSP and glued it to the circle. It was just what the circle needed.  And now to write in it and get it ready to mail in the morning.

This card was fun and quick to make. I think it would be a nice layout for other types of cards too. I have lots of DSP to play with and lots of birthdays and anniversaries coming up next year. So I'm going to keep this layout in mind. 

Thank you SO very much for taking your time to stop by and see today's Christmas card,
Wanda

Saturday, December 10, 2022

Penguin Place, Santa's Delivery, Christmas Card, 2022 Stampin' Up!

When I had opened up my "Penguin Place" set the other day I noticed that I had a penguin in it that was already punched out and the white part was not only punched out but taped to the body. So I thought I'd use it on today's card, somehow! 

First the penguin needed eyes, a beak and feet. I stamped the eyes using black Memento ink. The beak was stamped using Crushed Curry ink and the feet were punched out using Crushed Curry card stock. I glued the feet in place since they were kind of tiny for taping.

Using Garden Green ink, I stamped and then fussy cut the hat and scarf. I glued the hat on the head and the scarf under the neck. 

I took out my "Santa's Delivery" Designer Series Paper (DSP) and I found some scraps to use up. The Poppy Parade strip measures 5-1/2" x 1-1/2". The Garden Green layer behind it measures 5-1/2" x 1-3/4". I taped the two together and set them aside. 

The polka dotted paper measured 1-3/4" x 3-1/2" and the Garden Green layer measured 2" x 3-3/4". I taped the two pieces together.

The strip with the words measured 1" x 4" and the Garden Green layer measured 1-1/4" x 4-1/4".  Before taping them I stamped the words from the "Santa's Delivery" set using Real Red ink. I should have uses Poppy Parade but I wasn't paying attention. 

I die cut a 1-5/8" Basic White circle and a Garden Green scalloped circle just a little bit larger from the "Layering Circles" die set. Before I taped the two circles together I took my Blending Brush and lightly scrubbed on some Garden Green ink. I needed to tone down the background of that circle a little.

Now I was ready to assemble the card. I taped the dotted piece in place first, making sure the top, right and bottom were close to equal distance apart. Then I added the Poppy Parade strip about 1/2" from the fold. 

The word strip was added next and it's about 1-1/4" from the bottom edge. The scalloped circle was then taped in place. The penguin was set in place using Dimensionals and I had found a little tree in the stamp set that was all cut out and just sitting there, so I glued it to the penguin. And the card was done

This was a very fun card to make. I love layers and this card sure does have lots of them!

Thank you SO much for taking your time to stop in and see today's Christmas card,
Wanda

Friday, December 09, 2022

Framed & Festive, Caroling Mice, Christmas Card, 2022 Stampin' Up!

On Thursday I had a friend over and we were making Christmas cards. I had made one something like this but used a different tree from a die I had gotten at Michael's. I took a picture of it but it must have gotten deleted because it was no longer on my phone when I went to get it. SO I made a new card that is close to the other one.

The base of my card is a folded half-sheet of Basic White card stock. This card opens on the right and the fold is on the left.

I cut a 4" x 5-1/4" piece of Shaded Spruce card stock for the layer. And a 3-3/4" x 5" piece of Designer Series Paper (DSP) from the "Santa Express" 12" x 12" package. 

Next I stamped the words from the "Framed & Festive" stamp set using Shaded Spruce ink on a piece of Basic White card stock. I die cut it using the second largest stitched circle die from the "Stylish Shapes" die set. And I die cut a scalloped Shaded Spruce circle using the second largest die in the "Layering Circles" die set.

Then I die cut a stitched circle using the third largest die from the "Stylish Shapes" die set on a scrap piece of Basic White card stock.  I also cut a scalloped circle from the center of the 4" x 5-1/4" layer of Shaded Spruce card stock. The 4th smallest scalloped die in the "Layering Circles" die set.

The tree is from the "Caroling Mice" set and was stamped using black Memento ink on a scrap piece of Basic White card stock. It was fussy cut and then I colored it in using my Blender Pen and Shaded Spruce ink pad. The trunk was colored in using the Soft Suede marker. I colored over the tree using my "Wink of Stella" pen. 

I took the Basic White circles, my Blending Brush and Shaded Spruce ink and lightly scrubbed some ink on them.

Now to assemble the card. I taped the DSP to the Shaded Spruce layer and then taped that to the front of the card.

Next I taped the circles together. I added Dimensionals behind both sets. I set the word piece in place first and the smaller circle. And finally the tree was set in place using Dimensionals.

This was a fun and quick card to make and you get to use some of that busy background paper!

Thank you SO very much for taking your time to stop in and see today's Christmas card,
Wanda

Thursday, December 08, 2022

Framed & Festive, Painted Christmas, Christmas Card, Stampin' Up! 2022

Today I wanted to try to keep my card quick and simple plus use a larger piece of Designer Series Paper (DSP) because I have SO much left and the month is going by quickly. As I see it, I will not be using up any of the packages I bought. That causes me to rethink my purchases in the future. Anyway, I did use up a nice chunk of DSP today.

The base of my card is a folded half-sheet of Basic White card stock. I cut a 4-1/8" x 5-3/8" piece of Real Red for the layer. The DSP is from the "Painted Christmas" 12" x 12" package and I cut it at 3-7/8" x 5-1/8". I taped the DSP to the Real Red piece and then that was taped to the card base.

The words are from the "Framed & Festive" set and were stamped using Garden Green ink. Rethinking that I probably should have used Real Red so they popped out more but I just left it as it was (for now). I die cut the words using the second largest stitched circle die from the "Stylish Shapes" set. Then I die cut a Garden Green scalloped circle from the "Layering Circles" die set. I used the second largest one in that set. I taped the two circles together and added Dimensionals to the back. I set the piece in place on the front of the card and the card was done.

I told you it was quick and simple! I need that this time of year! So many extra things we do in December and it's so odd that we manage to get them all done too!  Kind of makes me wonder what I do with my time the rest of the 11 months in the year!!!  LOL

Thank you SO very much for taking your time to stop in and see today's quick Christmas card,
Wanda

Wednesday, December 07, 2022

Penguin Place, Christmas Card, Stampin' Up! 2022

I subscribe to "Crafty Roots" blog and today there were three versions of the penguin card and when my eyes hit the third card I knew it was the one I wanted to make. The first one was simple and the second one was a step up but the third one had a lot more going on. I just love the look and the colors. You can see the original card here

The base of the card is a folded half-sheet of Pool Party card stock. This card opens on the right and the fold is on the left. The measurements on the original card/post are not USA measurements, so here's how I adjusted it to fit the standard size A2 cards we make. 

I cut a 3-7/8" x 5-1/8" piece of Shaded Spruce card stock and I die cut the second largest scalloped circle from the "Layering Circles" die set from it before I moved on.

Then I cut a 3-3/4" x 5" piece of Basic White for the focal piece.

For the background lines and trees I kind of worked them together. I used Pool Party for the lines (except for the bottom one, it's Shaded Spruce  - by accident-). I stamped the bottom left one first and then stamped the trees. I inked up once and stamped three images. Then I made the next hill and added those two trees. And the final hill was added and trees went all across the hill. 

Now it was time to die cut the circle. It measures 2-11/16". It's the second largest circle in the set. After die cutting it, I stamped Pool Party snowflakes all over the upper part and then I stamped some in the upper right and left corners. I took my Blending Brush and scrubbed in some Pool Party ink on the sky of the circle and then all around the edges and corners of the focal piece. I took a kitchen steel scrubber (not steel wool) and I poured a little white acrylic paint on some scrap paper and spread it around then dabbed the scrubber onto the paint and then onto my focal piece. I did put the circle back in place before I started stamping with the paint.

The circles were taped together. 

Next came the penguin. He is from the "Penguin Place" set and was stamped using black Memento ink. I stamped the hat and bow tie using Cherry Cobbler ink. I fussy cut the hat and bow tie and the penguin was punched out. I punched out two feet using some scrap Crushed Curry card stock. And the beak was stamped using Crushed Curry ink. I glued the had and bow in place. Dimensionals were added behind the penguin.

Next the words were stamped and they are from the same "Penguin Place" set and I used Shaded Spruce ink to stamp them.

Now it was time to assemble the card. I added a 4" x 5-1/4" piece of Basic White to the inside of the card. Then the focal piece was taped to the Shaded Spruce piece. The circles were added, trying to line the scenery up as much as possible. The penguin was added next and then the pearls. They were white but were colored with the dark Pool Party Blends Pen. Once they were set in place the card was done.

Isn't it cute? See why I had to make it? It was fun too!! I was a bit leery because I don't often stamp with the blocks anymore, I mostly put my stamps in my Stamparatus so I can be sure I get a nicely inked image. It was fun and it worked!

Thank you SO very much for taking your time to stop in and see today's Christmas card,
Wanda

Tuesday, December 06, 2022

Grassy Grove, Santa's Delivery, Painted Christmas, Christmas Card, Stampin' Up! 2022

I got my motivation for today's card from one I saw on Pinterest. You can see that card here

The base of my card is a folded half-sheet of Basic White card stock. This card opens on the right and the fold is on the left. 

I cut a 4" x 5-1/4" piece of Basic Black card stock for the layer.

The Designer Series Paper (DSP) is from the "Painted Christmas" 12" x 12" package.  I cut it at 3-7/8" x 5-1/8". I used the black and white piece and used my Blending Brush to scrub on some Cherry Cobbler. I started out with Real Red but it looked more like Poppy Parade so I went with the Cherry Cobbler ink instead. I set it aside to dry because the paper was pretty saturated with ink.

In the meantime I cut a 1-1/2" x 3-7/8" strip of DSP from the "Painted Christmas" package. 

Then I took the second largest circle from the "Layering Circle" dies and cut it from a piece of vellum. I textured that circle using the pine branch embossing folder from the "Wintry 3D" set. 

The deer is from the "Grassy Grove" bundle and I die cut the larger deer from a scrap piece of Basic Black card stock. I had some red and black checked ribbon and I trimmed it down to fit around the deer's neck. I tied it and then glued it in place. Dimensionals were added to the back of the deer and I set it aside.

For the wording I used the "Santa's Delivery" set and stamped them using black Memento ink on a scrap piece of Basic White card stock. I die cut them using the tag from the "Taylor Made Tags" die set. I was glad to finally use it. I just had to have the dies for some reason and once they arrived I couldn't remember why. So when I was making this card I thought I could fit the tag in and it worked. The tag set also has round circles to die cut too so I cut one from a scrap piece of Cherry Cobbler card stock and I taped it to the tag, lining up the hole in the tag to the hole in the circle. I colored a crystal rhinestone using my Blends Pen and colored it in. Then I set it on the tag.

Now to assemble. The Basic Black piece is taped to the card base. Then the DSP was taped down. The DSP strip was taped down about 1" up from the edge of the red and black DSP piece. The vellum sheet is added next. I glued it where the deer would cover it, glue shows up through the vellum. I also took a toothpick and ran a light amount of glue around the inner edge of the circle to get it to lay down better. I used the Mono glue and by adding it lightly it didn't show much.  Then the deer was added and lastly the word tag. And the card was done.

It turned out better than I thought it would, I think adding the word piece as what helped it out.

Thank you SO very much for stopping in to see today Christmas card,
Wanda

Monday, December 05, 2022

Framed & Festive, Painted Christmas, Christmas Card, Stampin' Up! 2022

I was looking through my Designer Series Papers and found this pretty pinecone one. I thought what a great card this would be for a single guy. It's a bit on the masculine side but yet it isn't! I just think the pinecones are SO pretty and I got to work on a card and this is what I came up with.

The base of my card is a folded half-sheet of Basic White card stock. I cut a 4" x 5-1/4" piece of Evening Evergreen for the layer. Before I did anything else with this piece, I die cut a  2-7/16" circle from the center. I try to do this right away because once I get into the assembly mode I forget and then have to take a new piece of card stock to make the circle. It seems like such a waste.

Next I cut my 12" x 12" sheet of DSP from the "Painted Christmas" package. I cut it into 4" x 5-1/4" and then later trimmed it to 3-7/8" x 5-1/8".

The words are from the "Framed & Festive" set and were stamped using Evening Evergreen ink. I die cut them using the second largest stitched circle die from the "Stylish Shapes" die set. I taped the Basic White circle to the Evening Evergreen circle and then added Dimensionals to the back.

A 3-7/8" x 1-1/2" piece of Soft Succulent was cut for the bottom and then it was textured using the pine needle folder from the "Wintry 3D" embossing folder set. I glued the strip to the bottom of the DSP. 

I cut a 3-7/8" x 1/4" strip of Basic White card stock and glued it just above the Soft Succulent piece, making sure the edges match so there's no gap.

The pine cone DSP is taped to the Evening Evergreen piece and that piece is set in place on top of the card base using Dimensionals. 

Then the word piece is set in place and the card is done.

So quick, easy and simple.  Who doesn't need that this time of the year?  I made 8 like this and I think that about wraps up my Christmas cards to mail out! Maybe!! LOL

Thank you SO very much for taking your time to stop in and see today's Christmas card,
Wanda


Sunday, December 04, 2022

Framed & Festive, Lights Aglow, Christmas Card, Stampin' Up! 2022

Today I wanted to make a card that was quick, simple and easy to reproduce. And since this card only uses a small strip of Designer Series Paper (DSP) you could get quite a few pieces out of a sheet. 

The base of my card is a folded half-sheet of Basic White card stock. My card opens on the right and the fold is on the left. 

I cut a 5-3/8" x 4-1/8" piece of Evening Evergreen card stock for the layer. I could have made the card base using a half-sheet of Evening Evergreen but I was trying to cut costs since I'm planning on making some to send out.  

Before I taped the Evening Evergreen piece to the front of the card base I die cut a circle from the center using the  2-7/16" die from the "Layering Circles" set. No one will ever know there's a hole in the center of that layer. I used tape instead of glue to set the Evening Evergreen piece in place. 

Next I took a 3-7/8" x 5-1/8" piece of Basic White card stock and textured the right side using the "Wintry 3-D" embossing folder. 

A 1-1/4" x 5-1/8" piece of DSP from the "Lights Aglow" 6" x 6" package was cut for the strip.  You can get 4 strips from one 6" x 6" sheet. You can get 18 strips from a 12" x 12" sheet.  That would be half the cards I need right there!! I'm cutting back this year due to the rising cost of postage.

So once the DSP was cut I taped it to the left side of the embossed piece. Dimensionals were added to the back and the piece was set in place on the Evening Evergreen piece. 

The words are from the "Framed & Festive" set and were stamped using Evening Evergreen ink on a piece of Basic White card stock. I die cut them using the stitched die from the "Stylish Shapes" die set. I taped the word circle to the Evening Evergreen circle and Dimensionals were added to the back. I set the piece in place on the front of the card and the card was done.

Mission accomplished. I created a quick, simple and easy card! And it turned out!! LOL

Thank you SO much for taking your time to stop by and see today's Christmas card,
Wanda

Saturday, December 03, 2022

Framed & Festive, Wintry 3D Embossing Folder, Stampin' Up!

Today's card is a very quick and simple one to make. This is not what I had in mind but after doing what I needed to do to make it work I'm happy with the way it turned out.

First you need a folded half-sheet of Basic White card stock for your card base.

Then you will need a 4" x 5-1/4" piece of Basic White card stock for the layer. I added Dimensionals to the back and set the piece in place on the front of the card base.

I took another 4" x 5-1/4" piece of Basic White card stock and textured one end of it using the "Wintry 3D" embossing folder. I used the full quarter sheet because I wanted to make sure I was able to get the entire folder textured onto the card stock. These are not a full-sized folder so you don't get texture on a full piece, it comes down about 3-1/4" x 4".  I trimmed the bottom part off so the piece was 3-1/4" long and 3-7/8" wide. Then I cut the strips just shy of 1" each. To do this I just cut on the shorter side of the 1" mark on my cutter. I added Dimensionals behind each strip. I set the left and the right strips in place and then the center two. You want to make sure you don't mix up the pieces or the image won't be back together, kind of like a puzzle. 

The words are from the "Framed & Festive" set and were stamped using Pool Party ink and die cut using the second largest stitched die from the "Stylish Shapes" die set.

I die cut a Pool Party circle using the 2-7/16" die from the "Layering Circles" die set. I taped the two circles together. I added Dimensonals on the lower part and glue on the upper part. I have an issue with tape when it comes to adding it to an embossed piece. I don't seem to get enough surface contact to make it stick well so I just use glue and know it's going to stay in place. Though this piece would stay in place without any glue or tape because of the Dimensionals but then the upper part might stick up (maybe, I don't know, I didn't let it get that to that point, I glued it). And that was it. Just quick and simple. 

This is a card you could quickly make a lot of in not time. To speed things up you could omit the strips and just use a solid piece instead.

Thank you SO very much for taking your time to stop in and see today's Christmas card,
Wanda