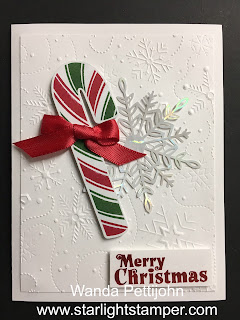
The base of the card is a folded half-sheet of Basic White card stock. This card opens on the right and the fold is on the left. I cut a 3-7/8" x 5-1/8" piece of Basic White card stock for the top layer. I textured that layer using the snowflake folder from the "Wintry 3D" embossing folder set. I had to emboss it twice because these folders are not as wide as the standard ones. But I got it to look pretty seamless! Plus when you add things to the top of it, it makes it more difficult to spot where you joined the two. I glued this to the card base.
The snowflake is from another kit Terri had sent. I am looking forward to putting that kit together too. I have several of them sitting here to be put together. I just need to find some extra time (in December???) to work on them. It's not like it's all that difficult, everything is all cut for you. Anyway, I glued the center of the snowflake to the right side of my card. I had to switch my card around because the candy cane I wanted went the opposite direction so I just switched up things.
After gluing the snowflake in place I stamped the words from the "Santa's Delivery" set. I used Real Red ink. I had set it up in my Stamparatus and I stamped over it twice and it got a bit darker than I wanted. I trimmed the words to 2" x 3/4". I added Dimensionals to the back and set it aside.
Next I took the candy cane that had been precut for me and I took some red ribbon that I had and made a bow. Then used a couple small glue dots to hold the bow onto the candy cane. Dimensionals were added to the back and the candy cane was set in place on the left side of the card. The words were added to the bottom right and the card was finished.
I do like how it turned out. It's colorful and festive looking.
Thank you SO much for taking your time to stop in and see today's Christmas card,
Wanda


SO FUN.
ReplyDeleteThe candy cane bundle was one of my MUST HAVE from the Mini Catalog.
Love the candy cane with the red ribbon bow. I have watched some of Terri's videos and just signed up for her newsletter.
ReplyDelete