Wednesday, November 30, 2022

Santa's Delivery, Santa Express, Christmas Card, Stampin' Up! Fall Catalog 2022

This card was a "must make" when I saw it. I saved it for a later date because I had a couple other ones I wanted to make first. I think it was all the red and then the white circle that drew my attention to this card. You can see the original card here. I'm trying my hardest to use up that package of Designer Series Paper (DSP) because we all know that when the catalog ends the paper retires. I have so much retired paper and then the colors change and I don't have the colors to go with the retired papers so I'm trying really hard to use it up. Wish me luck because it will be a first for me!

The base of my card is a folded half-sheet of Basic White card stock. I cut a 4-1/8" x 5-3/8" piece of Poppy Parade card stock and taped it to the front of the card. Then I cut the DSP from the "Santa Express" 12" x 12" package at 3-3/4" x 5" and taped that to the Poppy Parade layer.

I die cut a circle from the "Layering Circles" die set using Basic White card stock and the largest circle in the set. 

I die cut the train from the "Santa Express" DSP and set it on the circle using Dimensionals. Then I taped that to the front of the card about 3/8" from the left, top and right edges of the DSP.

The words are from the "Santa's Delivery" set and were stamped using Garden Green ink on a 3-3/4" x 3/4" piece of Mint Macaron card stock. I was going to change it to Granny Apple Green but it stuck out like a sore thumb, even though there was Granny Apple Green on the bottom part of the train. But the Mint Macaron can be found on the mittens so I stuck with that color. I taped the strip in place on the front of the card about 1/2" from the bottom edge of the DSP.  

A white bow was tied and glued in place and the card was done.

This was a very fun, quick and easy card to make. Plus it's so bright and colorful. It screams Christmas!!

Thank you SO much for taking your time to stop in and see today's Christmas card,
Wanda

Tuesday, November 29, 2022

Santa's Delivery, Santa Express, Christmas Card, Stampin' Up!

I found another card that uses the busy Designer Series Papers (DSP) that I so often struggle with.  This layout is perfect for busy DSP and I think I'm going to pull out some other papers that I found were a bit busy and see if I can't tone them down with this layout.

The base of my card is a folded half-sheet of Basic White card stock. This card opens on the right and the fold is on the left.

I cut a 4-1/8" x 5-3/8" piece of Poppy Parade card stock for the layer. 

Next I cut a 3-1/4" x 4-1/2" piece of Basic White card stock for the layer. And the DSP from the "Santa Express" 12" x 12" package was cut at 3-1/8" x 4-3/8".  I taped the DSP to the Basic White piece.

I used the lacy edge die from the "Painted Labels" die set, a part of the "Painted Poppies" set and die cut two from Basic White card stock. I cut two because I needed the piece to be a bit longer than the die allowed. I just lined up the two pieces to the length I needed and glued them together. If you look close you can see the edge of the top piece on the left.

A 1-1/4" x 3-1/8 piece of Basic White was cut for the back layer of the center panel. I glued the lacy edge to the bottom of that Basic White piece. Then I cut a 1" x 3-1/8" piece of DSP from the "Santa Express" package and taped it to the Basic White piece.

The words are from the "Santa's Delivery" set and were stamped using Poppy Parade ink on a scrap piece of Basic White card stock. I die cut it with a die from the "Painted Labels" die set. 

To assemble the card I took the large background layers and set them in place using Dimensionals. Then I added the center strip using Dimensionals.

The words piece was added using Dimensionals and on the upper part of that piece I stacked the Dimensionals to make the label level. 

I didn't have any Poppy Parade ribbon but I did have some ribbon that was close so I tied a bow and glued it in place. I added a red rhinestone to the word piece and the card was done.

This was a fun card to make and I was thrilled to be able to use some busy DSP. Though this piece of DSP had mixed feelings attached to it. On the backside are some cute colored holiday dots on a white background. But since I had this piece cut in and sitting in my package I thought I'd use it for this card. And I'm glad I did because now I could see how much this layout toned down the business of the DSP.

Thank you SO very much for taking your time to stop in and see today's Christmas card,
Wanda

Monday, November 28, 2022

Santa Express, Framed & Festive, Christmas Card, Stampin' Up!

I saw this card on Pinterest a few days ago and had left the window open on my computer and then my computer decided it was time to update something and I lost the photo. Fortunately it did it's thing shortly after I was done making the card. The only think I changed was the words. 

I think this die cut wreath from the "Santa Express" bundle is SO darn cute and that's why I was thrilled when I saw this card on Pinterest.  This card was easy to make and quick to put together. The dies are from the "Santa's Train" die set. 

The base of the card is a folded half-sheet of Poppy Parade card stock. This card opens on the bottom and the fold is on the top.

I cut a 3-3/8" x 4-5/8" piece of Basic White for the layer. And on top of that is a 3-1/4" x 4-1/2" piece of Designer Series Paper (DSP) from the "Santa Express" 12" x 12" package. I taped the DSP to the Basic White piece.

Next I die cut the stitched rectangle. I used the largest one in the grouping of four in the "Rectangle Stitched Framelits" set. I took a piece of Granny Apple Green card stock and cut a layer for the rectangle that is about 1/8" wider all around. I taped the Basic White piece to the Granny Apple Green piece.

I die cut three wreaths using Granny Apple Green card stock and three ribbons using Poppy Parade card stock. I glued the wreaths in place using a dot of glue at the top to start with. Once they were set, I lifted them up a little and using a toothpick with glue on it, I ran it across the backside of the wreaths and pressed them down.

The ribbons were set in place using a small Dimensional. Then the panel was set in place on the front of the card making equal space on the left, top and right sides.

The words are from the "Framed & Festive" bundle and were stamped using Poppy Parade ink. I die cut them with the smallest die in the same die set and from the same grouping of four dies. The words were set in place using Dimensionals.

Red rhinestones were added to the center of each bow. A 4" x 5-1/4" piece of Basic White card stock was added to the inside and the card was done. 

See, I told you it was easy to make and quick to put together.

Thank you SO very much for taking your time to stop in and see today's Christmas card,
Wanda

Sunday, November 27, 2022

Penguin Place, Framed Florets, Caroling Mice, Christmas Card, Stampin' Up!

I remembered that the "Penguin Place" set was brought back from last year. I thought it was such a fun set. There was a punch for the penguin but not for his hat or scarf. I've gotten spoiled by all the dies and punches but it wasn't bad to fussy cut so I decided I'd give my card idea a try and this is what I came up with.

The base of my card is a folded half-sheet of Basic White card stock. This card opens on the right and the fold is on the left.

I cut a 4-1/8" x 5-3/8" piece of Poppy Parade card stock for the layer. I die cut the oval from the "Framed Florets" die set from the center of that piece. Then I taped that piece to the front of the card.

Next I cut a piece of Designer Series Paper (DSP) from the "Painted Christmas" 12" x 12" package. I taped that on top of the Poppy Parade piece. I also die cut another oval using Basic White card stock.  I took the Basic White ova framed piece and traced the inside on a piece of scrap paper. I fussy cut around it about 1/8" but realized later I could have gone a bit bigger, like 1/4". I did this so I could glue the frame and circle back together with some stability to the piece.

I took the Basic White oval and sponged some Pear Pizzazz ink over it and then I took the snowflakes image from the "Penguin Place" set and stamped them using Pear Pizzazz ink. Unconventional snow and snowflake colors  but it fit with the background colors in the DSP. After stamping the snowflakes I glued the oval to the fussy cut oval. Then I added glue close to the inner part of the oval frame and added that to the fussy cut oval to make one solid piece. 

The penguin was punched out and the eyes and beak were stamped on using black Memento ink for the eyes and Mango Melody for the feet. The had was stamped using Poppy Parade and the scarf was stamped using Garden Green. Both were fussy cut. The feet were punched out from a scrap piece of Mango Melody card stock. The penguin was glued together, a couple of Dimensionals were added to the back and it was set aside.

I remembered I had a tree left over from the "Caroling Mice" set so I thought I'd use it on this card. I colored it with the dark Soft Sea Foam Blends pen and then with the Soft Sea Foam marker. I taped it to the oval and then the penguin was set in place. 

Dimensionals were added to the back of the oval piece and it was set in place on the front of the card about 1/4" from the edge of the DSP and equally spaced on each side.

I colored the snowflakes and tree with my Wink of Stella pen to give the card a bit of shimmer.

The words are from the "Santa's Delivery" set and were stamped using Poppy Parade ink. I took my Poppy Parade marker and ran it along the edges of the word piece that I had die cut using the smallest stitched frame die in the "Rectangle Stitched Framelits" set. The word piece was set in place using Dimensionals and the card was done.

It's festive looking!  I often wonder why penguins are a part of Christmas. They do not live at the north pole! Something for you to ponder!! LOL

Thank you SO much for taking your time to stop in and see today's Christmas card,
Wanda

Saturday, November 26, 2022

Caroling Mice, Framed & Festive, Christmas Card, Stampin' Up! 2022 Catalog

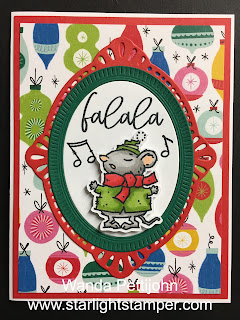
Do you ever wonder why you bought a certain stamp set?  I'm not sure why I bought the "Caroling Mice" set. Maybe because I thought it was cute and I didn't think beyond how I was going to use it. I am struggling with this set and I decided to take the set out today and make a card. This is what I came up with. 

The base of the card is a folded half-sheet of Basic White card stock.  This card opens on the right and the fold is on the left.

I cut a 4-1/8" x 5-3/8" piece of Poppy Parade card stock. I die cut the lacy oval from the center of the piece using the "Framed Florets" die set. I taped the Poppy Parade piece to the front of the card.

Next I cut a piece of Designer Series Paper (DSP) from the "Celebrate Everything" 12" x 12" stack and I taped it over the Poppy Parade piece.

The words are from the "Framed & Festive" set and were stamped on a piece of Basic White card stock using black Memento ink. Then I die cut them using the oval die from the same die set. I made sure the words were higher up on the  oval so I had room for the mouse.

The mouse is from the "Caroling Mice" set and was colored in using Blends pens. I used both light and dark Granny Apple Green, Poppy Parade, Gray Granite, and dark Petal Pink. I fussy cut the mouse and added Dimensionals to the back. I set it aside.

I taped the word piece to the center of the card. Then I used some post it tape to set the Poppy Parade oval around it. It took a bit of adjusting to get it equally around the oval. Then I glued the Shaded Spruce oval frame on top of the Poppy Parade frame. I used glue because I wanted it to get in between the openings in the frame so it would glue both down at the same time. It did in several places but not all of them. So I gave it a few minutes to set up and then lifted up the larger loose areas and added some glue to make sure it would stay.

Once the gluing was done I set the mouse on top of the oval so I could see where to stamp the musical notes. And after they were stamped I added the mouse and the card was done. 

I think I should have colored in the musical notes, they look kind of blah sitting there as they are.

This was a fun card to make and maybe sometime soon I'll play with the image that has the trio of mice.

Thank you SO very much for taking your time to stop by and see today's Christmas card,
Wanda

Friday, November 25, 2022

Grassy Grove, Framed & Festive, Christmas Card, Stampin' Up!

I had to make one more card using the deers from the "Grassy Grove" bundle. I found another card on Pinterest, though it was not made using Stampin' Up! images, I used what I had and converted it. I forgot to add the link to the original card. You can see it here

The base of the card is a folded half-sheet of Basic White card stock. This card opens on the right and the fold is on the left. 

I cut a 3-7/8" x 5-1/8" piece of Basic White card stock for the top focal piece.

The left and bottom edges of the focal piece were masked off at 3/4" each. 

Taking my Blending Brush I scrubbed on some Flirty Flamingo in the bottom corner. Then I scrubbed on some Mango Melody and using the brush almost dry of Mango Melody, I continued to scrub more up into the sky, making sure I kept it at an angle.  

The tree from the "Grassy Grove" set was stamped using black Memento ink.  I didn't add snow to this one because the sky didn't look like it is snowing, it looks like the sun is setting.

I die cut the smaller deer for this card. The larger deer was just a bit too big for the words I wanted to add.

The words are from the "Framed & Festive" set and were stamped using black Memento ink and then the deer was added using a couple of small Dimensionals.

I added Dimensionals to the back of the focal piece and set it in place on the front of the card base and the card was done.

This was a very quick and easy card to make and I got what I was looking for. 

Thank you SO very much for taking your time to stop in and see today's Christmas card,
Wanda

Thursday, November 24, 2022

Grassy Grove, Framed & Festive, Christmas Card

While looking in Pinterest I ran across a card that I thought was very pretty but nothing on it was by Stampin' Up!, my preferred stamps to use. SO I used what I had to make this. I was going to say I had gotten out my "Grassy Grove" bundle but we all know I never put it away from yesterday's card!!! LOL You can see the original card here.

The base of my card is a folded half-sheet of Basic White card stock. My card opens on the right and the fold is on the left.

I cut a 4" x 5-1/4" piece of Basic White card stock for the front focal piece. Actually I cut three that size. One I die cut a circle in it, centering it as much as I could. I used the largest circle from the "Layering Circles" die set. I used removable tape and affixed it to the focal piece. I took my blending brushes and first scrubbed on some Daffodil Delight ink. Then I scrubbed on some Pumpkin Pie ink and then a little bit of Cajun Craze. All of this was done on the right side of the circle. And on the left side, I scrubbed on some Balmy Blue, then some Soft Succulent and a little bit of Smoky Slate on the lower left side and up about half way. 

Next I die cut the deer from the "Grassy Grove" bundle using Basic Black card stock.  

The trees are also from the "Grassy Grove" set and were stamped using black Memento ink.

For the word piece, I tore a piece of Basic White card stock, the third one I had cut at 4" x 5-1/4". I don't always like the way the tears look so I make sure my piece is long enough to rip up another line. It took three tries before I got a line I liked. It was a bit long but it's okay, I just lined it up with the focal piece and cut off the excess. On that torn piece I stamped the "Noel" from the "Framed & Festive" set using black Memento ink.

For the snow I used some white acrylic paint and a kitchen stainless steel scrubber. I had cut it in half because I thought the scrubber was a bit too big and if I was going to ruin it I'd rather ruin a smaller piece. I spread some white acrylic paint on my silicone mat and then dabbed the scrubber in it and then tapped it onto the card stock. It gave the piece a snowy look.  I set it aside to dry a bit before I finished the card. I did use my heat tool to help it dry faster.

Once the paint was dry I added Dimensionals to the back and set the piece in place on the front of the card base. Then I added the word piece using Dimensionals and then the deer was added with Dimensionals. And the card was done.

I do like how this turned out and I was glad I could somewhat replicate the card that caught my eye on Pinterest.

Thank you SO very much for taking your time to stop by and see today's Christmas card,
Wanda

Wednesday, November 23, 2022

Framed & Festive, Grassy Grove, Christmas Card, Stampin' Up!

So today I thought I'd give the "Grassy Grove" set another try using some Designer Series Paper (DSP) that I thought would look wintery.  I think I have my mind set on making this layout for our Christmas cards.  I suppose I could always go though my stash and find some wintery retired DSP too and I may just do that.  But for today I used some DSP from the "Pretty Prints" 12" x 12" package. I saw a card on Pinterest using Basic White for the front of the card. You can see that card here. I didn't have the DSP they used. It was SO pretty.

The base of the card is a folded half-sheet of Evening Evergreen card stock. This card opens on the bottom and the fold is on the top.

I cut a 4-1/8" x 5-3/8" piece of Basic Gray for the layer. I wasn't sure what I wanted there but I knew Basic White would be too bright and my first thought was Basic Gray but after seeing it all done I'm thinking Soft Succulent might have been a better choice. But it's done and it's Basic Gray!

A 5" x 3-3/4" piece of DSP from the "Pretty Prints" package was cut and taped to the Basic Gray piece. 

Then I cut a 5-1/8" x 3-7/8" piece of Basic White card stock and used the die from the "Grassy Grove" bundle. I glued that to the DSP. I glued around the border area (on the backside) and on some of the wider areas. I set the die cut piece in place.

Then I die cut the two deers and glued them in place on the front.

The words are from the "Framed & Festive" set and were stamped using Evening Evergreen ink on a scrap piece of Basic White card stock. I die cut them using the smallest rectangle in the "Rectangle Stitched Framelits" die set and the second smallest die was used to cut the Evening Evergreen layer behind it. I taped the two layers together and set the piece in place using Dimensionals. 

A 4" x 5-1/4" piece of Basic White card stock was added to the inside and the card was done.

This was a fun card to make and I'm hoping that the DSP in the background looks like snow. Kind of? LOL

Thank you SO very much for taking your time to stop in and see today's Christmas card,
Wanda

Tuesday, November 22, 2022

Grassy Grove, Framed & Festive, Christmas Card, Stampin' Up!

When I saw this card on Pinterest I knew I just had to make it. And I knew I had most of the items to make this card so here it is. You can see the original card here. 

The base of the card is a folded half-sheet of Basic Black card stock. This card opens on the bottom and the fold is on the top. 

I cut a 4-1/8" x 5-3/8" piece of gold foil card stock. I die cut the two deers from the center of the gold foiled piece. Then I glued the gold foiled piece to the front of the card.

A 3-3/4" x 5" piece of Designer Series Paper (DPS) from the "Lights Aglow" 6" x 6" stack was cut and glued on top of the gold foil piece. I used glue because I've had issues with the tape not sticking so well to the gold foil. I suppose if I ruffed up the gold foil a bit the tape would adhere better but I don't like to do that because I sometimes would ruff up areas that showed. So glue works best for me.

Then I cut a 3-7/8" x 5-1/8" piece of Basic Black card stock and I die cut the forest image using the die from the "Grassy Grove" bundle.  I glued that in place just a round the border and a few dots in some of the larger areas in the trees.

The deers were glued in place in the center of the card.

I die cut a stitched rectangle from the "Rectangle Stitched" Framelits die set. I had used the second smallest on the smaller grouping of four dies. And I used the smallest one in that grouping for the words.

The words are from the "Framed & Festive" set and were stamped using Versa Mark on a scrap piece of Basic Black card stock. Then gold embossing powder was sprinkled over it and it was heat set. Then it was glued to the gold foiled rectangle. Dimensionals were added to the back and the piece was set in place on the upper part of the card. I centered it by eyeing it. I didn't measure.

I added a 4" x 5-1/4" piece of Basic White to the inside and the card was done.

I REALLY like the looks of this card and if I had a lot of gold foil card stock, I think I would be making these for our yearly Christmas card. But there's not enough of the DSP in that stack. UGH!!  There goes that idea! Oh well.  LOL

Thank you SO very much for taking your time to stop in and see today's Christmas card,
Wanda

Monday, November 21, 2022

Framed Florets, Birthday Card, Stampin' Up!

I made this card for a very special friend for her milestone birthday. I just thought it was pretty and I knew she'd like it. You can find the original card here. I changed the card base on mine.

The base of the card is a folded half-sheet of Basic White card stock. This card opens on the right and the fold is on the left.

I cut a 4-1/8" x 5-3/8" piece of Soft Succulent card stock and a 3-7/8" x 5-1/8" piece of Evening Evergreen card stock for the layers. I taped them together and then I taped them to the front of the card.

The flowers are from the "Fitting Florets" 12" x 12" Designer Series Paper package. The front of the card was created using a combination of die cut and fussy cutting.

The pieces were set in place on the front of the card. I kind of followed the way they were set on the original card.

The little hearts are die cut from the one oval frame in the set using Blushing Bride and Lovely Lipstick card stock. I used glue to set them in place.

The words are from the "Framed Florets" set and were stamped using Evening Evergreen ink. I die cut them using the stitched square from the "Stylish Shapes" set. Dimensionals were added to the back and the piece was set in place on the front of the card.  And the card was finished.

What was fun about this card was that I was able to use some of the floral designs that were cut off on the edges. I never think to use a half of a flower or a half of a design. I think it's great that these can also be used on a card.

Thank you SO much for taking your time to stop in and see today's birthday card,
Wanda

Sunday, November 20, 2022

Framed Florets, Framed & Festive, Christmas Card, Stampin' Up!

Sweet and simple or simply sweet?  I found this card on Pinterest and what caught my eye was all the fun die cuts on the left side, plus the colors. You can see the original card here

The base of the card is a folded half-sheet of Basic White card stock. The original card used a fancy fold and I didn't want to do that, so I modified the card. 

A 4-1/8" x 5-3/8" piece of Soft Succulent card stock was cut for the layer.  And the two open leaves were also die cut from the center of that piece of card stock (no one will ever know there's card stock missing from the center, it's covered by the card base and the Designer Series Paper (DSP) layer.

The DSP is from the "Fitting Florets" set and was cut at 3-7/8" x 5-1/8".  I taped the DSP to the Soft Succulent piece and then I taped those to the front of the card.

Next I stamped the words from the "Framed & Festive" set using Evening Evergreen ink. Then I die cut them using the pretty framed die from the "Framed Florets" die set. I found this die a bit more difficult to work with because of all of the open areas. I taped the word piece in place and glued the frame around it, trying not to get too much glue on it and on the openings.

Then I die cut two of the longer leaf clusters. They were glued in place near the center of the left side and then the Soft Succulent leaves were glued on top. I did cut the ends of the leaves a bit, I thought they were a little too long. 

A bow was tied and glued to the side, covering the ends of the leaves. A "Gold Adhesive-backed Swirls" embellishment was set in place on the left side and the card was done.

Super quick and simple. And not to mention sweet!

Thank you SO very much for taking your time to stop in and see today's Christmas card,
Wanda

Saturday, November 19, 2022

Forever Fern, Happiness Abounds, Framed Florets, Birthday Card, Stampin' Up!

I think it's fun that I can bring in some stamp sets that I already had and use them with the new ones. I am loving the "Framed Florets" bundle and mixing it with my other sets makes it an even better purchase!! I found this card on Pinterest. You can see the original card here

The base of the card is a folded half-sheet of Starry Night card stock. I often forget that I have in colors to play with too. I have not used this color in a while, a long while. 

The layers were cut as follows. The Orchid Oasis card stock was cut at 4-3/4" x 3-1/2".  And the Basic White piece was cut at 4-5/8" x 3-3/8". I taped those two layers together. 

I took two pieces of Basic White card stock that measured 3-3/4" x 4".  I die cut the oval from one of the pieces and I stamped on the other.

I tried to stamp the tall leaf cluster from the "Forever Fern" set and stamped it in the center of the 3-3/4" x 4" piece of Basic White card stock using Starry Night ink. And I used the more rounded leaf image and stamped it using Orchid Oasis ink. Then I die cut the piece using the oval die. 

The words are from the "Happiness Abounds" set and were stamped using Starry Sky ink. I used my paper cutter to trim them to 1/2" wide and about 3-3/8" long. 

I tied a white bow and I was now ready to assemble the card. 

I had cut a 4" x 5-1/4" piece of Basic White card stock for the inside and I taped that in place.

I took the two taped layers and set the stamped leaves on it, centering it as close as I could by eyeing it. Then I glued the oval frame around it.

Dimensionals were added to the back of the word piece and it was set in place on the front of the card on the lower part of the oval.

The bow was glued and tucked under the bottom left corner of the word piece. Then the whole thing was set in place on the front of the card using Dimensionals and the card was done.

This is a super easy and quick card to make. I like the looks of it and that's why I just had to make one.

Thank you SO very much for taking your time to stop in and see today's birthday card,
Wanda

Friday, November 18, 2022

Santa's Delivery, Rings of Love, Christmas Card, Stampin' Up! 2022

I found today's card on the Internet and the minute it popped up I knew I had to make it. I had most of the stuff so I jumped right in. You can see the original card here. I did change it a little because of not having everything! There are instructions on how to make it at the link, so here's how I made it.

The original card was made using a half-sheet of Mint Macaron card stock but I decided to use a half-sheet of Basic White card stock and a 4" x 5-1/4" piece of Mint Macaron card stock. I cut a 3-7/8" x 5-1/8" piece of Basic White for the top layer.  On that top layer I die cut the oval frame with the hearts. Then I die cut the oval white frame.

Next I die cut the oval tree piece using Designer Series Paper (DSP) from the "Rings of Love" 12" x 12" package. It's retired but I had a lot of sheets left over and this card really appealed to me. I was glad I ran across it because it allowed me to use this DSP on a Christmas card. I used my Blending Brush and scrubbed on some Night of Navy ink to make the sky blue. 

I fussy cut the house, tree and bushes from the same DSP package.

I taped the tree oval on the front of the card and then I glued on the oval ring. The house went on next and the shrub to the right of the house. I tucked it behind the house a bit. I added the tree on the left and the shrubs in the front were added.

The words are from the "Santa's Delivery" set and were stamped using Night of Navy ink. I die cut them using the rectangle die from the "Mini Pocket Envelope" die set. I took my dark Mint Macaron Blends pen and colored around the edges so it popped better on the card. I set the words in place using Dimensionals.

I took some ribbon that is actually Soft Succulent and not Mint Macaron but it was light enough and blended well. I glued it in place just under the bottom right corner of the word piece and the card was done.

This was a very fun card to make. I love the colors and I especially love that I could use more papers in that package.

Thank you SO very much for taking your time to stop in and see today's Christmas card,
Wanda

Thursday, November 17, 2022

Framed & Festive, Framed Florets, Christmas Card, Stampin' Up! 2022

Today I thought I'd make a Christmas card using a piece of Designer Series Paper (DSP) from the "Fitting Florets" 12" x 12" package. I have to admit, I do prefer the floral images in that set over the others. But none the less, this card was still fun to make.

The base of my card is a folded half-sheet of Basic White card stock. This card opens on the right and the fold is on the left. 

I cut a 4" x 5-1/4" piece of Sweet Sorbet card stock and die cut the oval frame from the "Framed Florets" die set. I wanted to do this first so I didn't waste any card stock. When you do this make sure you cut it from the center of the card stock.

My DSP on the bottom is from the "Fitting Florets" package and measured 3-7/8" x 2-1/2".  You can make a lot of cards using this layout and one sheet of the DSP, 18 to be exact!! That would be half my Christmas card list this year!! Hmm, may have to rethink our Christmas card!

I took a piece of Basic White card stock and die cut the bottom edge using a die from the "Basic Borders" die set. I set it up so the right side measured 2-3/4" when cut and the left side measured 3-1/2".  You have a little wiggle room because the DSP is a bit longer than you need.  Or you can die cut it close to the end, glue it to the DSP and trim it to fit. But wait until you texture it before you glue it. I textured mine using the "Painted Texture" embossing folder. 

The DSP was taped to the bottom are of the Sweet Sorbet layer and the Basic White textured piece was glued in place on top of that.

The words are from the "Festive & Framed" set and were stamped using Night of Navy ink and then die cut with the same die as the Sweet Sorbet oval. I put the Sweet Sorbet oval and frame back together, I turned them over and used scotch tape to hold them back together. 

The word piece was taped on top of the Sweet Sorbet oval and Dimensionals were added to the back. I didn't press down on the oval piece, I wanted to make sure I could slip some fun leaf pieces under it. The top one is Night of Navy and the bottom ones are Basic White and both are from the "Festive & Framed" die set. 

I had colored three crystal rhinestones using my dark Balmy Blue Blends pen and I set them on the card for a bit of sparkle. The card needed something.  And that finished it off.

This was a fun card to make though I prefer something more festive for my Christmas cards.

Thank you SO very much for taking your time to stop in and see today's Christmas card,
Wanda

Wednesday, November 16, 2022

Framed Florets, Fitting Florets, Birthday Card, Stampin' Up! 2022

There are SO many fun papers in the "Fitting Florets" 12" x 12" Designer Series Paper (DSP) package. And here's how I made today's card.

The base of my card is a folded half-sheet of Basic Black card stock. This card opens on the bottom and the fold is on the top.

I cut a 4" x 5-1/4" piece of DSP from the "Fitting Florets" package. I liked the checked and after really looking at the DSP (of course after the card was put together) I think the color on the checkered piece is maybe Evening Evergreen. Either will work. I taped the DSP to the front of the card.

A 1" x 5-1/2" piece of Basic Black card stock was cut and I taped it across the middle of the card, on top of the DSP.

Next I cut  a 3" x 3" piece of DSP from the same package and I cut that into 3 one inch strips. These strips were taped to a 3-1/2" x 3-1/2" piece of Basic Black card stock. Dimensionals were added to the back and the piece was set in place about 1/2" on the top, right, and bottom.

The words are from the "Framed Florets" set and were stamped using Versa Mark on a scrap piece of Basic Black card stock. I embossed them with white embossing powder. I die cut them using the oval frame from the "Fabulous Frames" die set. I also die cut another one using Basic White card stock.  I often tape the oval to the frame but this time I set the oval in place and I had cut a piece of scrap card stock that was smaller than the oval frame and I glued that to the frame and center word piece so I had a nice solid piece. I set the oval in place on the front of the card using Dimensionals on the left and tape on the right.

I fussy cut a small flower from the same DSP and I set it in place on the upper right part of the oval. Three silver metallic pearls were added to the card in the center of the three visible flowers.

A 4" x 5-1/4" piece of Basic White was added to the inside and the card was done.

This was a fun card to make and I am starting to really like making those panel type cards.

Thank you SO very much for taking your time to stop by and see today's birthday card,
Wanda

Tuesday, November 15, 2022

Rustic Harvest, Peaceful Moments, Masculine Birthday Card, Stampin' Up!

So today set aside the "Framed Florets" bundle. I didn't say I put it away (I am not known for putting things away!! LOL) it's waiting for me to play with it some more. But I took a little break from it to make a masculine fall birthday card and here's how I made it.

The base of my card is a folded half-sheet of Basic White card stock. Next I cut a 4" x 5-1/4" piece of Mossy Meadow and then you can die cut the framed oval from the "Framed Florets" bundle. I forgot to so I had to use some scrap. 

A 3-3/4" x 5" piece of DSP from the "Rustic Harvest" 12" x 12" package was taped to the Mossy Meadow piece and then that was taped to the front of the card.

I cut a 2-1/2" x 4" piece of Cajun Craze card stock for the rusty looking layer. And on top of that I taped a piece of DSP from the "Rustic Harvest" package that measured 2-1/4" x 3-3/4". And that was taped to the Mossy Meadow DSP.

I took the Mossy Meadow oval frame and taped the oval to the inside. I had flipped it over and used scotch tape to hold it back together.

Next I stamped the words from the "Peaceful Moments" set and die cut them using that same framed oval. I slid the die so the words would be more towards the bottom. I taped that to the Mossy Meadow oval.

I fussy cut a pumpkin from the same package of DSP and set it on the oval using Dimensionals. The oval was set in place with Dimensionals and the card was done.

I think it looks like a masculine fall birthday card. It was quick and fun to make too, even with the fussy cutting!

Thank you SO very much for taking your time to stop by and see today's masculine birthday card,
Wanda

Monday, November 14, 2022

Framed Florets, Birthday Card, Stampin' Up! 2022

I found this pretty card on the Internet but I forgot to get the link before I had closed the window. If I find it I will add it to my post so you can see it. The only difference between that card and mine is the center of the flowers. The original used some type of light blue embellishment and I used some "Metallic Pearls" and I'm not sure if they are retired or not. But I have quite a few silver ones so I'll be using them regardless, I need to use them up.

The base of my card is a folded half-sheet of Night of Navy card stock. This card opens on the right and the fold is on the left. 

I cut a  4" x 5-1/4" piece of Basic White card stock for the inside and then one for the outside.

Then I cut a piece of Designer Series Paper (DSP) from the "Fitting Florets" 12" x 12" package. I taped it to the Basic White piece and then I taped that to the front of the card.

Next I stamped the words. They are from the "Framed Florets" set and I used Night of Navy ink on Basic White card stock to do that. I die cut them with the die from the "Framed Florets" bundle. Then I die cut a Night of Navy one using that same die. I turned the Night of Navy die over and taped the oval back to it using scotch tape. I wanted to raise the piece up with Dimensionals and I wanted it to be more solid. I couldn't use Dimensionals on the outer edges because they are lacy and see through. I taped the word oval to the top of the Night of Navy oval and I set the piece in place on the front of the card.

I die cut two flowers from the same DSP and I also die cut a silver leaf branch using the die from the same set. I glued the bottom part of that die in place and then set the flowers on top using Dimensionals. I added the silver metallic pearls and the card was done.  

I probably should have moved the leaves over a little so they didn't touch the "b" in birthday but you can still read it so I guess it's okay.  I'm just being picky.

I think this card is pretty and that is why I had to make it when I saw it.

Thank you SO very much for taking your time to stop by and see today's Christmas card,
Wanda


Sunday, November 13, 2022

Framed & Festive, Framed Florets, Forever Fern, Christmas Card, Stampin' Up! 2022

Yup, I'm still playing with the "Framed Florets" bundle and I'm loving it. I know it's only going to be around for a short time but I want to try to make a lot of cards with the dies. Though I do like the stamp sets too, I just think I can use these dies with a lot of my other sets. You always have to feel like you got your money's worth out of a set, right?  Though I never do. Some I use a couple of times and then never go back to them. And I wonder why I ordered it in the first place. But most of my sets I put more thought into, I want to make sure I can use it for more than once occasion and easy of use. The "Framed Florets" bundle fell under the "more than one occasion" category.  And here's today's card. 

The base of my card is a folded half-sheet of Evening Evergreen card stock. This card opens on the right and the fold is on the left. I cut two 4" x 5-1/4" pieces of Basic White card stock, one for the inside and one for the top.

My Designer Series Paper (DSP) is from the "Fitting Florets" 12' x 12" package and was cut at 3-7/8" x 5-1/8".  I taped the DSP to the Basic White piece (the one that goes on the outside).

Next I stamped the words from the "Framed & Festive" set using Evening Evergreen ink on a piece of Basic White card stock. Then I die cut it using the oval die from the "Framed Florets" die set. Now from here is where I wasn't sure where I was going to go with this card. What I had planned was to stamp the rounded leaves image from the "Forever Fern" set and color them using the Wink of Stella pen. I did that and the leaves looked more orange than the Poppy Parade color. So I set that idea aside.

Then I took the larger leaf die and die cut it using Basic White card stock. But I still wanted a red on the card. So I took my Poppy Parade marker and I colored in the berries on the DSP. Now I had some Poppy Parade color. Then I die cut the oval using Poppy Parade card stock. I turned the oval with it's center over and scotch taped it back together. I taped the words in place on the front of the oval. Dimensionals were added to the back and the piece was gently set in place. I didn't press down because I wanted to be able to put the leaves behind it.  I ended up lifting the oval up and setting the white leaves in place with tape and then the oval went back on. 

To fix my rounded leaves issue, I took my Blender Pen and my Poppy Parade marker and colored them in that way. I scribbled on a clear block and picked up the color with my Blends Pen. Once I was done coloring them in I tucked them under the oval. But the piece still needed something. So I die cut two gold foil leaves and slipped them under the oval too.

A crystal rhinestone was colored using the dark Poppy Parade Blends pen and it was set in place on the oval. I was thinking a Poppy Parade bow but I looked and I did not have any Poppy Parade ribbon at all. So the rhinestone was the way to go for today!

I do like how it turned out and coloring the berries on the DSP really pulled the colors together.

Thank you SO very much for taking your time to stop in and see today's Christmas card,
Wanda

Saturday, November 12, 2022

Framed Florets, Fitting Florets, Thank You Card, Stampin' Up!

I am amazed at all the pretty papers in the "Fitting Florets" Designer Series Paper (DSP) 12" x 12" package. I can see myself using the whole package!! (That would be a first!). I found a card using this pretty blue DSP. You can see the original card here

The base of the card is a folded half-sheet of Night of Navy card stock. This card opens on the bottom and the fold is on the top. 

A 3-3/4" x 5" piece of Balmy Blue was cut for the layer and a 3-1/2" x 4-3/4" piece of the DSP was cut for the top layer. I taped the two layers together and added Dimensionals to the back. I set them in place on the front of the card base.

The words are from the "Framed Florets" set and were stamped using Night of Navy ink. I die cut them with the second largest stitched circle from the "Stylish Shapes" die set. I added Dimensionals to the back and I set the circle in place on the front of the card.

A few pearls were added to the word piece. I added a 4" x 5-1/4" piece of Basic White card stock to the inside and the card was done.

This was a fun, quick and easy card to make. I love this layout, it's simple yet pretty.

Thank you SO very much for stopping by and seeing today's thank you card,
Wanda

Friday, November 11, 2022

Framed & Festive, Snowman Magic, Christmas Card, Stampin' Up! 2022

My plans are to mix some themes with this new "Framed Floret" bundle. Yesterday I made a birthday card and today I worked the piece into a Christmas card. There's SO much you can do with this set. I am looking forward to making some get well cards and thinking of you cards too, plus some other birthday and Christmas cards. 

Today's card was fun and easy and of course one I like because it's got a snowman on it!

The base of the card is a folded half-sheet of Soft Succulent card stock. This card opens at the bottom and the fold is at the top.

I cut two pieces of Basic White card stock that measure 4" x 5-1/4" each. One for the front and one for the inside. The one for the front needed to be stamped on so I didn't tape it to the card yet. But the inside one I did tape down.

Next I cut a 3-3/4" x 5" piece of Designer Series Paper (DSP) from the "Lights Aglow" 6" x 6" stack. I took one of the oval dies from the "Framed Florets" die set and die cut the center of the DSP. I saved the pieces for a future card (maybe). I save everything!!

Then I die cut the a piece using the same die and Soft Succulent card stock. I needed the outer ring but I did save the oval, just because it's what I do. LOL

I used removable tape and taped the DSP to the Basic White piece so I could see where the words needed to go. I set the word piece up in my Stamparatus and stamped them using Evening Evergreen ink. The words are from the "Framed & Festive" set that came in the bundle. 

Then I proceeded to make the snowman from the "Snowman Magic" bundle. I die cut two snowmen. On one I die cut the face and I saved the nose. This one is the front piece. On the second piece, the back piece, I colored in the face area black so when the front piece is added the eyes and mouth will be black. I had die cut two arms and colored them in using my Bronze Blends pen. I glued them in place on the second piece and then I glued the front piece to the back. When I die cut the snowman I had also die cut a few snowflakes from the set. I often do that and sometimes end up with extra. Today I didn't have any extra.

I took the nose piece and colored it using my dark Pumpkin Pie Blends pen. I added a tiny amount of glue and set it in place.

The scarf was stamped using Soft Succulent ink and die cut, it was glued in place on the snowman.

Then I die cut a Basic Black had and glued it to the top of the snowman's head. I also cut a tiny sliver of Daffodil Delight card stock and glued it to the hat for the band.

The buttons were drawn in with my Basic Black marker, but there is a button stamp you can use. I didn't feel like setting everything up in the Stamparatus for that so I just drew them in. 

Now to assemble the card. I taped the Basic White piece with the words on it to the front and then the DSP on top of that. Next the Soft Succulent frame was glued in place.

The snowman was set in place using Dimensionals and the snowflakes were glued in place. A crystal rhinestone was added to the center of each snowflake and the card was done.

I was pleased with the way the card turned out. I thought the seriousness of the DSP and the whimsical snowman might clash but they did go well together. I think adding the snowflakes aided in that.

Thank you SO very much for taking your time to stop by and see today's Christmas card,
Wanda


Thursday, November 10, 2022

Framed Florets, Birthday Card, Stampin' Up!

I have never been SO excited for an order to come as I was when I placed the one for the "Framed Florets"  bundle. I just couldn't wait to play with it. I've seen so many beautiful cards on Pinterest and now I can play and here's what I made. I found this card here

The base of the card is a folded half-sheet of Polished Pink card stock. This card opens on the right and the fold is on the left. 

A 4" x 5-1/4" piece of Basic White card stock was cut for the inside, it was taped in place. And a 3-3/4" x 5" piece of Basic White card stock was cut for the front. That piece was textured using the "Painted Texture" embossing folder. I didn't have the folder that was used on the original card so I just used what I had that I thought would look good.

Next the Polished Pink oval was cut using the die in the bundle. I also die cut a Basic White one so I could have the center oval piece. 

The flowers were die cut from the matching Designer Series Paper (DSP) "Fitting Florets" 12" x 12" package. 

The words are from the "Framed Florets" set and were stamped using black Memento ink. I did set the die cut flowers on top of the Basic White oval to make sure I knew where the words would go. The were pretty much as far down as I could go. I stamped the words after the oval was cut. I set the oval up in the Stamparatus so it wouldn't move on me. My ink is not as juicy as I'd like so I had to stamp the words a couple of times. That Stamparatus comes in handy and I use it on almost every card now. Once the words were stamped the card was ready to assemble.

I glued the embossed piece to the front of the card. Glue works best on textured pieces. Then I glued the Polished Pink oval. I also glued the Polished Pink center oval in place too. I wanted the Basic White oval to be raised up just a little. Then I taped the Basic White oval in place. The flowers were set in place using Dimensionals and the card was done.

This was a fun, quick and easy card to make. I am going to be having a lot of fun with this bundle.

Thank you SO very much for taking your time to stop in and see today's Birthday card,
Wanda


Wednesday, November 09, 2022

Santa Delivery, Santa Express, Christmas Card, 2022 Stampin' Up!

I just love it when I have Designer Series Paper (DSP) and dies that match. It sure takes the fuss out of fussy cutting!

Today's card is a little different than I usually do. This card is not solid on the front. I know, I stepped outside my box again!

The base of my card is a folded half-sheet of Poppy Parade card stock. After cutting it in half the piece measured 4-1/4" x 11". I cut off 2-2/4" off the front. Save that piece, it's for the layer on the front of the card.

I cut a 2-3/4" x 4-1/4" piece of DSP from the "Santa Express" 12" x 12" package for the side of the flap. And I cut a 2-3/4" x 4-1/4" piece of Basic White for the top layer of the piece that was cut off. I also cut a 4" x 5-1/4" piece of Basic White for the inside. I taped that to the inside and then I began working on the rest of the card.

I die cut the Santa and wagon from images in the "Santa Express" DSP package. I added Dimensionals to the back and set them aside. I made sure I didn't put the Dimensionals too high up on the train, I didn't want to make the card get stuck shut.

I did set the Santa part on top of the Basic White piece to see where the words were going to go. The words are from the "Santa Delivery" set and were stamped using Poppy Parade ink. I was now ready to assemble the card.

I taped the DSP to the left flap.  Then I taped the Basic White piece to the piece from the front that was cut off. That piece was then glued to the front of the card. I centered it on the card as close as I could by eyeing it.  

The train was added and then the train car. I noticed that some of the scrap had wheels on it, so I fussy cut the wheels out and set then on top of the wheels on the train and train car using Dimensionals. And the card was finished.

It's a cute Christmas card, not among my favorites but it's still cute.

Thank you SO very much for taking your time to pop in and see today's Christmas card,
Wanda

Tuesday, November 08, 2022

Forever Fern, Lovely & Lasting, Birthday Card, Stampin' Up!

Taking a break for a day from the fall and Christmas card making to make cards for my twin sister-in-laws. Their birthday is today and hubby will be seeing his sisters to give them their cards. That usually means that I can add as many layers and embellishments as I want because I don't have to pay for postage.

I found today's card on Pinterest and I thought it was SO pretty.  Though I did forget to add some ribbon, I may just leave it off. I'm not sure I have any Pool Party ribbon anyway and it does look fine without it. You can see the original card here.

The base of the card is a folded half-sheet of Basic White card stock. This card opens on the right and the fold is on the left. 

I took the dotted stamp image from the "Forever Fern" set and stamped the bottom part of the card using Pool Party ink.

Then I cut a 4-1/4" x 1-1/4" piece of Pool Party card stock for the strip and a 4" x 1" piece of Basic White for the strip on top of that one. I also used the same dotted stamp to add dots to the entire strip using Pool Party ink.

The words are from the "Lovely & Lasting" set and were stamped using black Memento ink on a scrap piece of Basic White card stock. Then I die cut them using the smaller ribbon end die from the "Stylish Shapes" die set. I added Dimensionals behind it and set it aside. When I die cut them I made sure the words were more on the right side than centered. 

Next I stamped the leaf images from the "Forever Fern" set using Pool Party ink. I die cut them and then colored each one with Wink of Stella. I also die cut one set of leaves using vellum.

Now I was ready to assemble the card. I taped the strips together and added some tape to the back of the piece and set it on top of the card about 1/4" from the bottom edge. I didn't press it down on top because I needed to make sure I had room to tuck in some leaf stems. 

I did use a little bit of glue to the bottom of the vellum leaf and I tucked it under the strip. Next the top right leaf image was taped in place under the vellum. The larger leaf spray on the left side was added, then the one with the longer thinner leaves and finally the one you see in the front. And the stem of that one is where you'd add your ribbon if you were going to add a bow.

I set the word piece in place, tucking the left side under the leaf spray.

I used my dark Pool Party Blends pen and colored 3 crystal rhinestones and I set them in place on the front of the card and the card was done.

What I found nice about making this card was that I was able to die cut all of the leaves at one time. I had stamped them on my card stock and made sure I had room for the dies and with one pass I die cut the four stamped leaves and the one vellum leaf. 

This was a fun card to make. I do like the colors and I'm sure my sisters-in-law will like the cards too.

Thank you SO very much for taking your time to stop by and see today's birthday card,
Wanda

Monday, November 07, 2022

Snowman Magic, Penguin Place, Christmas Card, The Good, The Bad and the Ugly

Yup, another "The Good, the Bad and the Ugly" card. This is not what was in my head but this is how it came out on paper!  I am not fond of it at all. But as you know, I share them all with you. Mostly because I shouldn't suffer alone!!! LOL

I'll share with you how I made this card and I'm hoping that I will find some other DSP or something to make it better.

The base of my card is a folded half-sheet of Basic White card stock. This card opens on the right and the fold is on the left. So far so good! LOL

I cut a 3-3/4" x 5" piece of Basic White card stock for the top layer. I had used my Blending Brush to scrub on some color. Here's the deal there. I had uses Granny Apple Green on it a few days ago and yesterday I added some Shaded Spruce. I was going to clean it up so I was scrubbing it on some scrap paper and I liked the color so I used that on the Basic White piece.  And again, so far so good.

Then I took the largest stitched circle from the "Stylish Shapes" die set and die cut the Designer Series Paper (DSP) from the "Santa "Express" 12" x 12" package. I cut it in half. I also die cut a Blushing Bride circle and cut that one in half as well. I taped the two circles together leaving a little bit of an edge showing at the bottom.

I cut a 1/4" piece of Evening Evergreen card stock for the band across the edge of the circles. I didn't measure how long, I just snipped off what I didn't need.

I also die cut the ribbon looking pieces using Blushing Bride and Evening Evergreen card stock. I taped the two pieces together and centered the top one as much as I could. I cut it at 1-5/8" long from the tip to the straight edge. I taped that just under the edge of the Evening Evergreen strip. 

A Blushing Bride tree was die cut. I am not sure where things went wrong but it was right around here.

Using Basic White card stock, I die cut the snowman. I die cut two bodies and one of them I die cut the face and I saved the nose which I colored using my dark Pumpkin Pie Blends pen. I stamped the scarf using Soft Succulent ink and die cut it. The arms were die cut using Basic White card stock and colored in using the Bronze Blends pen. A Basic Black had was die cut and a sliver of Daffodil Delight card stock was added for the band on the hat. I glued the arms to the snowman body without the face. In the face area of that snowman I colored it in with my Basic Black marker. Then I glued the two snowmen together. I glued the nose in place. The scarf and hat were added and using my Basic Black marker I colored in a few buttons. I added Dimensionals to the back of the snowman and set it aside.

I had die cut three snowflakes from the "Snowman Magic" bundle using Basic White card stock and se them aside.

The words are from the "Penguin Place" set and were stamped on the bottom right corner using Evening Evergreen ink.

So to create the ugly part, I set the half-circles on the top layer to see where the tree should go. The tree was glued in place and then the circle was taped in place. The ribbon piece was added next and two snowflakes were glued to it. Then the snowman was added. And the last snowflake was added to the upper right area. And for a final touch, I added a crystal rhinestone to the center of each snowflake. The top layer was set on the front of the card using Dimensionals and the card was done.

I am not fond of this card at all, though I do like the snowman. LOL

Thank you SO very much for stopping by to see today's interesting Christmas card,
Wanda

Sunday, November 06, 2022

Snowman Magic, Christmas Card, Stampin' Up! 2022 Fall Catalog

You guessed it. I did not put away my "Snowman Magic" bundle. It's still sitting on my worktable, so I thought I'd make another card using it. And I will probably be making a few more before Christmas too. I think most of our holiday cards this year will be done using this set. I just love this snowman.

The base of my card is a folded half-sheet of Basic White card stock. I cut a 4-1/8" x 5-3/8" piece of Shaded Spruce card stock for the layer and a 4" x 5-1/4" piece of Basic White for the top layer and I set them aside.

I die cut the snowman from the "Snowman Magic" bundle. I also die cut the arms and the hat was cut using a scrap piece of Basic Black card stock. Then I stamped the scarf and die cut the scarf and another snowman, plus I put the face die on the first snowman and die cut that all at the same time. I like to cut a lot at one time.

I colored the snowman's arms using my Bronze Blends Pen. You can also use the Crumb Cake marker or Crumb Cake card stock to cut them out. Then I glued the ends to the second snowman I die cut. I took my Basic Black marker and colored in over the face area and then I glued the two snowmen pieces together.

The scarf was glued in place. When I die cut the face, I kept the nose piece. I colored it using my dark Pumpkin Pie Blends Pen. I glued it back in place.

A sliver of Daffodil Delight card stock was cut for the band of the hat and that was glued in place on the hat. Then the hat was glued on top of the snowman's head.  I made some black dots on the bottom ball of the snowman and it was done.

I die cut a 2-1/8" circle and took my Blending Brush and scrubbed on some Shaded Spruce ink. Then I cut a Shaded Spruce scalloped circle for the back layer. I taped those two layers together. Dimensionals were added to the back and the piece was set aside. 

A 2" x 4" piece of Designer Series Paper (DSP) from the "Santa Express" 12" x 12" package was cut at taped to the bottom of the Basic White piece. I cut a 4" x 1/4" piece of Shaded Spruce card stock was cut for the strip.

Then I took the circle piece and set it on top of the card front to see where the words would go. The words are from the "Snowman Magic" set and were stamped using Shaded Spruce ink. Once the words were done I set the piece in place using Dimensionals. Then I set the circled in place. The snowman was also set in place using Dimensonals.

And for a final touch, I added a tiny crystal rhinestone to the snowflake under the word "magical" and the card was done.

This was a fun card to make and once again I was able to use a scrap piece of DSP!

Thank you SO very much for taking your time to stop by and see today's Christmas card,
Wanda

Saturday, November 05, 2022

Snowman Magic, Santa Express, Christmas Card, Stampin' Up! 2022 Fall Catalog

I ran across a card I has started a while back. It was a folded half-sheet of Basic White card stock and the front had 2-1/8" cut off. And that was it!  Pretty much a blank canvas, huh? LOL  Not a great find but I thought I'd work with it and get it off my worktable. So read on to find out what I did .

I took a 2" x 5-1/4" piece of Designer Series Paper (DSP) from the "Santa Express" 12" x 12" package and I taped it to the front. 

Then I took out the snowman die from the "Snowman Magic" bundle and die cut two of the bodies. I cut a pair of arms, and a snowflake. Then I stamped the scarf using Granny Apple Green ink and die cut it with the matching die and I also die cut the hat at the same time, oh I had cut the second snowman with this pass and the face on the first snowman on my Big Shot. I like to try to cut as much as I can with one pass.

I colored the arms using my Bronze Blends Pen. I took the second snowman and I colored in the face area using by Basic Black marker. Once the top snowman is set in place the eyes and mouth with will be black. Nice way to do that, huh?  I had saved the nose when I cut the face out. I colored it with my dark Pumpkin Pie Blends Pen. 

The hands were glued in place on the second snowman and then the top snowman was glued in place, sandwiching in the hands. Then I glued on the scarf and then the nose. The had was glued on the top part of the head. I had cut a super thin strip of Daffodil Delight card stock and glued it on the had for the band.

Next I die cut a stitched circle from the Stylish Shapes die set using Basic White card stock. I had used the third largest circle. And I took the second largest circle and die cut a Granny Apple Green circle. 

I took the smaller circle and my Blending Brush and scrubbed on some Granny Apple Green ink. Then I taped the two circles together. 

The snowman was added using Dimensionals. I had taken my black marker and added the buttons on the bottom part of the snowman. I could have used the stamp but I was too lazy to get it set up in my Stamparatus. 

I added the snowflake with a dot of glue. 

The words are from the "Snowman Magic" set and were stamped using Granny Apple Green ink. I added a little rhinestone to the snowflake on the word part and on the one I added to the snowman circle.

The circle piece was set in place on the front of the card. I added Dimensionals to the left side of the circle and I added Dimensionals along the edge of the flap, that way I wouldn't have to be concerned about going over that edge with the Dimensionals and sticking the card shut. And that was it.

This was a very fun card to make. I'm partial to snowmen and I'd like to make a few snowmen cards to send out this year.

Thank you SO very much for taking your time to stop by and see today's Christmas card,
Wanda

Friday, November 04, 2022

Caroling Mice, Santa Express, Christmas Card, 2022 Stampin' Up! Fall Catalog

I liked how I colored the mouse so much yesterday that I thought I'd go with the same colors on today's card. Though featuring the mouse in the circle ring on yesterday's card makes the mouse look larger. Funny how our eyes deceive us.

The base of my card is a folded half-sheet of Basic White card stock. This card opens on the right and the fold is on the left.

I took the "fa-la-la-la-la" Designer Series Paper (DSP) circle from yesterday's card and thought I'd work it into a card and I was thrilled that it worked.  I had used the second largest die from the "Stylish Shapes" die set and the DSP is from the "Santa Express". I also die cut the green DSP from the same set but used the next size stitched circle smaller. 

The mouse was stamped on a scrap piece of Basic White card stock and was colored in using my light and dark Blends pens. I used Smoky Slate, Poppy Parade and Granny Apple Green and I used the dark Petal Pink. Once I was done coloring I die cut it with the third largest stitched circle die.

I took a 4" x 5-1/4" piece of Basic White card stock and my Blending Brush and scrubbed on some Granny Apple Green ink.

Next I taped the red circle down and then the green on top. The white circle was set in place using Dimensonals.  I set the piece in place on the front of the card using Dimensionals.

Then I printed the words on my computer because I didn't have very many holiday words and I really wanted "Fa-la-la-la-la" on the card. I used Comic Sans MS 16pt for the words and I used the RGB code for Poppy Parade. R-230, G-6, B-45.  I printed it out on a piece of Basic White card stock and die cut it with the stitched ribbon die in the same "Stylish Shapes" die set. I set the word piece in place on the front of the card using Dimensionals. And the card was done.

This was a fun and quick card to make, plus I got to use that scrap circle from yesterday's card! 

Thank you SO very much for taking your time to stop in and see today's Christmas card,
Wanda


Thursday, November 03, 2022

Caroling Mice, Christmas Card, 2022 Stampin' Up!

I just had to have the "Caroling Mice" set! I thought they were so darn cute and now that Halloween is over it's time to make some fall and Christmas cards. Today it's a Christmas card. And today I'm using the lone mouse in the set. 

The base of my card is a folded half-sheet of Basic White card stock. This card opens on the right and the fold is on the left.

I stamped the mouse from the "Caroling Mice" set using black Memento ink on a 3-3/4" x 5" piece of Basic White card stock. I had to strategically place it on the piece so it was centered and about 7/8" up from the bottom. I needed the piece to be big enough for the Designer Series Paper (DSP) to go over it for stability for the ribbon.

Next I colored in the mouse using my Blends pens. I used both light and dark Granny Apple Green, Poppy Parade and Gray Granite. I used the dark Petal Pink for the ears, nose and mouth. 

I cut a piece of DSP from the "Santa Express" 12" x 12" package. Then I die cut the circle using the second largest stitched die from the "Stylish Shapes" die set. I also die cut the ring using the largest and second largest dies at the same time. I glued the ring on top of the DSP. Then I taped the stamped piece to the DSP. 

The musical notes were stamped next. I made sure I didn't stamp over the ring. I stamped them using black Memento ink and then I colored in the notes with my Basic Black marker. I didn't want to use my Blends pen in case it bled through. 

A ribbon was tied around the top. I like to cut a 6" piece of ribbon and tape the ends to the back of the piece and then slide a new piece of ribbon under the taped ribbon and tie a knot. Once that was done I glued the piece in place. I like to use glue here because of the scotch tape on the back. I want to make sure the piece stays in place (practically forever!!!).  And that was it, the card was done.

I do like how the card turned out and the fa-la-la-la-la DSP is nice and bright and just perfect for this layout!

Thank you SO very much for taking your time to stop by and see today's Christmas card,
Wanda