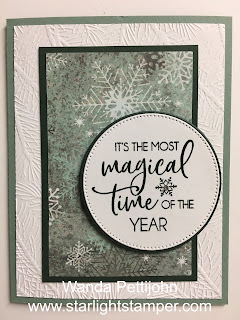
I was looking through the colors of the Designer Series Paper (DSP) and they were so sparkly. The sheets have gold embossing on them. I turned them over to see what was on the back and I saw the snowflake piece. I don't remember what was on the other side of this piece, once I saw the snowflake I was hooked. The DSP is from the "Texture Chic" 12" x 12" package. I had received six 4" x 6" pieces. So here's what I did with this piece.
I took a piece of the Soft Succulent card stock that was in the package and I folded it in half.
Then I took a piece of Basic White card stock and textured it using the "Winter 3D" embossing folder. It's a thinner folder, as in not as wide as the other ones, so I had to run the card stock through the Big Shot twice. I just moved the card stock over just enough to get the image all over it but trying not to show a line where I joined the two embossings. I think I did a pretty good job because I can't see where I met the first run with the second run. I glued this piece to the front of the card.
Next I cut the DSP at 2-1/4" x 4-1/4" and a piece of Evening Evergreen (that came in the package) at 3" x 4-1/2". I taped the two pieces together and then I glued it to the front of the card.
The words are from the "Snowman Magic" set and were stamped using Evening Evergreen ink. I die cut them using the second largest stitched circle die from the "Stylish Shapes" die set. And for the layer behind it, I die cut the 2-11/16" (second largest) circle from the "Layering Circles" die set. I taped the two circles together. Dimensionals were added to the back and the circle was set in place on the front of the card.
I added a tiny crystal rhinestone to the snowflake in the circle and a 4" x 5-1/4" piece of Basic White card stock to the inside and the card was done.
This was a very fun, quick, and easy card to make.
Thank you SO very much for taking your time to stop by and see today's Christmas card,
Wanda


I love it!
ReplyDelete