Pin It

Monday, October 31, 2022

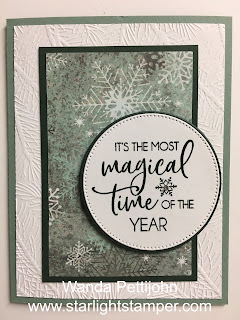
Snowman Magic, Christmas Card, Stampin' Up! 2022 Catalog

My card today can be made in just a few short minutes. It's super simple and could be simplified even more if needed. So if you need to whip out a bunch of Holiday cards in no time, this is the way to go.

The base of my card is a folded half-sheet of Basic White card stock. This card opens on the bottom and the fold is on the top. I had cut it on the 8-1/2" side so when it was cut it measured 4-1/4" x 11".

I cut a 3-3/4" x 4-1/4" piece of DSP from the "Celebrate Everything" 12" x 12" stack. I taped it to the front of the card starting at the bottom.

For the upper part I cut a 2" x 4-1/4" piece of Poppy Parade card stock and I textured it using the "Wintry 3D" embossing folder. Now to simplify your card even more, don't emboss it, it will save you a minute or two but it does look better textured. I glued that piece in place because I find that tape doesn't cover the entire surface and the pieces sometimes come off or they lift off later.

The words are from the "Snowman Magic" set and were stamped using Poppy Parade ink. I die cut them with the second largest stitched circle in the "Stylish Shapes" die set. And I die cut a Shaded Spruce piece of card stock using the scalloped circle that was just a bit larger from the "Layering Circles" die set. The two circles were taped together and Dimenisonals were added to the back and the piece was set in place on the front of the card.

A tiny crystal rhinestone was added to the center of the little snowflake and the card was done.

Now wasn't that quick? And it's nice looking too!

Thank you SO very much for taking your time to stop by and see today's Christmas card,
Wanda

Sunday, October 30, 2022

Very Best Occasions, Santa Express, Christmas Card, Stampin' Up! 2022

I liked yesterday's layout so much I thought I'd give it a try using some Christmas/Holiday Designer Series Paper (DSP) and this is what I came up with!

The base of the card is a 4-1/4" x 5-1/2" piece of Evening Evergreen card stock. A 4" x 5-1/4" piece of Basic White card stock was taped to the top of it.

The Evening Evergreen "flap" piece was cut at 3-1/4" x 8-1/2" and scored at 4-1/4".  A 3" x 4" piece of Basic White card stock was added to the inside. And a 3" x 4" piece of DSP was cut and taped to the outside. Then the piece was taped to the card base. I prefer to use glue to make sure it will stay put in place. I glued it about 1/4" from the left edge of the base.

The words are from the "Very Best Occasions" set and were stamped on a piece of Basic White card stock using Evening Evergreen ink. I die cut them with the 2-1/8" circle die from the "Layering Dies" set. And a scalloped circle a bit larger was die cut using Evening Evergreen card stock. The two circles were taped together and then set in place on the front of the flap using Dimensionals on the left side. 

I colored in the berries using my Poppy Parade marker and I used my Blender Pen and Evening Evergreen ink for the holly leaves since I didn't have the marker or the Blends pen in that color. I like it that I have three ways to color something! And that was it, the card was done.

This was a fun and quick card to make and you can get 12 cards from one 12" x 12" piece of DSP. So you could get a big part of your holiday cards done with just one sheet! 

Thank you SO much for taking your time to stop by and see today's Christmas card,
Wanda


Saturday, October 29, 2022

Lovely & Lasting, Rustic Harvest, Thinking of You Card, Stampin' Up!

I saw this fun card on Kards by Kadie blog and my eyes lit up! I have been looking for a card to make using this DSP from the "Rustic Harvest"  Designer Series Paper (DSP) 12" x 12" package. I had seen a few but was waiting for something else to come along and look what "came along!"  I was thrilled. You can see the original card here.  While you are there, check out some of Kadies other cards and projects, she has some nice items.

Now you know I'm not one for fancy folds but this one was fun and easy to make, plus it still leaves you room on the inside to write. Some of those fancy folds have such limited space and for layouts like this, they add a piece of Basic White on the back to write on. That I do not care for at all. You write on the inside of cards!  It's been a card law for years!!! LOL

The base of the card is a 4-1/4" x 5-1/2" piece of Basic Black card stock. The instructions read that you needed to cut a 3-1/4" x 8-1/2" piece of Basic Black and score it at 4-1/4".  Two pieces of Basic White were cut at 3" x 4".  One is for the inside and one is for the front. I taped those in place but I did glue the folded piece on the front and it was glued about 1/2" from the left edge of the card base. I chose glue for the stability. 

Next the DSP was cut at 2-3/4" x 3-3/4" and taped to the front of the card. Now I didn't follow the way the original card was made or I would have added my ribbon around the Basic White piece with the DSP taped on and then affixed it to the front of the flap. SO my ribbon goes around that flap and is tied in a knot and that's why my not looks different too. But it's okay, it still looks nice. I also added a 1" strip of the DSP to the inside of the card too, at the bottom of the 3" x 4" Basic White piece.

The words are from the "Lovely & Lasting" set and were stamped on a scrap piece of Basic White card stock using black Memento ink. I die cut them with the 1-7/8" circle from the "Layering Circles" die set. And the Basic Black scalloped circle was cut one size larger. I taped the circles together and then glued them to the front of the card. What I do here to make sure I don't get glue or tape on the inside part is I set the circle where I want it to go. Then I open the flap, holding firmly onto the circle and I take my fingernail and "draw" along the edge of the flap on the backside of the circle. This makes a light mark and I know to glue on the other side and almost up to that mark. Once the glue was added I had the flap open and I set the circle in place, looking from the backside and then I opened the card up and laid it sprawled out so I could move the circle a bit if I needed to straighten it out. Then I pressed down firmly to get the glue to adhere.  A couple of rust enamel dots were added to the circle and the card was done.

This was a fun card. I found it very easy to make and maybe next time I'll get the ribbon part done so it's not so bulky inside. It's not all that bulky but I really don't care to see the ribbon on the inside when I open up the card.

I think I'd like to try this layout for a Christmas card. It's quick and easy enough to make several. I am still searching for our annual card. I think I may have found the layout!  

Thank you Kadie, for such a great card to CASE.

And thank you SO very much for taking your time to stop by and see today's Thinking of You card,
Wanda

Friday, October 28, 2022

Artistically Inked, Rustic Harvest, Thank You Card, 2022 Stampin' Up!

I found today's card on Pinterest and I thought I'd give it a try with the materials I have. You can see the original card here and follow along to see how I made it.

The base of the card is a folded half-sheet of Mossy Meadow card stock. This card opens on the right and the fold is on the left.

I cut a strip of Designer Series Paper (DSP) from the "Rustic Harvest" 12" x 12"package. I cut the yellow piece 5" x 1" and I cut another piece from the same package at 4" x 1-1/2".  I colored the leaves in using my Blends pens. I used light and dark Mango Melody, light and dark Pumpkin Pie, dark Calypso Coral, light Cajun Craze, light Old Olive, and Bronze. I tried using my markers but you could see where I went out of line. Yes, I color out of the lines (a lot!!!). But with the Blends pens it doesn't show  when the background is black. After coloring I taped the strips down. The first one, the yellow one was taped about 1/4" from the fold and equally lined up on the top and bottom. The leaf strip was taped on top of that about 1" from the fold and centered as much as you can by eyeing it.

The words are from the "Artistically Inked" set and were stamped using Mossy Meadow ink. I die cut it with the 2-1/8" circle from the "Layering Circles" die set. I moved the circle so the words were at the upper part because I was going to be adding something to the bottom. I wasn't sure what I was going to add because I didn't have what was put on the original card. I got out the "Rustic Harvest" package and I found a sheet of pumpkins, gourds, and leaves so I fussy cut out a pumpkin and some leaves. I wasn't too fond of the gourds. 

I set the word circle in place using Dimenisonals. The pumpkin was added using tape on the upper left part and Dimensionals on the bottom and right side. I added a little bit of tape to the leaves and tucked them under the pumpkin. And the tiny leaf was set in place with pieces of a Dimensional.

I had an enamel dot and I added that above the "thanks".

A 4" x 5-1/4" piece of Basic White was added to the inside and the card was done.

This was fun to make and I got to use some DSP that I probably would have let just sit in the package until it retired!.

Thank you SO very much for taking your time to stop in and see today's thank you card,
Wanda

Thursday, October 27, 2022

Forever Fern, Very Best Occasions, Christmas Card, Stampin' Up!

I have loves using the "Forever Fern" set since it arrived in my first order of the new catalog the year it premiered. I have made many cards with it and I like to try to incorporate it into Christmas cards too. I think I could use fall colors and play with it some more! Hmm, maybe tomorrow. I am pretty sure I will be leaving it out. Putting things back right away is not something I tend to do! LOL

The base of my card is a folded half-sheet of Basic White card stock. I cut a 2-1/2" x 4" piece of Basic White and textured it using the "Wintry 3D" embossing folder. A 2-5/8" x 4-1/8" piece of Basic Red was cut for the layer. I glued the two pieces together.

I set the textured layered panel on top of the card and lightly drew with my pencil along the left and top sides for placement of the dots.

The dots are from the "Forever Fern" set and were stamped using Old Olive ink. I inked the stamp and stamped on the card stock and then stamped one more time without adding more ink. I did this all around the top and left side.

The words are from the "Very Best Occasions" set and were stamped using Real Red ink. I colored in the leaves with my Old Olive marker and the berries were colored in with my Real Red marker. I added Wink of Stella to the leaves and berries. I die cut the words using the 2-1/8" circle die from the "Layering Circles" die and I took the next size larger (2-7/16") and cut a Real Red circle. I taped the circles together and added Dimensionals to the back. I gently set the circle in place. I didn't press down because I needed it a bit loose to tuck in the leaves.

I stamped 3 sets of Real Red leaves from the "Forever Fern" set and two sets of leaves from the same set using Old Olive ink. I die cut them with the matching dies. I added some glue to the backs and then tucked them under the circles. I colored the leaves using Wink of Stella. Make sure you wipe the brush off before going from one color to the next. The Wink of Stella picked up the color and blended it around the leaves. I thought it gave it a smoother looking touch. And that's all there was to making this card.

This was a fun, quick and easy card to make. I like how it turned out, thought I could have used less dots on the top.  

Thank you SO very much for taking your time to stop by and see today's Christmas card,
Wanda


Wednesday, October 26, 2022

Very Best Occasions, Celebrate Everything, Christmas Card, 2022 Stampin' Up!

Bright and festive. I was looking at this very busy Designer Series Paper (DSP) from the "Celebrate Everything" 12" x 12" stack and was wondering what I could do with it that would tone it down a bit and this is what I came up with.

The base of my card is a folded half-sheet of Garden Green card stock. This card opens at the bottom and the fold is at the top.

I cut a 3-1/2" x 4" piece of the busy DSP and taped it to the right side of the card. Then I cut a 1-3/4" piece of the red DSP from the same package and I taped it to the left side. I also cut a super thin 1/8" strip of Crushed Curry card stock and glued it over the area where the two pieces of DSP meet. I used glue because I thought tape would be too difficult to work with on such a thin piece, plus a lot of tape would be wasted. The glue worked just fine.

Then I was stuck. What to do for the rest of the front, it was still a bit too busy. I needed some larger words. I used the words from the "Very Best Occasions" set. I stamped them using Garden Green ink. I colored in the holly leaves using my Garden Green marker and I used my Basic Black marker to draw the center vein lines back in. And the berries were colored in using the Poppy Parade marker. I added a dot of Wink of Stella to each berry.

The word piece was die cut using the second largest stitched circle from the "Stylish Dies" set and I used the second largest scalloped circle from the "Layering Circles" die set. Both were done using Basic White card stock. I taped the circles together. Dimensionals were added to the back and then set in place on the front of the card about 1" from the left edge of the card and equal spacing on the top and bottom, as close as I could by eyeing it. I didn't measure.

A 4" x 5-1/4" piece of Basic White card stock was added to the inside and the card was done.

This was a very fun, quick, and easy card to make. It toned down the busy DSP just enough to be pleasing to my eye!

Thank you SO very much for taking your time to stop by and see today's Christmas card,
Wanda

Tuesday, October 25, 2022

Rustic Harvest, Artistically Inked, Thanksgiving, Friendship, Thinking of You Card, Stampin' Up! 2022

I have been trying to make do with what I have when I run across a card I want to make but don't have all of the elements.  That's the case in today's card. You can see the original card here. And I think it turned out just fine.

The base of my card is a folded half-sheet of Very Vanilla card stock. This card open on the right and the fold is on the left. 

I cut a piece of Designer Series Paper (DSP) from the "Rustic Harvest" 12" x 12"package, it measured 5-1/2" x 2".  I taped it to the left side of the card about 3/8" from the fold.

The pumpkins image is from the same package of DSP and was cut at 3" x 5".  I set that on the front of the card using Dimensionals. It's also about 3/8" from the right edge and visually centered from the top and bottom edges. 

I did not have a pumpkin as shown in the original card so I thought I'd just go with out it and let the DSP speak for itself.

The words are from the "Artistically Inked" set and were stamped using Cajun Craze ink. I die cut them using the stitched ribbon die from the "Stylish Shapes" die set. I die cut the over to the right because I was planning on tying a bow and affixing it to the open are. I had some wide twine left from a Paper Pumpkin kit a while back so I thought I'd use it. Not only am I using what I have, I'm trying to use up the little bits of stuff around here. There's still some more of that twine left but now that I'm on a mission to start using that stuff up, I may actually succeed!  Wouldn't that be nice? LOL 

Next I set the word piece in place using Dimensionals. It's about 1-1/4" up from the bottom edge and about 1/8" from the DSP edge on the right. I don't think it would matter where you put the words, I think they would look great anywhere on this card.

So once the words were set in place on the front of the card, the bow was glued in place. I'm sure a glue dot would work too but my glue was out so I grabbed that. You want something stronger than your tape runner.  And once the bow was added, the card was done.

This was a super quick card to make and SO easy to do too!

This card could be used for a Thanksgiving card, friendship card, or a thinking of you card and for both male or female!

Thank you ever so much for taking your time to stop in and see today's harvest hello card,
Wanda

Monday, October 24, 2022

Very Best of Occasions, Christmas Card, 2022 Stampin' Up!

I had some scraps of Designer Series Paper (DSP) from the "Celebrate Everything" 12" x 12" stack and I thought I'd use them. Now this card doesn't use much DSP at all so if you are planning on making your holiday cards using this layout, you may get quite a few out of one 12" x 12" sheet. So if you took one sheet of the green and one sheet of the red you can get and cut the strips 1" wide by 2" long you can get 36 cards!  Hmmm. I may be rethinking our holiday card for this year!! 

So let's talk about how I made this simple card. The base of the card is a folded half-sheet of Poppy Parade card stock. This card opens on the right and the fold is on the left.

I cut four 1" strips of DSP that measure 2" long. My DSP is from the "Celebrate Everything" package. 

A 4" x 5-1/4" piece of Basic White card stock was cut for the top layer. I taped the 1" strips across the bottom. 

Next I cut a 3/4" strip of Poppy Parade card stock to go horizontally across the front of the card. I set that on the card to see where the words were going to go.

The words are from the "Very Best Occasions" set and were stamped using Garden Green ink. I colored in the leaves using my Garden Green marker and my Poppy Parade marker for the berries. Then I taped the Basic White piece in place on the front of the card.

The strip was taped over the area where the edge of the strips are, I pretty much centered that strip over the edge of the 2" strips.

I colored some crystal rhinestones with my Blends pen and set them in place on the front of the card.

A 4" x 5-1/4" piece of Basic White card stock was added to the inside and the card was done.

This is a very quick and easy card to make. It's got a nice look to it too.

Thank you SO very much for taking your time to stop by and see today's Christmas card,
Wanda

Sunday, October 23, 2022

Snowman Magic, Celebrate Everything, Christmas Card, 2022 Stampin' Up!

I found a fun card on Pinterest that caught my eye because it used the busy Designer Series Paper (DSP) from the "Celebrate Everything" 12" x 12" stack. I changed it a bit because I didn't want to make a fancier card, I just wanted a regular layout.

The base of the card is a folded half-sheet of Poppy Parade card stock. This card opens on the right and the fold is on the left.

I cut a 4" x 5-1/4" piece of Basic White card stock for the inside and a 4" x 5-1/4" piece of DSP from the "Celebrate Everything" stack. I taped the Basic White piece in place on the inside and the DSP on the front.

The words are from the "Snowman Magic" set and were stamped using Garden Green ink. I die cut them with the second largest stitched circle from the "Stylish Shapes" die set. I also die cut a Garden Green scalloped circle using the die from the "Layering Circles" die set. I taped the stitched circle to the scalloped circle.

I used a 10" piece of "Iridescent Trim" to place under the circles. I taped them to the middle of the card with some scotch tape. The circle was added over the top of it using Dimensionals. And the card was finished. Though I think I may add a tiny crystal rhinestone to the snowflake on the word circle. 

Thank you SO very much for taking your time to stop in and see today's Christmas card,
Wanda

Saturday, October 22, 2022

Rustic Harvest, Very Best Occasions, Thanksgiving or Thank You Card, Stampin' Up!

I found this card on Pinterest and thought the colors were so pretty that I had to make one. You can see the original card here.  This was a fun and easy card to make. Plus I really like this layout.

The base of my card is a folded half-sheet of Basic Black card stock. This card opens on the bottom and the fold is on the top. I added a 4" x 5-1/4" piece of Basic White card stock to the inside.

I cut a 4" x 5-1/4" piece of Mossy Meadow card stock and textured it using the "Painted Texture" embossing folder. I glued the card stock on top of the card base.

Then I cut a 5-1/4" x 1" strip of Basic Black card stock and glued it to the front of the card about 1-1/8" down from the top edge/fold.

The Basic Black square was cut at 3-1/4" x 3-1/2" and the Designer Series Paper (DSP) from the "Rustic Harvest" 12" x 12" package was cut at 3" x 3" and then cut into three 1" strips. I taped the outside strips on first and then the center one.  It makes it a lot easier to get them spaced nicely. I added Dimensionals to the back of the piece and set it in place on the front of the card.

The words are from the "Very Best Occasions" set and were stamped using Mossy Meadow ink. I die cut them with the ribbon type die from the "Stylish Shapes" die set. I set the piece in place by using a Dimensional on the left and tape on the right.

I fussy cut a leaf from another sheet of the DSP in the same "Rustic Harvest" pack and I taped the one end and added a Dimensional to the left side and the card was done.

This was fun to make and I really like playing with this layout. I have lots of DSP and I think I'm going to look for something that will work with this layout so I can play with it again!

Thank you SO very much for taking your time to stop in and see today's Thanksgiving
Wanda

Friday, October 21, 2022

Rustic Harvest, Very Best Occasions, Thanksgiving Card, Stampin' Up! 2022 Fall Mini Catalog

Today I thought I'd set my Halloween sets aside and play with some Designer Series Paper on my cards. On top of the pile is the "Rustic Harvest" 12" x 12" DSP so I decided that's what I'm playing with.

The base of my card is a folded half-sheet of Basic White card stock. This card opens on the right and the fold is on the left.

I cut a 4" x 5-1/4" piece of Cajun Craze for the layer and the fun layers on top of that are a 3-7/8" x 5-1/8" piece of Basic White that I die cut the bottom using a die from the "Basic Borders" die set. The tip of that die is about 1-1/4" up from the bottom and and about 1-1/4" over from the left edge. On the right edge the piece measures about 3" from the top to where it's die cut. It's kind of hard to measure things like this. I just set the die on the piece until I thought it looked nice.

The DSP was cut at 2-1/2" x 3-7/8". I taped that down on top of the Cajun Craze card stock.  I textured the Basic White piece using the "Painted Texture" embossing folder and I glued that in place. I prefer the glue because it sticks better than tape because glue gets on those bumpy areas and stays put where tape is everywhere but doesn't stick everywhere.  

The pumpkins are cut from the same DSP and were set in place using Dimensonals. I cut a few extra leaves and glued them in place on and under the pumpkins.

The words are from the "Very Best Occasions" and were stamped using Mossy Meadow ink on a scrap piece of Basic White card stock. I die cut them with the die from the "Stylish Shapes" die set. I set the words in place using Dimensionals and the card was done.

This was a fun and easy card to make. I find it funny how I can type up how I made the card so much quicker than it too me to make it. Though you have to take into account getting out the things you need to make this card. Not everything is left on my worktable.  Most days!!! LOL

Thank you SO very much for taking your time to stop by and see today's Thanksgiving card,
Wanda


Thursday, October 20, 2022

Mini Envelope Pocket Dies, Gift Card Holder, Stampin' Up! 2020 Fall Catalog

I bought the "Mini Envelope Pocket" die set a while back. For some reason I just had to have it. I do recall using the oval in it for some other cards but other than that it's just sitting on my worktable. So today I was looking for something fun to make and it dawned on me that I'm going to be in need of some gift cards for Christmas and what would be better than some fun holders for them. So here's my first one.

I took a piece of Basic White card stock and die cut the folder. A quarter sheet will make one.

Then I glued the side and bottom shut.

I tore a piece of scrap card stock and used it for the snowline. I colored the snowline in using Wink of Stella. I could have added a diamond glitter paper for the snow, but I wasn't sure how well it would hold up on the corners. SO I just went with a flat base.  I took the torn scrap piece and set it on the bottom area of the holder and using Balmy Blue ink and my Blending Brush, I scrubbed on some color in the center and worked my way outward. I also covered the snowman using Wink of Stella.

I die cut two snowman bodies. One for the front and one for the back. I also die cut the arms and hat at the same time. When I die cut the second snowman body, I die cut the face on the first one (save the nose). I also had stamped the scarf using Balm Blue ink and I die cut it at the same time. Oh and the little snowflake too. I like to die cut as much as I can with one pass. My arm gets tired cranking that thing so many times!  LOL

I took the arms and colored them in using my Bronze Blends pen. You can use Crumb Cake markers or Blends pen or even card stock. I like the look of the Bronze Blends pen for this. I added two dots of glue on the second snowman and I set the arms in place. 

I colored the face area using my Basic Black marker. I made sure the eyes and mouth on the front piece showed through as black. Then I glued the front to the back, sandwiching in the arms.

I stamped the buttons on the bottom using black Memento ink.

The scarf was glued in place. Before adding the hat I took a thin strip of Daffodil Delight card stock and glued it to the hat. The hat was then glued in place.

The nose was colored using my dark Pumpkin Pie Blends pen and glued in place on the face.

I set the snowman in place using Dimensionals. I added the snowflake and the gift card holder was done. Though I think I'm going to add a little rhinestone to the center of the snowflake, it looks like it needs something. I think the next one I make will have more details, there's lots of dies in that set!!

Thank you SO very much for taking your time to stop in and see today's gift card holder,
Wanda


Wednesday, October 19, 2022

Best Witches, Scary Cute, Kid Friendly Halloween Card, Stampin' Up! 2022 Mini Catalog

I found today's card on Pinterest. I was ready to move on from Halloween cards but I found this cutie and thought I'd give it a try. There's not a lot of info on how it was made, so here's how I made mine. 

The base of the card is a folded half-sheet of Basic Black car stock. This card opens on the right and the fold is on the left.

I cut a 4" x 5-1/4" piece of Basic White car stock for the inside and I taped it in place. And I cut a 4" x 5-1/4" piece of Designer Series Paper (DSP) from the "Black & White Designs" 12" x 12" package. The stars have stars on the back so I cut a 1-1/2" x 5-1/4" strip for the center of the card. I did cut a strip of scrap card stock just a little bit smaller than 1-1/2" x 5-1/4" to tape behind the DSP. I needed it to be a bit more firm than it is. I took some Highland Heather ribbon that I had and I taped the ends to the back of the strip.  

The 4" x 5-1/4" piece of DSP was taped to the front of the card and then the strip was taped in place.

I stamped the witch from the "Best Witches" set using black Memento ink. I colored her in using Blends pens. I used light and dark Highland Heather, dark Daffodil Delight, dark Basic Gray, light Basic Black, Bronze, and both light and dark Petal Pink. I fussy cut her out before I colored her.

Then I cut a 2-1/2" x 3-1/2" piece of Basic White card stock and I stamped some stars on it. I didn't have the stars that were used on the original card so stamping the ones from the set did the trick. I cut a 2-3/4" x 3-3/4" piece of Highland Heather for the layer. I taped the two layers together.

The witch was set in place on top of the two layers using Dimensionals. And Dimensionals were added to the back of the layers and set in place on the front of the card. 

I added a bat using Dimensionals. Wink of Stella was added to the bat for some sparkle. I also put some on the hat buckle but it doesn't show up much.

A bow was added to the top of the card and then the words were added. They are from the same "Best Witches" set and were stamped using black Memento ink on a scrap piece of Basic White card stock. 

Tuesday, October 18, 2022

Best Witches, Kid Friendly Halloween Card, Stampin' Up! 2022 Mini Catalog

Like I was saying in yesterday's post, there's not that many more days until Halloween and I haven't used my Halloween sets as much as I would have liked to.  I always tell myself not to buy too many sets because I don't get to play with them all as much as I'd hoped. And when the catalogs come out that little voice in my head that tells me to be cautious is muffled!!! LOL  So here I am with sets that got very little use. Today I'm playing with "Best Witches" and here's how I made my card.

The base of my card is a folded half-sheet of Blackberry Bliss card stock. This card opens on the right and the fold is on the left. 

I cut a 3-3/4" x 5" piece of Granny Apple Green card stock and I textured it using the "Painted Texture" embossing folder and then I glued it to the front of the card.

I cut three strips of Designer Series Paper (DSP) from some scraps I had sitting on my worktable. I cut them at 1/2" and glued them in place. I like to use glue on textured card stock because tape doesn't seem to get into all the areas and doesn't seem to stick as well as I'd like it to.

Next I stamped the witch from the "Best Witches" set using black Memento ink. I colored her in using my Blends pens. I used Blackberry Bliss, light and dark. Light Black. Dark Smoky Slate. Granny Apple Green, light and dark. Light Mango Melody. Light and dark Light Petal Pink. And Bronze. I did fussy cut her out before I colored because I recall having ink in my fingers when cutting and having it transfer from one area to the other. So I learned to cut first and then color. I set her in place using Dimensionals.

The words are from the same "Best Witches" set and were stamped using black Memento ink. They were die cut using the die from "Stylish Shapes" set. I set the words in place using Dimensionals.

A 4" x 5-1/4" piece of Basic White card stock was taped to the inside and the card was done.

Thank you SO very much for taking your time to stop in and see today's Halloween card,
Wanda

Monday, October 17, 2022

Scary Cute, Kid Friendly Halloween Card, Stampin' Up!

I just realized there's only a couple weeks left until Halloween and then I have to stop making Halloween cards. I haven't made that many and I have a couple of stamp sets that are being neglected. I'm wanting to move on to fall and Christmas cards. But today I thought I'd throw in a Halloween card and here it is and how I made it.

The base of my card is a folded half-sheet of Basic Black card stock. This card opens on the bottom and the fold is on the top.

Next I cut a 4" x 5-1/4" piece of Gorgeous Grape for the layer and taped it on top of the card front.

A piece of Basic Black was cut at 4-3/4" x 3-1/2" and the Granny Apple Green Designer Series Paper (DSP) from the "Brights Collection" 6" x 6" stack was cut at 3-1/2" x 3-1/4". I taped the DSP to the Basic Black piece and I taped those to the Gorgeous Grape piece.

Then I die cut the Pumpkin Pie circle using the second largest stitched circle die from the "Stylish Shapes" set and a Basic White one (or any scrap you have).I cut a circle from that circle using the 5th circle die in the set. And I cut two small Basic White circles. One I stamped the frog from the "Scary Cute" set using black Memento ink and the other I stamped "Boo" from the same set. The frog was colored in using the light and dark Granny Apple Green Blends pens. The "Boo" had been stamped to the right side of the circle because in my head I'm thinking I am going to add a bat to the other side.

So now that I have my circles cut and stamped, I taped the "boo" one to the inside of the Pumpkin Pie circle. Oh, I forgot to say, the Pumpkin Pie DSP is from the "Gingham Cottage" 12" x 12" stack. Dimensionals were added to the back and the piece was set on the front of the card about 1" from the right edge and eyed evenly as possible on the top and bottom.

The frog piece was added using a couple of Dimensionals on the left and a little bit of tape on the right.

The bats were glued in place. A 4" x 5-1/4" piece of Basic White card stock was added to the inside and the card was done.

This was such a fun card to make. It's such a different layout than I usually use. Sometimes it's good to step outside the box!! LOL

Thank you SO very much for taking your time to stop by and see today's kid friendly Halloween card,
Wanda

Sunday, October 16, 2022

Snowman Magic, Penguin Place, Christmas Card, Stampin' Up!

I found a card on Pinterest that I thought I would give a try BUT I found out that the triangle dies are retired and I do try to use current products as much as I can. SO I improvised. Read on to see how I made this card with my changes. You can see the original card here

The base of my card is a folded half-sheet of Basic White card stock. This card opens on the right and the fold is on the left.

On the link there were no instructions on how the rectangle frame had been done. I did try to use two thicknesses of card stock but it didn't give the same appearance, so I ended up just die cutting the rectangle from a piece of Basic White card stock. I used the third largest rectangle from the "Rectangle Stitched Framelits" set. 

Since the triangle dies were retired, which I found sad because I don't recall using them much at all, I ended up using my stitched square dies from the "Stylish Shapes" set. I used the second and third largest dies. I cut them in half on the diagonal. The Designer Series Paper (DSP) I used is from the "Lights Aglow" 6" x 6" stack. Since the squares were cut in half the long side didn't have any stitched marks, so what I did was I die cut two pieces from the smallest long rectangle dies in the "Rectangle Stitched Framelits" set.  

The green and cream colored pieces were taped together and the red rectangle strips were taped on top. I did cut the rectangle strips in the center area because they were too long. Then I taped the piece to the Basic White stitched rectangle piece. 

The words were stamped next. They are from the "Penguin Place" set and were stamped using Cherry Cobbler ink. Dimensionals were added to the back and the piece was set in place on the front of the card.

The snowman was die cut using some scrap Basic White card stock. I die cut two, one for the front and one for the back. The face was then die cut. I saved the nose and colored it with my Pumpkin Pie marker.

The arms were die cut and colored with the Bronze Blends pen. You can also use Crumb Cake or Early Espresso card stock. 

I stamped the scarf using Soft Succulent ink and die cut it with the matching die. At the same time I die cut the hat using a scrap piece of Basic Black card stock.

On the second snowman piece I colored in the face area using my Basic Black marker. I set the first snowman on top to make sure the eyes and mouth showed up black. I stamped the buttons on the bottom part of the snowman body using black Memento ink.

Next I added a dot of glue on each side of the body for the arms. I pressed them down a bit and then I glued the first snowman to the back. 

The nose was added next using a toothpick and a little bit of glue.

The scarf was glued on and then the hat. For the band on the hat I cut a sliver of Daffodil Delight card stock and glued it in place. 

Dimenisonals were added to the back of the snowman and it was set in place over the red rectangle strips.  And the card was done.

I had a lot of fun making this card and I'm pleased with the way it turned out.

Thank you SO very much for taking your time to stop by and see today's Christmas card,
Wanda

Saturday, October 15, 2022

Very Best Occasions, Rustic Harvest, Thanksgiving or Thank You Card, 2022 Stampin' Up! Fall Mini Catalog

Today's card is simple, easy, and fun to make. Even with a little bit of fussy cutting! I'm not a big fan of fun or different folds but this card needed it to be effective.

The base of my card is a folded half-sheet of Cajun Craze card stock. It was cut in half on the short side, so once cut it measured 4-1/4" x 11".  This card opens on the right and the fold is on the left.

I measured 2" up from the bottom and cut the front part to the fold. Then I cut on the fold from that cut mark to the top. I saved that piece for later.

I cut a 1-7/8" x 5-1/8" piece of Designer Series Paper (DSP) from the "Rustic Harvest" 12" x 12" package and taped it to the front of the card. 

Next I used the 2-1/8" circle die from the "Layering Circles" die set and cut the half circle about 3/4" in from the right edge. Then I took that scrap piece that I saved and die cut a scalloped piece using the 3rd largest 2-9/16" scalloped circle die and the 2-1/8" die at the same time I cut the scalloped ring for the circle. I glued it in place and then trimmed the ends. 

A 4" x 5-1/4" piece of Basic White card stock was cut for the inside. 

Then I fussy cut the pumpkin and a couple of leaves from the "Rustic Harvest" DSP. I glued one leaf to the bottom part of the pumpkin, next to the leaf that was already printed on the pumpkin. It looked kind of odd just sitting there alone and after adding the second leaf it looked just fine. I also had a tiny leaf on the scraps that were left so I fussy cut it out too. 

I laid the pumpkin in the circle area for placement and to see where I would be adding the words. The words are from the "Very Best Occasions" set and were stamped using Cajun Craze ink. Then the Basic White piece was tape to the inside part of the card.

The pumpkin was set in place using Dimensionals and that little leaf was glued in place. I learned a new trick when it comes to gluing in tiny pieces.  You use the pick up tool, the end that has the blue sticky stuff and hold the piece you want to use. You add the glue to it and just press it in place. No more trying to hold onto tiny pieces or dropping them either!!! Such a game changer for me and I know a friend who is going to love this idea. She's got arthritis and this will be a game changer for her too. And after the leaf was added the card was done.

See, I told you it was fun, quick, and easy to make!

Thank you SO very much for taking your time to stop by and see today's Thanksgiving card,
Wanda

Friday, October 14, 2022

Rustic Harvest, Artistically Inked, Friendship Card, Stampin' Up! 2022 Fall Catalog

Today I found another fun card using the "Rustic Harvest" Designer Series Paper (DSP). I'm still not sure why I bought this package of DSP but I need to make sure I use it! I'm sure I won't use it up but at least I can make a few cards I like from it and today's card is one I do like. You can see the original card here

The base of the card is a folded half-sheet of Crumb Cake card stock. This card opens on the bottom and the fold is on the top.

I cut a 4" x 5-1/4" piece of Basic White and taped it to the inside.

Then I cut a 2" x 4" piece of DSP from the "Rustic Harvest" 12" x 12" package and I taped it to the left side of the card, making it equal on the top, side, and bottom.  

Then I cut a 3" x 4" piece of DSP from the same "Rustic Harvest" package and I taped it to a 3-1/4" x 4-1/4" piece of Mossy Meadow card stock and that was then taped to the front of the card.

The words are from the "Artistically Inked" set and were stamped using Mossy Meadow ink on a scrap piece of Basic White card stock. I die cut them using a die from the "Stylish Die" set. I set the word piece in place using Dimensionals.

I tied a black Baker's Twine bow and glued it to the left side of the word piece and I fussy cut a leaf from the DSP and with a dot of glue, I stuck it to the upper corner of the word piece and the card was done.

This was a very fun, quick, and easy card to make. I do like how it turned out.

Thank you SO very much for taking your time to stop by and see today's friendship card,
Wanda

Thursday, October 13, 2022

Rustic Harvest, Art Gallery, Masculine Birthday Card, 2022 Stampin' Up! Fall Mini

Today's card was found here on Pinterest. I was looking for a card to make using the "Rustic Harvest" Designer Series Paper (DSP) and I saw this one. It did involve some fussy cutting, but I was up for the challenge

Here's how I made the card. First I fussy cut three pumpkins and some leaves. I fussy cut around the vines. That part I didn't like but I survived it! LOL  Then I cut the card stock.

The base of the card is a folded half-sheet of Basic Black card stock. I cut a 4" x 5-1/4" piece of Basic White for the inside.

Next I cut the DSP from the "Rustic Harvest" 12" x 12" package. It measured 4" x 5-1/4" and I taped it to the front of the card.

Then the top two layers were cut. The Basic Black piece measured 4-1/8" x 2-7/8" and the Basic White piece measured 4" x 2-3/4".  

The pumpkins and leaves were fussy cut and the one pumpkin with the vine was the worst to cut because the vine was kind of winding around a bit. But I cut it out and was happy with the way it looked. 

I set the second and third pumpkin on top of the Basic White piece to see where the words would go. The words are from the "Art gallery" set and were stamped using Mossy Meadow ink.

Next I taped the Basic Black piece to the Basic White piece and began adding the pumpkins and leaves. I set the piece in place on the front of the card using Dimensionals.

I taped a 4" x 5-1/4" piece of Basic White card stock on the inside and the card was done.

This was a very fun and easy card to make. It's not only great for a fall Thanksgiving type card but a masculine birthday card as well.

Thank you SO very much for taking your time to stop by and see today's masculine birthday card,
Wanda

Wednesday, October 12, 2022

Scary Cute, Kid Friendly Halloween Card, Stampin' Up! 2022 Fall Catalog

When I saw this card on Pinterest I just knew I had to make one. I love finding kid friendly Halloween cards. This one was just too cute to pass up. You can see the original card here.  

The base of this card is folded half-sheet of Basic Black card stock. This card opens on the right and the fold is on the left.

A 4" x 5-1/4" piece of Basic White card stock was cut for the inside and for the top of the card.  And a 4-1/8" x 5-3/8" piece of Basic White card stock was cut for the layer on top of the card base.

I die cut a circle using the 2-1/8" die from the "Layering Circles" die and I set it on top of the smallest Basic White piece. I took my Blending brush and scrubbed on some Daffodil Delight around the circle.  Then I scrubbed on some Pacific Point ink and I did get some on the Daffodil Delight (on purpose!). And then Night of Navy ink was scrubbed on the outer area.

I die cut the tree and bats from the same "Scary Cute" bundle using Basic Black card stock. 

I took a scrap piece of Basic Black card stock and cut the ground freehand. 

The words are from the "Scary Cute" set and were stamped on the ground piece using Versa Mark. They were then embossed with white embossing powder. I always have trouble getting the words straight when I use white on a dark background. Once the words were done I taped the ground piece in place.

Then I stamped the Frankenstein boy from the same "Scary Cute" set. I used black Memento ink to do that.

I glued the tree and bats in place.

And for the final touch, I took my white gel pen and added some stars to the sky. And the card was done.

This was a very fun and quick card to make.

Thank you SO very much for taking your time to stop by and see today's kid friendly Halloween card,
Wanda


Tuesday, October 11, 2022

Snowman Magic, Lights Aglow, Christmas Card, Stampin' Up! 2022 Fall Mini Catalog

Tonight I thought I'd make a quick card.  We are in the process of having new windows installed in this old house. I look forward to the house being warmer this winter but it's so disruptive to have it done. Moving everything away from the windows. Not such a big deal until you get to my workroom.  I need to downsize!!  LOL  But a week from today it will be long over and I'll be happy! And it will be quieter. I say quieter because there's still noise outside because our streets are being totally redone. Each day brings a new noise! Proposed deadline is the beginning of November, so that's winding down too! Maybe the new windows will be quiet and I won't hear the noise from the street as much!! Anyway, let's talk about today's quick and simple card.

The base of my card is a folded half-sheet of Very Vanilla card stock. This card was cut in half on the short size so once it was cut it measured 4-1/4" x 11". 

I cut a 2-1/4" x 5-1/2" piece of gold foil card stock and a 2" x 5-1/2" piece of Designer Series Paper (DSP) from the "Lights Aglow" 6" x 6" stack. There's some really pretty papers in that stack. I taped the DSP to the gold foil piece and then I taped that to the front of the card about 3/8" from the left side.

The words are from the "Snowman Magic" set and were stamped using Versa Mark and then embossed with gold embossing powder. I die cut them with the second largest stitched circle die from the "Stitched Shapes" die set.

The gold foil layer behind it is from the "Layering Circles" set. I used the 2-11/16" die. I taped the two layers together and then I set them in place with Dimensionals.  As I look at the card I think that little snowflake could use a crystal rhinestone, so I'll be adding one once I'm done posting this.

This was a fun and quick card to make. I like the layout, it's simple yet effective. You can use up some scrap pieces of DSP with this layout. Or you can make a lot of cards with one sheet of DSP. A 12" x 12" sheet would give you 12 strips to make 12 cards. I may dig out some retired DSP and make our Christmas cards with it so I can use up some of it. I have SO much in my stash.

Thank you SO very much for taking your time to stop by and see today's Christmas card,
Wanda

Monday, October 10, 2022

Snowman Magic, Christmas Card, 2022 Stampin' Up! Fall Catalog

I found a fun card using the snowflake frame die from the "Snowman Magic" bundle. I thought it was clever how the die was cut twice and used one on top of the other. That was what caught my eye about the original card. You can see that card here

This card was easy to make and very quick too.

The base of the card is a folded half-sheet of Night of Navy card stock. This card opens on the bottom and the fold is on the top. When I cut the full sheet, I cut it on the short 8-1/2" side.  So once it was cut it measured 4-1/4" x 11". I added a 4" x 5-1/4" piece of Basic White card stock to the inside.

Next I die cut the snowflake frames. I cut a piece of Balmy Blue and Basic White card stock at 3-1/2" x 4-3/4". Then I cut a piece of Night of Navy at 3-3/4" x 5".  And next I cut a piece of Balmy Blue card stock at 3-7/8" x 5-1/8".  

The words are from the "Snowman Magic" set and were stamped using Night of Navy ink on a piece of Basic White card stock. I die cut the piece using the second largest stitched square in the "Stylish Shapes" die set. 

Now to assemble the card. I glued the two snowflake frames together. I set the Balmy Blue one down on my worksurface. Then I added glue to the back of the Basic White piece and made sure it was the opposite of the Balmy Blue piece and I set it on top. I set it aside to dry a bit.

I glued the Bamly Blue layer down and then the Night of Navy down on top of it.

The word piece was laid on top and the snowflake frame was laid on top of that for placement. Once I got the word piece where I wanted it, I held it in place and removed the snowflake frame. I used my fingernail and "drew" a line on the side and bottom of the square so I could see on the Night of Navy piece where it was going to be set. I taped the back of the word piece and set it in place, lining up the side and bottom following the lines I "drew". 

Then the frame piece was glued on top. Crystal rhinestones were added to some of the snowflakes in the frame and the card was done.

It's SO pretty. I think I'd like to try another card sometime using the double frame and maybe adding the snowman or something fun!

Thank you SO very much for taking your time to stop by and see today's Christmas Card,
Wanda 

Sunday, October 09, 2022

Lights Aglow, Christmas Card, Split Circle Technique, Stampin' Up! 2022 Fall Mini Catalog

Today's card was a lot of fun to make. I have been having fun with the "Split Circle" technique. I found a card on Pinterest and I thought it would be fun to use the Designer Series Paper (DSP) that I have to make it into a Christmas card. You can see the original card here

The base of my card is a folded half-sheet of Basic White card stock. This card opens on the bottom and the fold is on the top. I cut a 4" x 5-1/4" piece of Basic White card stock, I textured it using the snowflake die in the "Wintery 3D" embossing folder set. I glued this piece to the front of the card.

Then I die cut the circles using paper from the "Lights Aglow" 6" x 6" stack. There's some mighty pretty papers in that stack. One side they are embossed with gold and the backsides are not but are just as pretty. I used the 2nd, 3rd, and 4th largest stitched circles in the "Stylish Shapes" die set. And I cut each circle in half. You need to cut two large and two small of each color and the middle one is the same for the top and bottom piece.

Next the circles were taped together and glued in place on the front of the card.

I die cut a couple of gold foil leaves using the die from the "Forever Fern" set. I glued then in place on top of the line of the light green half-circle.

The words are from my computer. I used the Lucinda Handwriting font and the RGB code for the Evening Evergreen color 73R 90G 83B.  I printed them out and cut them 1/2" x 3-7/8".  I should have set the strip on the card using Dimensionals instead of gluing it in place.  It could stand a bit of depth.  But all in all I like it and I think I would make this card again. I may make a few for Christmas cards this year. They don't take a lot of DSP to do it.

Thank you SO very much for taking your time to stop by and see today's Christmas Card,
Wanda

Saturday, October 08, 2022

Scary Cute, Halloween Treat Holder, Weekend Project, Stampin' Up! 2022 Fall Mini Catalog

I found this fun coffin treat holder on Pinterest and I clicked through the link to see if there were any instructions.  I did find them but I also found them hard to follow.  It could be that I was just too tired to think straight but I tried a couple of times and then just figured it out on my own. You can see the original instructions here

Here's how I made it. The Basic Gray card stock was cut at 8-1/2" x 2-3/4".  This piece was scored at 4", 4-1/4" and 4-1/2". It was folded in half for the cutting part.

On the top edge I marked both left and right at 3/4". On each side, one inch down I placed a mark. And on the bottom I marked each side (on the fold) 1/2". I cut the top corners off first, following the side and top markings. Then I cut the bottom one using the same side marking to the bottom marking on the fold. Now it looks like a coffin, right?  


Next is the inside piece that holds the treat. I could not for the life of me figure out how the piece was made. So here's how I made mine. I took a 4-1/4" x 2-1/2" piece of Basic Gray card stock. I scored it on the short side at 3/8" on the left and the right. I turned the piece to the long side and I scored it at 1-7/8" and 2-3/8".  I clipped the small side pieces and snipped the edges to allow for the piece to fold in nicely. Did you notice I fell off the track scoring?  It's easy to hide, just make sure you cover that part or put it to the back! Once the pieces were cut I stamped them using the dotted image from the "Color & Contour" set because I didn't have any other spotted looking image. It did the job. I stamped it with Basic Gray ink.

Now to assemble, I glued the sides of the treat holder together and then I glued it to the inside of the coffin. Glue was added to the bottom and the back.


I die cut the haunted house from the "Scary Cute" bundle using Basic Black card stock and I glued it on the front of the holder. I added a Crushed Curry moon too.

For the front I stamped the little Frankenstein boy from the same set using black Memento ink on Basic White card stock. I fussy cut him out. Then I die cut a stitched circle, it was the 3rd smallest in the "Stitched Shapes" die set. I took my Blending brush and scrubbed on some Night of Navy ink. The Basic Black circle behind it was the 4th smallest in the "Layering Circles" die set. I taped the two circles together. I set it in place on the front of the treat holder using Dimensionals.

The words are from the same set and were stamped on a scrap piece of Basic White using black Memento ink. I die cut them with the cute die from the same "Scary Cute" bundle. I set them in place using Dimensionals.  

I added a few Basic Black card stock bats that are also part of that bundle.  Those I glued in place.  And the treat holder was done.

This was fun and pretty easy to do once I figured out how to make the holder part. 

I apologize for how this post looks. Blogger must have been having issues. I had a lot of problems downloading the phots.  I've never encountered this before and this is what I ended up with. I had to run with it because I needed to get this posted.  I hope they fix the problem soon.

Thank you SO very much for taking your time to stop by and see today's Halloween treat holder,
Wanda

Friday, October 07, 2022

Snowman Magic, Christmas Card, 2022 Stampin' Up! Fall Mini Catalog

Here's another card I had fun making. I had gotten a package of DSP and several coordinating colors of card stock from Terri when I had placed an order. I ran across it when I was moving some stuff on my worktable. I did not say I was cleaning up my worktable, I said I was moving some stuff.  We all know the table needs to be cleaned but not today!!!

I was looking through the colors of the Designer Series Paper (DSP) and they were so sparkly. The sheets have gold embossing on them. I turned them over to see what was on the back and I saw the snowflake piece. I don't remember what was on the other side of this piece, once I saw the snowflake I was hooked. The DSP is from the "Texture Chic" 12" x 12" package. I had received six 4" x 6" pieces. So here's what I did with this piece.

I took a piece of the Soft Succulent card stock that was in the package and I folded it in half.

Then I took a piece of Basic White card stock and textured it using the "Winter 3D" embossing folder. It's a thinner folder, as in not as wide as the other ones, so I had to run the card stock through the Big Shot twice. I just moved the card stock over just enough to get the image all over it but trying not to show a line where I joined the two embossings.  I think I did a pretty good job because I can't see where I met the first run with the second run. I glued this piece to the front of the card.

Next I cut the DSP at 2-1/4" x 4-1/4" and a piece of Evening Evergreen (that came in the package) at 3" x 4-1/2".  I taped the two pieces together and then I glued it to the front of the card.

The words are from the "Snowman Magic" set and were stamped using Evening Evergreen ink. I die cut them using the second largest stitched circle die from the "Stylish Shapes" die set. And for the layer behind it, I die cut the 2-11/16" (second largest) circle from the "Layering Circles" die set. I taped the two circles together. Dimensionals were added to the back and the circle was set in place on the front of the card. 

I added a tiny crystal rhinestone to the snowflake in the circle and a 4" x 5-1/4" piece of Basic White card stock to the inside and the card was done.

This was a very fun, quick, and easy card to make.

Thank you SO very much for taking your time to stop by and see today's Christmas card,
Wanda

Thursday, October 06, 2022

Best Witches, Kid Friendly Halloween Card, Split Circle Technique Stampin' Up! Fall Mini Catalog 2022

I had so much fun making this card. I was looking on Pinterest and saw a card that used the "Split Circle" technique so I thought I'd see if I could make one using a Halloween motif.  And here it is. I think the green background could use something more but other than that I like it. Maybe I'll add a few black bats, I don't know but it does need something. You can see one I made by clicking here

The base of my card is a folded half-sheet of Basic White card stock. This card opens on the bottom and the fold is on the top.

I cut a 4" x 5-1/4" piece of Basic Black card stock for the layer and a 3-7/8" x 5-1/8" piece of Granny Apple Green Designer Series Paper (DSP) from the Brights Collection 6" x 6" stack. I taped that on top of the Basic Black piece.

Next I die cut the circles using the 2nd, 3rd, and 4th largest circles in the "Stylish Shapes" set. I counted the circles being the largest one was number 1. 

I used Highland Heather DSP from the "Brights Collection" stack. Pumpkin Pie from the "Gingham Cottage" 12" x 12" stack, and Basic Black from the "Black & White Designs" 12" x 12" package. You need to cut 5 circles. The center one can be used for both the top and bottom split. You need to cut one large and one small of the Highland Heather and Basic Black ones. After you die cut them you need to cut them in half. After I die cut mine, I folded the scrap piece in half to find the center of the circle. I placed the circle back inside the piece and then marked center on the top and bottom lightly with a pencil. After they were cut I assembled the circle halves and taped them together. Put them together before you tape them or you could mess them up.  Yup, speaking from experience here!!

I die cut the second to the last circle using a scrap piece of Basic White card stock. I colored it in using Gorgeous Grape ink and my Blending brush. 

The frog is from the "Best Witches" set and was stamped using black Memento ink. I fussy cut him out and colored him with both light and dark Granny Apple Green Blends pens. I set him in place on top of the Gorgeous Grape circle using a Dimensional.

The words are from my computer. I didn't have a current set with just "happy halloween" so I used my computer and I colored the words using the RGB code for the Pumpkin Pie color. I used Comic Sans MS font, bolded. I die cut the words using the ribbon ends die from the same "Stylish Shapes" set. I set the words in place using Dimensionals and the card was done. But like I said, the background needs something. Black dots. Stars. Bats.  Something.

Thank you SO very much for taking your time to stop by and see today's Halloween card,
Wanda

Wednesday, October 05, 2022

Happiness Abounds, Hues of Happiness, Stampin' Up!

Here is another one of the cards I made from the "World Cardmaking Day" kit that Terri had sent me. I didn't get a chance to make them all. There were three in the kit. I will make the last one in the next few days. It was fun and different for me. I'm not one to do a lot of "fun folds" type cards. Mostly because those purchasing my cards don't care much for them.

This card has a flat base. It's a 4-1/4" x 5-1/2" piece of Basic Black card stock. The front flap part is cut at 2-1/4" x 5-1/2".  It's folded in half and a 2" x 4" piece of Basic White card stock is added to the inside. You can stamp on it before adding it. I just left it blank, there's not a lot of room to write on a layout like this.

The front has a 2" x 4" piece of Designer Series Paper (DSP) from the "Perfect Penciled" 12" x 12" package. I taped it to the front of the flap. Then I taped that flap piece to the the Basic Black base. It's about 1" from the left edge.

The flower is from the "Hues of Happiness" DSP and was die cut with the matching die. I also die cut a Basic Black piece to go behind it for stability. I set the flower on the front and I gently ran my fingernail over the back of it along the edge of the flap so I could see where not to add Dimensionals. I added the Dimensionals and set the piece in place on the front. 

Leaves were die cut and set in place under the flower and the card was done. 

It's a very quick and easy card to make. And I'm thinking that it's a great way to use up some of those strips of DSP I have.  Though I think I would use the layout but not make the flap part. I'd just cut that front piece at 2-1/4" x 4-1/4" and use a folded half-sheet of Basic Black for the card.

This was a fun card to make!  I can't wait to find some time to finish the last one.

Thank you SO very much for taking your time to stop by and see today's fun fold card,
Wanda

Tuesday, October 04, 2022

Snowman Magic, Christmas Card, Stampin' Up! 2022 Fall Mini Catalog

This card was not what was in my head when I started out. But this is how it ended up and I'm sharing it with you anyway.

The base of my card is a folded half-sheet of Basic White card stock. This card opens on the bottom and the fold is on the top.

I cut a 4-1/8" x 5-3/8" piece of Balmy Blue for the layer and a 4" x 5-1/4" piece of Basic White for the top of the card. 

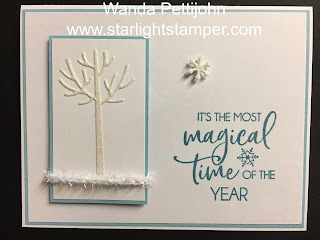
I had die cut the tree using the die from the "Snowman Magic" bundle. I used the diamond glitter paper with a double-sided sticky sheet behind it so I could make it into a sticker.  The Basic White piece of card stock it's on measures 3" x 1-3/4" and the Balmy Blue layer measures 3-1/8" x 1-7/8".  I set the tree in place about 1/2" up from the bottom edge of the Basic White piece. I taped the two layers together. Then I taped the ends of some pretty "Iridescent Trim" to the back. As I look at it I think I should have wrapped the trim around it all the way to the bottom to give the illusion of snow. I don't know.  What do you think?

I set the tree piece on top of the card front for word placement. The words are from the same "Snowman Magic" set and were stamped using Balmy Blue ink. 

There was a little snowflake die in the set so I die cut a glitter paper one and set it in place using a custom cut Dimensional.

Dimensionals were added to the back of the tree panel and it was set in place on the front of the card.

It's an okay card but not what was in my head. 

Thank you SO very much for taking your time to stop by and see today's Christmas card,
Wanda

Monday, October 03, 2022

Happiness Abounds, Hues of Happiness, Art Gallery, Thinking of You Card, Stampin' Up!

Today I needed a thinking of you card and I ran across this one on Pinterest. You can see the original card here. The lady showing the card was showing 10 of them she made using this layout. It's a fun, easy, and quick layout.  I also have a fun and NEW tip/technique for you too, so stay tuned.

The base of the card is a folded half-sheet of Gorgeous Grape card stock. This card opens on the right and the fold is on the left.

I cut a 4" x 5-1/4" piece of Fresh Freesia card stock for the front and a 4" x 5-1/4" piece of Basic White card stock for the inside. I taped the Basic White piece to the inside. Every time I do that before I finish the card I hear Clint Eastwood in my head saying "Do you feel lucky, Punk?". A couple of times I've gotten the card flipped over and then the Basic White piece is behind the front of the card but most of the time I get it right! So, today this "punk" felt lucky!! LOL 

I did click through the Pinterest Post and found some measurements. The Designer Series Paper (DSP) is from the "Hues of Happiness" 12" x 12" package as well as the flowers and leaves on the front of the card. I cut a strip that was 1" x 2-3/4".  And I cut a Basic White piece that was 4" x 2-3/4".  I taped the DSP strip to the left on the Basic White piece. 

The piece was set on top of the card for placement of the words. The words are from the "Art Gallery" set and were stamped using Gorgeous Grape ink.

Once the words were stamped I taped the Basic White piece in place just above them. 

I tried to find out what was used between the DSP and the Basic White part of the piece but had no luck. So here's where the fun tip/technique comes in. I took a 1/4" x 2-3/4" strip of Diamond Glitter paper and I peeled the backing off it. Then I took my dark Highland Heather Blends pen and colored the backside. My first thought was to color the front but I didn't want glitter bits on my pen and I didn't want to ruin my pen. So peeling the backing off allowed the ink to bleed through the paper and give it the appearance of being Highland Heather. A fun tip/technique. Please feel free to use it or pass it on, but I do ask that you give a link back to my blog.  I let the strip sit for a few minutes so the ink dried and then I glued it on top of the Basic White strip, butting the left side to the right side of the DSP.

Next the flower die cut flower from the "Hues of Happiness" DSP package was added using Dimensionals and the leaves from the same set were die cut and set in place using glue. 

I added some Wink of Stella to the flower and the card was done.

Thank you SO very much for taking your time to stop by and see today's card and new tip/technique,
Wanda