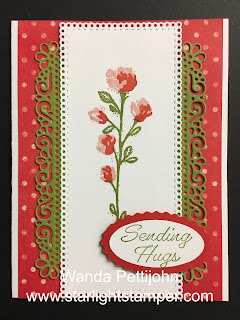
The base of the card is a folded half-sheet of Basic White card stock. I cut a 4" x 5-1/2" piece of Designer Series Paper (DSP) from the "Flowering Fields" 12" x 12" package. I taped it to the front of the card base.
Next I die cut the Old Olive lacy piece from the "Ornate Layers" dies. I have a love/hate relationship with those dies. I love how they look but I hate having to spend so much time cleaning out the die and the card stock that was die cut. So many little dots and pieces that need to be removed. UGH! But since I LOVE the look so much, I keep using them! After I die cut the piece, I cut it in half up the middle.
The center is a piece of Basic White that was die cut using another die from the same "Ornate Layers" dies. Before I die cut it, I stamped the image. First I stamped the stem using Old Olive ink. Then I stamped the larger part of the flowers using Blushing Bride ink. The center part of the flowers were stamped using Poppy Parade ink. Then I centered the die and cut the piece out. I added tape to the back and lined up the Old Olive pieces and set them in place. Then that was taped on top of the DSP.
The words are from the "Eden's Garden" set and were stamped using Old Olive ink. I punched them out using the "Double Oval" punch. And a Poppy Parade layer was made from the same punch. I taped the two pieces together and they were set in place on the front of the card using Dimenisonals. And that was it.
It's a bright and cheery card but I think that Basic White piece could have been a bit thinner, there's too much white on either side of the flower. But it was a die cut and there wasn't a lot I could do about it. It was fun making the card and I really do like the colors.
This card can be used for a variety of occasions. I like the versatility of it.
Thank you SO very much for taking your time to stop by and see today's card,
Wanda


1 comment:
I really like the combination of the two die cut pieces. The flower is very pretty and I think you have created a very pretty card!
Post a Comment