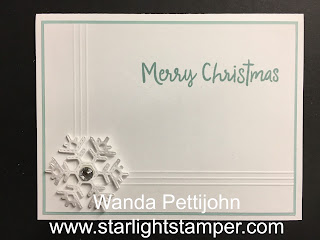
The base of the card is a folded half-sheet of Basic White card stock. This card opens on the bottom and the fold is on the top.
I cut a 4" x 5-1/4" piece of Pool Party card stock for the layer.
Then I cut a 3-7/8" x 5-1/8" piece of card stock for the top layer.
I used my scoring board and I scored the piece on the long side at 4-1/4" and 3-1/4" down. The next score is at 4-3/8" and down 3-1/8". And the final score line is at 4-1/2" and down to 3". Turn the card stock so the score lines are on the bottom. Score at 3" and meet up to the third vertical score line. The next score is at 3-1/8" and score to the center vertical score line. And the last score line is at 3-1/4" and score to the first vertical score line.
Turn the card stock over. You are going to be using the opposite side.
I stamped the words from the "Snowman Season" set using Pool Party ink.
The layers were taped together and then taped to the front of the card.
The snowflake is from the "Stitched Snowflake" dies and was cut from a scrap piece of Basic White card stock. I set it in place over the area where the lines meet. I used a Dimensional to set it in place. A clear crystal rhinestone was added to the center of the snowflake and the card was done.
If you are planning on making them to mail out and don't want to pay the extra postage for the rhinestone, you can die cut or punch out a small circle using silver foil card stock or some silver or white glitter card stock. Tape or glue the circle in place and you're done.
This was a very fun card to make. I love making those score lines. They add a lot in a subtle way.
Thank you SO very much for taking your time to stop by and see today's Christmas card,
Wanda


This is a very lovely card.
ReplyDeleteLOVE how you created embossed lines across the front of this card. GREAT idea!
ReplyDelete