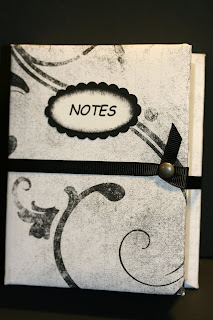
 I had purchased these notepaper holders at Target a while back. Every now and then they have these in their Dollar Spot and the last time they had them I picked up a bunch! I had them in a room where they just do NOT belong and I'm trying my hardest to get that room organized again. It's coming along slowly but at least it's coming along. Hopefully by the first of the year it will be back to normal or at least close to it!! There is nothing "normal" in this house (including me!!!) LOL
Ok, back to this cute note paper holder. I took out the paper. It was blue with the guy on the right on one part of it. I will be cutting that part of the paper off and making a spiral notebook with it in the future. And I also just use some of the pages for little notes to myself. I then took the white box part off. I did have to pry it up a bit. I took my little 6" metal ruler and slid it under it and the glue gave way and the box lifted off. It did rip the paper backing a bit but it doesn't matter because it's all being covered up by the paper you add.
Now the REALLY nice thing about these holders is the part that actually holds the paper is white so I didn't have to do a thing to it. The ones I got last time were colored and I had to cover them with white card stock.

Once I got the box part out I took my decorative paper and covered the outside of the box. I used about a half sheet of 12" x 12" paper. I glued the paper on with a glue stick. It covered the area well and didn't dry before I was ready to set the paper in place. Glue sticks allow you to move the paper around a bit before it sets up. The paper is from the Stampin' Up! "Night and Day" package. The piece I used had a wonderful design in it so I didn't need to add much for embellishments. I let the paper speak for itself here.
On the inside I had added a piece of white copier paper to cover the seams and edges of the decorative paper. Again I used the glue stick on the paper to hold it in place. While that was setting up I added the "notes" oval and o
 val scallop. The word "notes" came from a stamp I had made at VistaPrint.
I eyed the cover and found what I thought to be close enough to "center" and punched a hole with the Crop-a-dial. I inserted a large brad through a piece of 1/4" black grosgrain ribbon and then through the hole I made and through the other end of the grosgrain ribbon. I left about a half inch of a tail on the ribbon. I wanted to make sure I had enough for the brand to go through. I did use the piercing tool on the ribbon first. The brads are just not sharp enough to poke through the ribbon. Once the brad was through the ribbon I opened up the prongs to set the brad in place.
Next I glued the box pa
 rt back in place. I used tacky glue here. I needed something stronger than the glue stick. Then I took the ribbon and went around the back of the holder and brought the free end to the front. I slipped it under the brad to hold it down. This keeps the box shut and secure enough to keep the cover closed.
I did add new paper to the box. I cut some white copier paper the same size of the paper that came from inside the box. It was simple enough to do! I'm not a big fan of cutting copier paper but if you do a little at a time it doesn't seem like such a chore. And like I said I bought a bunch of these so I will be making them up for the craft fairs I will be in next fall. I have PLENTY of time to cut copier paper!!! LOL
I find altering items a very fun thing to do and when they turn out great it makes them even more fun to do!!
These are not only great for Craft Fairs but for a Make N Take, Customer Appreciation Gifts, Hostess Appreciation Gifts and even a fun Stamp Camp project.
Thank you every SO much for visiting my blog today,
Wanda

2 comments:
I will have to keep an eye out for these would be wonderful for the nursing home.
Great idea!!! You can bet I'll be looking for these boxes the next visit to our local Target!!! Thanks for the great project idea.
Post a Comment