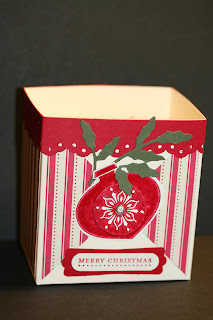
 Here are some of the boxes I demoed last month. I used the Fancy Bag die cut. Instead of making it into a bag I decided to try to make a box with it. It makes the die cut a more versatile piece of equipment when you can do more than what it was designed to do. To make a box you just don't fold the side score lines and you fold it inside out, meaning you fold it so the deeper score lines are on the inside.
Here's the instructions for making the notepad holder box:
1. On your Fancy Favor Die cut piece cut off the top edge.
2. If you want the box stamped, now is the time to do it. This one is stamped using the “Sparkle” jumbo wheel. Stamp on the side that has lighter score marks.
3. Fold on the score lines except for the side ones that form a bag. You want to keep this a box. Tape the box together. Cut a piece of card stock to drop in the inside bottom. You need a little more stability on the b
 ottom of the box. Measure the bottom of the box to get the size.
4. Using the “Eyelet Border” punch, punch out an 11" piece. Cut it to 3/4" wide when done. Set in place on top of the box and begin wrapping it around the box. Pinch the fold lines and then tape in place.
5. Stamp the words and punch them out using the “Word Window” punch. The words here are from the “Teeny Tiny Wishes” set. Punch out the “Modern Label” piece in Real Red card stock. Tape the words on top.
6. For the bulbs, ink the image with Real Red craft ink and emboss with clear embossing powder. Punch out with the “Ornament” punch.
7. Stamp the word “notes” using the “Note to Self” set. Punch it out with a 3/4" circle punch. Add “notes” to the bulb using a Dimensional. Offset the words so the bulb can be placed at a slight angle on the box. Set all the pieces on the box for placement, when you are satisfied where you set them, tape them in place. Do not tape the top of the bulb, you will need to slip the holly under it.

8. For the holly use the Sizzix “Little Leaves” die cut. Clip the leaf edges to form the holly. Tape in place under the bulb.
For the scratch pad holder you will need a sheet of card stock. On the 8-1/2" side score it at 5-1/4" and then again at 5-3/4". On the 11" side score at 2-3/4" and at 5-7/8". There are now 6 rectangles on your card stock. 4 large ones and two small thin ones. On one end cut away two large rectangles on each side and two small rectangles. When cutting the 2 smaller ones cut a little bit into the next rectangle. You will be doing this so the notebook lays flat in the holder. When you are done cutting you will have the center rectangles (three of them, one on each end and a thin one in the middle). And you will have on one end three rectangles. The side ones are the flaps. Fold all score lines. Fold one flap down and tape the other flap on top of it. Slide your scratch pad inside. Decorate the front as desired.
The second photo here is another box front I made using decorative paper on the front and sides. And you can make the notebooks accordingly.
And lastly there is the Santa box. I used punches for the feet, "fur" and buckle. I wanted to use brushed gold card stock but I was out of it so I had to use More Mustard. It worked out but not how I wanted it to be! SO guess what I ordered??? You guessed it, brushed gold card stock!! This can be used as a party favor and you can even decorate notepads for the inside of this one too! You can really have a lot of fun with this die cut! I have a few more ideas I'm going to be putting down on paper soon and they will be appearing on the blog shortly! To see other items using Sizzix Die Cuts just click here.
Thank you SO much for visiting today,
Wanda

Oh... that Santa box is soooo adorrrrrable!!!
ReplyDeleteI LOVE THE SANTA BOX, and fur to boot. Great ideas for giving the die more use;)
ReplyDeleteThe Santa box in genius! Just love it!
ReplyDeleteSherry
These boxes are just too darn cute! Here I go, spending more money!:) TFS!
ReplyDeleteI will definitely be 'casing' that Santa box. It is adorable. tfs
ReplyDelete