Pin It

Sunday, August 31, 2008

Faux Seersucker Card

When I was offering the 20 technique pages as blog candy last week I had asked two questions of those entering. One was to tell me their favorite technique of the ones I posted and the other was to tell me another favorite of theirs I did not have listed. Of all the ones mentioned I knew and have them on my list to make but one. Faux Seersucker!!!

Upon looking at it I figured it out and Vickie D. emailed me with her instructions. They were pretty much like the ones I had written up for the technique book! And today I had time to give it a try. I thought I'd play with the pinks today!!! I used Pretty in Pink and Pink Pirouette. I did use Regal Rose to color in the flowers on the "Fast Flowers" I wheeled on the white card stock. The flower pot and words are from the "Fun and Fast Notes" set.

I also played with the new "Top Note Bigz Die." It was fun layering it because the die is also perforated so once you get it cut out you just take your snips and cut along the perforated line. Then you cut out another one for the layer. SO easy and SO fun!!! Thank you Sue for letting me watch over your die cut while you were away for the weekend!!! You just never know what these things do in your workroom while you are gone!! It's best to let someone tend to them for you!! LOL

I cut out a few more projects to play with too and I will be ordering one of my own!!!

It's such a soft looking card.

Tomorrow I will post the instructions and the technique page!!!

This item was made using Stampin' Up! products. To view more items made using Stampin' Up! products click here.

Thank you SO much for stopping by,
Wanda

Saturday, August 30, 2008

Faux Wood Technique Page

Here is the first card in "Round Two" of my technique pages. I really do like this technique. It's VERY easy to do and it gives a card such a wonderful unique look to it.

The instructions on the page are as follows:

Take your light colored piece of card stock. Here I used More Mustard. Now take the Vanilla craft pad and slide it over the card stock going from top to bottom. Take the Chocolate Chip ink pad and drag it lightly over the Vanilla inked area. You do want to tilt the pad at a 30 to 45 degree angle. If you lean towards one side more you can get a line to form like a board. Turn the piece of card stock around and repeat the dragging. You can add as much or as little lines as you want. You can use a marker to draw in nail holes too. It looks great with or without them. I'll add this page to the next big Blog Candy give away. Hoping again to have another 20 pages to give away!!

Thank you SO much for stopping by,
Wanda

Friday, August 29, 2008

It Sure Looks Like Wood Tutorial!

The card I posted yesterday was made using the Faux Wood technique. I have seen this done other ways but this one is the quickest and easiest one I've seen yet. Thank you Sue for showing us this on Sunday!!! She's SO good to us!!


To do this technique I used the Very Vanilla Craft pad and Chocolate Chip ink pad and More Mustard card stock.


I covered my card stock with Very Vanilla by sliding the pad across the paper and don't leave any card stock uncovered.


Then take the Chocolate Chip ink pad and drag it across the card stock while it is still wet. Hold the ink pad at a 30 to 45 degree angle. If you tilt the ink pad a bit you will be able to catch the corner of the ink pad on the card stock and this will create the lines. You can practice on a piece of copier paper with the Chocolate Chip pad to get the hang of it. It's really not hard at all and believe it or not, I got such cool lines the very first time I did it!!!


In one of the other Faux Wood techniques I'd seen they had you draw on lines and draw on the nail holes. I think it looks great without them.
Be sure to let the card stock dry before handling it. You can use your embossing tool to speed up the drying time.

Pretty simple, wasn't it??? And SO much fun too!
I will be making a technique page using this very design and it will be added to "Round Two" of technique pages!!!


I was asked if the Vanilla Craft ink gets on the Chocolate Chip pad. Yes, it does but just wipe the Chocolate Chip pad on some copier paper when you are done and it comes off.
Thank you SO much for stopping by and have a fun and safe holiday weekend!!
Wanda

Thursday, August 28, 2008

I Have Been Awarded!!!

I have received this award from Carrie at Snoopy's Homemade Fun and from Amy at Zoelife Creations.

I want to thank you two for the award.

In the spirit of paying it forward, I now get to nominate my favorite blogs!
Here are the rules:
1. Pick 5 of your favorite blogs (that's hard there are tons!)
2. Winners can put the logo on their blog.
3. Link the person who gave your award to your blog.
4. Name the 5 that you are giving the award to with their links.
5. Leave a message on their blogs so that they know they've won!

The blogs I have chosen are:
1 - Cheryl at Cheryl Stamps and Scraps
2- Leslie at Continuing to Create
3- Vivian at Florida Stamping with Vivian
4- Lynnette at My Stamping Addiction
5- Laura at LuLu's Corner

WOW! It Looks Like Wood!!!

Just a quick post here. I couldn't leave you with just the Blog Candy Winner post today. I want to share a card with you that I made on Sunday at our DIVA Day event. Sue is SO good to us, she pampers us the whole time we are there.

Here is a fun card we made using the "Faux Wood" technique. I will show you step by step how to do this technique tomorrow and I will also be making a new technique page for this one!! I would like to fill my blog with all the techniques you could possibly look for!!! There's a LOT of techniques out there. I may have to buy another album to store mine in!!! But that's a GOOD thing!!!

This item was made using Stampin' Up! products. To view more items made using Stampin' Up! products click here.

Thanks SO much for stopping by,
Wanda

Blog Candy Winner!!!

I know you've been waiting all week to find out who the lucky winner of the Technique Pages Blog Candy is. Well, the wait is over!!

All of the techniques you listed that you'd like to see were actually on my list except for the faux searsucker technique that Susan mentioned. I've never heard of that one before. Could someone enlighten me on this technique?

And now onto the lucky winner of the Blog Candy. Drum roll please..........

And the winner is JIB and here her comment:

I've never done it but I love the Polished Stone. The technique I'd like to see is what ever technique they used to do the train card in the new SU catty. I LOVE that card. So if you could tell me what it is I'd be grateful.Wow 500,000+. I have 51 and I think 3/4 of those are me. LOL

Please email me with your snail mail address and I will get the pages out in the mail to you on Wednesday. With the holiday being Monday that means that Tuesday will be a very busy day at the post office so I will wait until Wednesday to go to the post office.

Thank you all for entering. For those of you interested, I do have extra pages and I will be selling them in my store next week.

Have a Stamp Happy Day!
Wanda


Wednesday, August 27, 2008

Wednesday Sketch Challenge at SplitCoastStampers

Here I was getting ready to start a new collection of technique pages and I realized it was Wednesday. I had nothing going on this afternoon so I went on SplitCoastStampers and thougth I'd check out the Sketch Challenge for today. And if I liked it I would play. "If" I liked it. LOL How funny is that? I like them all. It's called a challenge and the more you don't like it the more you NEED to do it! But I always seem to like them, except for the totally square ones. That's just too much of a challenge for me. I don't venture out of the box too much when it comes to those. I have made square cards but I prefer to make "regular" size ones!.

For today's challenge I thought I would make a Hallowen card. I know it's still August and Halloween is a little over 2 months away. SO I guess it's close enough time wise to make the card a Halloween one! I LOVE Halloween "stuff." Cards, window decor, wall decor, costumes, the music and the scary movies too!! But only if I watch them at home, NEVER in the theater!! I'm too much of a chicken!!! LOL

I was at Joann's today and they had Halloween stuff out. I even found some dollar Halloween clear stamps there. And of course I had to pick up some!! They even had a cute Thanksgiving one for a dollar too. And yes, I had to buy that one too! I didn't find what I was looking for there so I had to go over to Michael's (just across the highway from Joann's)and I didn't find what I wanted there either. UGH!!! But I did see that they have Christmas stuff already on the shelves!!! Can you believe that??? Now that's just a little bit too early for me and no, I didn't buy anything Christmas there!!

Ok, onto the Sketch Challenge for today. The stamp is from Penny Black. Isn't it cute??? It's a pretty big tone too. 4-1/4 x 2-1/2". I am going to be selling it after the holiday weekend. I'm hoping to get at a lot of my stamps that are just sitting around here and get them in my store.

Back to the card. I used the new Stampin' Up! decorative paper "Ghostly Greetings." I LOVE all the sheets of paper in the back and both sides too!!! Sometimes you run across one that you don't like one side or the other. Well, NOT in this pack!!! Gotta LOVE that!!

I added a few bat and ghost brads that I had and I found the pumpkin and witch hat ribbon I had sitting on the shelf!! Cards are SO easy to make when you use decorative paper!!! There's a LOT less to clean up too!!! LOL

I'll be drawing for the Technique Pages Blog Candy tomorrow.

Thanks SO much for stopping by,
Wanda

Tuesday, August 26, 2008

Oh What A Night!!

I'm SO excited!!! I'm actually pre-posting this a few hours early. I am at a Stamp Share! My upline's upline's sideline is holding a Stamp Share and I was invited to attend. I'm SO excited about it. It's the very first time I've attended this one and I am SO looking forward to it. I know I'm going to be SO keyed up when I get home!!! But that's ok because SplitCoast will be releasing their Wednesday Sketch Challenge around midnight so I will have something to entertain me!!!

I also signed up to participate in the card swap. The theme is to make a card using a new set from the Fall-Winter 2008 catalog. My order won't be here until later this week so I am using a couple of sets from the pre-order. I only bought two sets, the "Wow Flowers" and "Heard from the Heart." I was pondering borrowing something from Sue (my fabulous upline) but I decided to challenge myself and use what I have. What a novel idea!!!! Using what I have!!! A totally new concept!!! LOL

I used the Baroque Motif set (not new) for my background. I stamped the images on glossy card stock using black StazOn. I sponged in Pacific Point, Baja Breeze and Garden Green. I was going to use the Kiwi Kiss but it was just too light. I layered it on Pacific Point. I just LOVE that color. I bet is one I'll be buying at least one pack every time I place an order!! I punched a bunch of Pacific Point and Garden Green 1-1/4" circles. The happy birthday circle came from the Wow Flowers set and the tiny flowers inside were made using the Trio Flower punch.

LOTS of taping went on here!! SO here you have it, my card front for the swap tonight

I'll tell you all about the Stamp Share in my next post!

This item was made using current Stampin' Up! products. To view more items made using Stampin' Up! products click here.

Thanks SO much for stopping by!
Wanda

Monday, August 25, 2008

It's Blog Candy Time!!!

Ok, here it is. What you have been waiting for when my blog reached 500,000 points!!! The ever coveted Technique Pages. There are 20, count them, 20 pages here!!!! Well. don't actually count them I forgot to add the Faux Cloisonne to the pile but it will be included in the Blog Candy!!To view them individually (including the Faux Cloisonne!) you just need to click here. I am putting 2 pages in a sleeve so you will receive 10 filled sleeves!!

To be entered in the random drawing here is what you do. You need to answer two questions. First tell me which one of these 20 techniques is among your favorites and then tell me a technique not listed here that you like. I will draw a name and enter it in on Thursday's post. Being it's the holiday weekend coming up I will wait a few days longer for the reply back from the winner. I myself may be heading out of town!

Please leave your comment on this post only. Do NOT include any email addresses, spammers like that and I only contact by email when I receive an email via my email address. And only enter once. Duplicate entries will be deleted. I do moderate the comments that come in to my blog and I know how easy it is to enter comments more than once because it didn't seem like the first one went through. I just pick one of those and post it and the other is rejected. Never a problem when you do that. I've done it myself!!

I thank you all for visiting my blog and making this exciting event happen for me!! I will be making more technique pages and posting them here. And who knows I may use then in another Blog Candy giveaway. I have some other fun mile markers coming up. It looks like I'm nearing another "Chatty Cathy" Blog Candy time. That's less than 20 posts away!!!!

I wish you all luck on the drawing!!

And I thank you ever SO much for stopping by,
Wanda

Sunday, August 24, 2008

Rock 'n Roll is Here to Stay!!!

Here is the final technique page before the Blog Candy will be offered. But it's NOT the final technique page I will be making. There are a LOT more to be posted in the months to come!!! Every technique (old or new) that I run across I will be eventually making a page with it.

The Rock 'n Roll technique is a very fun and easy technique to do. There is not a whole lot to it either. I find it easier to work with round stamps but other stamps will work as long as you can catch the edges on the ink pad.

Ink your rubber stamp with the lighter color of ink.

Take the rubber stamp and roll the edges in the darker color of ink. If using a flower stamp, the tips of the petals will be where the darker color will be applied by rolling the stamp on the ink pad.

Accent the stamped image with a contrasting color for the layering.

See, I told you it was a very simple technique but it sure does add a lot to the image, doesn't it?

Tomorrow I will be updating the slider on the right side bar of the blog so you can see all of the pages or you can click here to see them too. And on that post you may leave a comment/answer a question - not sure yet what I'm going to do for you to be entered in the drawing for the Technique Pages blog candy!

SO stay tuned!!

This item was made using current Stampin' Up! products. To view more items made using Stampin' Up! products click here.

Thanks every SO much for stopping by,
Wanda

Saturday, August 23, 2008

Reverse Masking Technique Page

I have two more technique pages I want to add to the book before I offer it as blog candy in celebration of my blog reaching 500,000 hits!!! This is a very fun technique. Reverse Masking is very simple to do and adds a very fun look to your projects.

Ink up your larger stamp and stamp the image on a piece of card stock. You will also want to stamp the image onto copier paper. Cut away the image on the copier paper. Make sure the background stays nice and neat. You are not keeping the image, you are keeping the background which is now your mask.

Now lay our mask over the image. The image you stamp should appear in the center of your mask.

Now ink up your print stamp with a contrasting color if ink. Stamp the prints all over the larger image. Remove the mask and see how fun the image now looks!

I find that darker prints on lighter backgrounds has a much better look to it. But for me that is a personal preference.

Come back on Monday for the blog candy post! To see the other technique pages that will be included with this one click here..

This item was made using current Stampin' Up! products. To view more items made using Stampin' Up! products click here.

Thank you SO much for stopping by!
Wanda

Friday, August 22, 2008

Shaving Foam Technique Page

In my previous post I showed you step by step how to do the Shaving Foam technique. I had never done that technique myself before and in write it down step by step I wanted to make sure I don’t forget anything. It’s an easy technique to do but a bit messy. The end results are SO worth it though. As with all photos on my blog, to get a closer view, just click on the photo.

Shake your can of shaving foam and fill your pan 1/4" from the top. Add drops of ink refills the foam. Pick colors that compliment each other. Here I used More Mustard, Pumpkin Pie and Lavender Lace. Take your stir stick and run lines into the foam like you are making a grid. Don't fold it in like you would a marble cake, you don't want the colors under the foam, you want them to remain on the top. Press your card stock into the foam. Scrap the paper across the edge of the pan to remove excess foam. Take a paper towel and remove the rest of the foam. Allow to dry and use it as fun backgrounds, especially for Halloween cards!!!

So I have another page for the technique book that I am giving away when my blog reaches 500,000 hits. Which should be any day now!!! It’s a fun and exciting time for me!!! Who would have thought??? And I owe it all to you for stopping by!

Thank you SO much for visiting my blog today,
Wanda

Thursday, August 21, 2008

Shaving Foam Tutorial

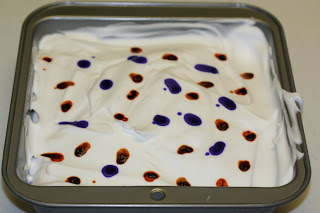
I had to laugh when I saw the photos from my camera to the desktop. The pan of foam and ink looked like a confetti cake!! LOL It almost looks good enough to eat!!! I don't think it would taste very good and I wonder if the ink would come off your tongue very well??? LOL I mean, look now long it takes for it to come off your fingers!!!???

To do this technique you will need the following items: White Card Stock, Shaving Foam, Ink Refills (2 or 3 colors), Cake pan or other shallow pan, Stir Stick, Paper Towels.

Shake your can of shaving foam and fill your pan 1/4" from the top. I smoothes mine off with my hands, it's not necessary but I wanted to make sure it would all photo well.

Add drops of ink refills the foam. Pick colors that compliment each other. Here I used More Mustard, Pumpkin Pie and Lavender Lace.


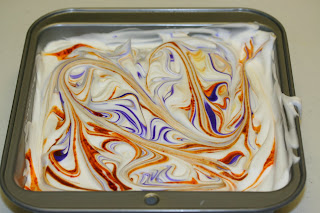
Take your stir stick and run lines into the foam like you are making a grid. Don’t fold it in like you would a marble cake, you don’t want the colors under the foam, you want them to remain on the top.


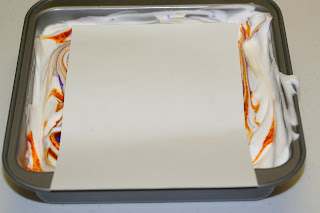
Press your card stock into the foam. Scrap the paper across the edge of the pan to remove excess foam.


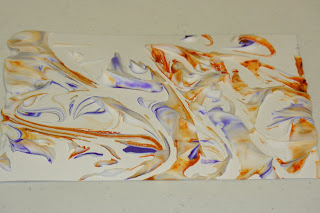
Take a paper towel and remove the rest of the foam. Allow to dry and use it as fun backgrounds, especially for Halloween cards!!! It adds a fun look to the background of your cards. You can stamp directly on top of the design too.


Tomorrow I use the background I created here and make a page for the technique book!!

Thanks SO much for stopping by,
Wanda


Wednesday, August 20, 2008

So It's NOT This Week's Challenge!!!

I know it's Sketch Challenge day on SplitCoastStampers and you're probably wondering where my card is. Well, I didn't participate today. I don't really like doing square cards. It's not that they are such a challenge for me that I won't do them it's that I don't have any envelopes for that size card and I don't really plan to buy any envelopes to fit those cards. And I do believe they cost a bit more to mail too! That's really not the issue here with me, I usually have to pay more to mail my cards because of the brads, ribbons, buttons, etc. on them! It's the envelopes!!!

Even though I didn't participate in the Sketch Challenge I did sort of work on a square card and then I cut it to fit a "normal" size card!

I used the "Fresh Cuts" set and the "Fresh Cuts Notes" to go with it. I was going to use the new Baja Blue card stock but I thought it had too much green in it to go with the Pacific Blue. SO I took out a piece of Bashful Blue and I liked the way the two melded together much better. I stamped Bashful Blue on top of the Fresh Cuts Notes paper. I punched out a flower using the Pacific Blue and then I stamped a flower using the Pacific Blue ink pad. I cut the flower out and added a brad to the center to hold the pieces in place.

I used the little floral vine stamp in the "Fresh Cuts" set with the VersaMark pad. I used my favorite wording stamp set "Sincere Salutations."

This card is for my sister-in-law. Her birthday was on the 6th. A little late but hey, she will still get it in the month of August!!! LOL I can't believe I forgot her birthday!

This item was made using current Stampin' Up! products. To view more items made using Stampin' Up! products click here

Thanks SO much for stopping by,
Wanda

Tuesday, August 19, 2008

Strawberries in a Box!

I was looking at Sara's blog today (I check her blog out every day, she's one busy lady!!!) and she had a picture of her acetate box. It's SO cute. Hop on over there to her blog Sara's Creative Adventure and have a look see. She participated in the SplitCoastStampers (SCS) Technique Lover's Challenge. I've never actually participated in that challenge though I have done a few of their projects after seeing them on blogs or on the SCS website.

I had gotten some pretty fancy Cream Savers. There was a mix of flavors, apple pie (yum) cinnamon roll (yum again!!) and strawberry. Notice no "yum" there??? I'm not a big strawberry fan. I don't like strawberries because of the seed things on them but I do like strawberry twizzlers!! So some strawberry flavored things are ok. But for the most part they would be the last things I would pick!!!

And now I'm REALLY glad I didn't eat them!!! They look SO cute in this box!!! I made these boxes last October for Halloween. I'm hoping to find some better eyeballs this year!!! These boxes are a lot of fun to play with and extremely easy to make. I added a little scallops to mine to give it a bit more flair. I don't have the new scallop punch yet but I will be getting it soon and it will save me a few minutes of punching!! And I bet it's a lot less messier too!!

So you will need to hop on over to Sara's blog to get the link to the instructions for this box. She lists it right away in her post. I have a few more ideas I want to work up using this box but I don't have time right now. It's on my list of things to make. I need to get to work on my next Technique Page. The 500,000 hits mark is coming up fast!!

This item was made using current Stampin' Up! products. To view more items made using Stampin' Up! products click here.

Thanks SO much for stopping by,
Wanda

Monday, August 18, 2008

Kleenix Brand Tissue Holder. Instructions! Weekend Project!

I have several tissue holders on my blog. Click here to view them. One holds the tissues I had gotten at the dollar store and the other one is for the tissue I had gotten at Rainbow Foods in their dollar section. And I realized that these tissues are not always available. But you can usually find Kleenix Brand tissues at almost any store. The prices were better at the dollar store and Rainbow though.

To make this tissue holder you will need to cut your card stock 7" x 8-1/2".

Scoring on the long side at 1", 2", 6-1/2" and 7-1/2". On the short side score your card stock at 2-1/4" 3-1/4" 5-1/2" amd 6-1/2". There is a photo below of where you need to cut the score lines. If you click on the photo you'll be able to see the score lines I made.

The inside flaps are clipped at an angle so they fit inside the ends better. Cut away the card stock where it's marked with an "x".

To make the opening I used the Stampin' Up! Word Window punch. I did have to fold that small flap over to get the card stock in the window are just right. You can use that edge as a guide so it will be an even window when you are done. Before I punched out the window I punched one out on scrap paper and used it as a drawing template so I knew I was getting the window centered enough. I traced it with a pencil and then I punched it out.

After punching the opening out on the pink one I stamped some leave images all over it. For the red one I used decorative paper and glued it in place with the Anywhere glue stick. I didn't think tape would hold up well in a purse. Assuming it would go in someone's purse. Though if it were me and I received one I set it out on display and it never gets used. Same with things with chocolate in them. I bet some of that chocolate is PRETTY OLD by now!!! LOL Anyway, once you have the box decorated as you like you will glue the little flap on the long side. The flap goes inside the box. But if you glue it wrong it will end up on the bottom and not be too noticable.

Once the box is glued you can add the tissue. I did open up mine and I could see some of the plastic through the window so I trimmed it up just a little. Now fold in the side flaps and finish decorating your holder.

On the pink flower one I had stamped the flower on white card stock using StazOn and colored it with a marker and a blender pen. I took my craft knife and cut a little slot in the side of the box just under the top part so I could slip a piece of ribbon in. I ran the ribbon through the inside and out the window and tied it. To my eyes the flower needed some leaves so I thought I'd put a ribbon there and it did the job!! I should have moved it up just a little bit more but this is the way it has to look. I'm always learning things for the next time I make it!!

On the red one I had to punch out the window again after gluing. Then I took the "thank you" stamp from "Seeing Spots" and stamped it three times on white card stock. I added the little red flower in the center, also from that set. I put silver brads on and realized it wasn't a good idea. In my purse "stuff" would get stuck on it or hung up on it. UGH!!! That is why I tried the pink holder!!! And here you thought I was being generous with my photos here!!! LOL

They were very fun to make and VERY simple. Scoring only takes a few minutes. I think the part that took the longest was cutting the pieces off the scored card stock! You can decorate them up as much or as little as you want or need. It all depends on what you are using it for.

For demonstrators you can put your business label on the back so your customers can have it with them when ever they are out and about!!! These are inexpensive enough to make and leave at places you visit. Like the doctor's office, dentist, stores, etc.!

If you have any problems with my instructions please feel free to email me!

For more "Weekend Projects" click here. There are over 45 of them on my blog so far. Plenty to keep you busy for a while!!! LOL

This item was made using current Stampin' Up! products. To view more items made using Stampin' Up! products click here.

Thank you SO much for stopping by,
Wanda


Sunday, August 17, 2008

Kissing Technique!

There IS a technique for kissing!!! LOL I would suppose there really is one!! I'm going to tell you somethiang about me that not a lot of people know. Just half of my classmates in Junior High School. See, I'm SO old we called it Junior High School back then!!! LOL I had taken Speech class as an elective. No, I didn't have a speech impediment, it was an actual speech making class. Why I took it I don't know because back then I was a VERY shy quiet person!! I know you find that hard to believe but it's true. Anyway, I went to my science teacher and asked her for some direction as to finding out the muscles used in kissing and she got me started. My speech was on kissing but used in the scientific/medical terms that no one knew what I was talking about until the end of the speech!!! It was fun and funny. And I was nervous because word had gotten out about the speech and the room was FULL and it included several teachers as well!!! I did get an "A"!!!

So onto a new "speech" on kissing!! This one involves ink, rubber stamps and card stock!!!

Ink up the background stamp and set it face up on your workspace. Take the solid stamp and press it onto the background stamp. Stamp the solid one on a piece of card stock. You can stamp the background one too for a different effect.

This is another page that will be included in the Blog Candy "Technique Book" that I will be offering when my blog reaches 500,000 hits. Which looks like it will happen sometime this week!!! It's a very exciting thing for me!! And I would like to add at least two more pages to the book before I offer it up as Blog Candy.

To view all of the pages that will be in the Blog Candy just click here.

This item was made using current Stampin' Up! products. To view more items made using Stampin' Up! products click here

Thanks SO much for vi sting my blog,
Wanda

Saturday, August 16, 2008

What Time Is It? It's Tutorial Time!

I just had to play with the large Sizzix snowflake die cut. I don't have the smaller die cuts that Stampin' Up! is offering so I had to make due with what I had. Imagine doing that??? Interesting concept!!! LOL

I had punched this snowflake out of fun foam first but changed over to white card stock because I thought the hands would get caught on the raised snowflake.

I just LOVE the blue paper from the "Summer Picnic" decorative paper. I kept a sheet of this paper because I was hoping to use it this winter for some snowflake project. I thought it looked like it would be a pretty "winter" background. To view it closer just click here. And you can see the scratch on the face from the cat!! But on the wall it doesn't show so the can can continue to live here!!! LOL

You will need a clock. And you will need to disassemble it!

I took the snowflakes stamp from the Stampin' Up! "Merry & Bright" set and stamped with VersaMark all over the blue background.

Then I embossed them in white. I cut the circle out, including the center hole and taped it to the inside of the clock.

I used the Sizzix and cut out the large snowflake and 12 of the smaller ones. I had to cut the large snowflake apart by just cutting off the long "arms" of the snowflake. I taped them back together on the blue paper. I glued one small snowflake in place and then I added the hands back on the clock so I could have a better see the placement of the rest of the small snowflakes.

Once I got all the small snowflakes taped in place I glued one, a different shaped one to the second hand so it could twirl around the clock until it dies or I no longer like it anymore!!! LOL

This was a very FUN project which really didn't take long at all. It would be great for craft fairs, stamp camps and gifts. These clocks are only $3.00 at Wal-Mart. The only thing I didn't like about this clock is the black hands. I was going to paint them white or light blue but they would be SO difficult to see from across the room. I looked up at my other clock and the hands are black too. I guess that was meant to me. If I spend time making the clock I'd also like to be able to read it too!!! Wonderful concept, huh?? LOL So the hands will remain black and I'll not whine about it!!! :o)

There are more weekend projects here.

And there are more Stamp Camp items here.

Thank you SO much for stopping by,
Wanda

Friday, August 15, 2008

Technique Page Polished Stone

I have to be honest with you. I have NEVER done polished stone before. I have done the non-metallic polished stone but not the original Polished Stone. The times I've wanted to do it was in the winter and it's VERY hard to spray paint indoors or even go out in the COLD garage and spray the card stock and not bring the smell in with me. I can't leave the card stock out in the garage to dry because in that kind of cold it freezes instead of drying!!! SO I thought I'd take this opportunity to do this technique for the book and to have a hand at it myself. I did make a few extra pieces to play with sometime later (probably this winter!!!).

Take a cotton ball and soak it with the rubbing alcohol. You want the cotton ball very wet but not so it runs down your arm. Drip a few drops if ink refills in one spot on the cotton ball. Ad d one or two more colors, too many will make mud. Drip the new colors in an open spot on the cotton ball. Add a few drops of the metallic ink on the cotton ball. Dab the cotton ball all over the card stock. The metallic ink will fight against the alcohol and move the colors around. Spray with clear spray paint to set the colors.

It's a VERY fun technique and it really adds a lot of color and fun to a card or a scrapbook page!!

My blog keeps getting closer to the 500,000 hits mark and I need to get a few more pages done to add to my book and one that I am putting up for Blog Candy!!! I need to make two or three pages a week to have a REALLY nice full looking book! It's nice to have this for reference, even with the simpler techniques in it. Not everyone has done them and it's nice to have them available! SO keep your eye on the counter and on the posts to see when the blog candy will be posted!!

To view all of the pages that will be in the Blog Candy just click here.

This item was made using current Stampin' Up! products. To view more items made using Stampin' Up! products click here

Thank you SO much for stopping by,
Wanda

Thursday, August 14, 2008

Ann Does it Again!!

Here is a card Ann made yesterday when she was at my home for Stamp Till You Cramp! She took one of my samples and used the layout. The layout happened to be from one of the SplitCoastStampers Sketch Challenges. Iat was SC162. Just a few weeks ago. I had made my card using the Stampin' Up! "To Have and to Hold" set. I had also done a snowman card using that sketch too. It may be our Christmas card this year!!!

Ann used the "Close as a Memory" set to make her card. Plus she ran ALL of the pieces through the Cuddlebug folder. Even the one she stamped on. Now for me that is a difficult thing to do just to see what it would look like. Spending that kind of time on an image and then running it though anything is a HUGE challenge for me.

Ann is a very talented person. She loves to stamp and you can see it in her work, can't you? I LOVE this card, it has such a clean fresh look to it. Plus it can be used for SO many occasions!!

And as you can see Ann also stamps on her envelopes. I have learned to do that from her. Thanks Ann for that!! It's all about the presentation and the envelop is no exception!!! You're paying 42 cents to mail it, you might as well decorate it too!!! LOL

Thanks SO much Ann for allowing me to share your work on my blog!

And I thank you all for stopping by,
Wanda

Wednesday, August 13, 2008

Wednesday Sketch Challenge at SplitCoastStampers

For some odd reason my computer didn't like my camera tonight!! I finally got them to talk to each other and was able to get the images off my camera. I was out earlier taking some WONDERFUL pictures of an absolutely BEAUTIFUL butterfly on the neighbors flowers. I took over 40 shots. The thing just kept going from flower to flower and I just followed. Oh my, I stalked a butterfly!!! LOL

Today's sketch at SplitCoastChallenge was a fun one. It was pretty simple but the focal part of the card was the challenge for me. I had stamped a windmill in a field and ended up with a ghost behind a fence!!! Don't ask!!! LOL

The stamp is by Penny Black. I have TONS of Penny Black stamps from when I use to teach. I hardly use them anymore but once in a while I open up the tote and play with one now and then!! Today was one of those "now and then" days!!!

I stamped the image on watercolor paper and used my blender pen with markers and colored away. I used clear embossing powder and a round stamp to make the moon and then did he background coloring over it. When doing this you need to be sure to wipe off the embossed areas because the ink does bead up on it and could make a big mess.

I used a piece of decorative paper I had gotten at Michael's and I used Lovely Lilac but in the photo it looks like Ballet Blue!! Bad lighting I guess. It's best to take your photos in natural light. It's late here and dark outside. I don't think natural light would work very well here!!! LOL

I also like to use this stamp on Shrinky Dinks. It makes a cute and perfect size pin.

If you have time head on over to SplitCoastStampers and check out their card challenge or one of the other Challenges. Each day they have a new one!!

Thank you SO much for stopping by,
Wanda

Tuesday, August 12, 2008

Ice Cream Anyone?

I made these fun headers to give out. I thought it would be fun to bag up some candies as gifts and when I saw the Baskin Robins candies at the store I knew right away what stamp I wanted to use!!! I chose the ice cream cone stamp from the Stampin' Up! "ABC Images" set. Isn't that just a cute little stamp??? I wonder if it would work with the new "Sock Monkey" stamp set??? Hmmm. I may have to check into that!! Like I don't have enough to do!!! LOL

To do these bags you do need to have 3" x 3" little plastic zip baggies. Now they really don't need to zip so if you have taller baggies you can cut them off. The stapling of the header will hold them shut.

You will need a piece of card stock 4-1/4" long by 3-1/4" wide. Fold in half to measure 2-1/8" by 3-1/4". The colored layer measures 2-3/4" by 1-7/8". The white piece measures 2-5/8" by 1-3/4".

I then stamped the ice cream cone image all over the white pieces using black Staz-On ink. I colored in the cones with Creamy Caramel and I colored in the cones using markers to match the card stock I used. Here I used Green Galore card stock and a Gable Green marker. I used Pixie Pink cards stock and marker. And the purple is Almost Amethyst. I colored directly from the marker. No blender pen or watercoloring.

I used the scallop punched and punched them out using Pixie Pink. Then I stamped the "for you" words from the "All Holidays" set using black Staz-On. I centered them in the 1-1/4" punch and punched them out. I sponged the edges and assembled everything.

When doing headers make sure the back side of the staples are on the front part of the bag. The layering hides them and this allows the backs of your headers to have a nice smooth staple that has a clean look to it. If your layer doesn't stick nicely use the Sticky Strip tape to hold that end of the layer down.

These would be great for many things, Customer Appreciation, Make N Takes, Hostess Appreciation, Stamp Camps and Craft Fairs. You can go seasonal with them and use them for little give aways at school too!

It's a fun way to dress up candies! Plus these candies are SO bright and colorful!! It was fun working with these colors!

This item was made using current Stampin' Up! products. To view more items made using Stampin' Up! products click here

Thank you SO much for stopping by,
Wanda

Monday, August 11, 2008

Altered Day Planner

I got these fun day planners at Michael's last week in their dollar bin. Don't be shocked but I only bought two! Yes, you read that right, two!!! LOL Shocker, huh??? I could have purchased more and I still could if I felt that I really needed to but I think two is enough for this project. I don't have any event that I would need to make more for as gifts.

Now I know on the original planner the purse with all the sparkle around it is adorable but I wanted to keep it simple. I like to keep my day planner in my purse but I don't want a flashy one. I keep a lot of information in it but I don't want it to look like it's all that important of a book if you know what I mean.

For the cover I used Soft Sky. I still had some sheets left and it was the closest color that went with the edges of the original cover. I was hoping that the Stampin' Up! spiral punch would have worked with it but the pitch on the notebook was much smaller. So I had to go to plan B and tape a piece of card stock as close to the punches holes as I could. The Soft Sky just blended right in with the design on the front cover and you can hardly tell. I used the computer and the Stampin' Up! font "Little Lamb" for the wording. I used a 2" round punch for the "Dates to Remember" part and the Word Window punch for the 2009 Planner wording. I wheeled on the background in Soft Sky ink and sponged everything with Soft Sky. It's VERY simple to do, simple looking and is exactly what I was looking for in a day planner.

I do like the frosted plastic protective cover over the front and back of the planner. It will hold up better in my purse than just a card stock covered one. And this was a well invested buck!!! LOL

Thanks SO much for stopping by,
Wanda

Sunday, August 10, 2008

Two Techniques in One! Technique Page

Here is another technique page for the book. I was doing a bit of statistics math today and realized I need to make two or three technique pages a week to get enough for my book that I am offering as blog candy when my blog reaches 500,000 hits. You can view most of the other pages in the side bar on the right, just scroll down. There's two or three pages missing and I need to update it.

The page for today is the "Heat Embossing & Emboss Resist" techniques. You really can't do the one without doing the other so I just combined them. To do the Emboss Resist you have to do the Heat Emboss first so it was easy to just lump them both together in one technique page.

Ink you stamp with the VersaMark pad. Stamp image on your glossy card stock. Sprinkle card stock with clear embossing powder and heat to set. Ink up your sponge and apply ink over the entire piece of card stock. You can use multiple colors of ink if you wish. Wipe off excess ink with a paper towel or tissue. Cut as desired. You can use colored card stock with the VersaMark pad, add colored embossing powders and heat to set. This is your basic heat embossing. The embossing resist is done using glossy card stock. You can have a lot of fun with these background papers.

It's a pretty fun technique and the emboss resist can get to be a bit messy with the ink and sponges but if you are careful you won't get a single bit on your fingers!!! I try to be careful. Key word here is "try!" It doesn't always work!!! LOL But I do have to say that I always have fun doing these techniques.

This item was made entirely of Stampin' Up! products. To view more items made entirely of Stampin' Up! products click here.

To see the other Technique Pages, click here. You can also watch them on the slide show on the right sidebar, just scroll down a bit. But if you want to see them faster just click on the link above to take you to all of them! One lucky winner will receive one of each of these pages!!!

This item was made entirely of Stampin' Up! products. To view more items made entirely of Stampin' Up! products click here.

Thank you SO much for stopping by,
Wanda

Saturday, August 09, 2008

It's VERY Good!!!

Here is a card my friend Ann made. After she had finished making them I asked her if I could take a picture of this one. I thought it was SO cute. She said I could but she also said "it's not very good." I beg to differ!!! I think it's fantastic!!

SO Ann your card is VERY nice and I REALLY like it. The colors are very fun and festive. It's a very appealing card and I think you did a wonderful job on it!

Thank you for allowing me to post it on my blog!
Wanda

Notebook and Beaded Pen. Weekend Project!

This is one of the notebooks that I made. It's a bit over sized. It measures 7-1/2" long by 4-1/4" wide.

The cute little kitty on the scale stamp is by Penny Black. Isn't the kitty just adorable. I thought it would be a cute stamp for a "diet journal."

I will be putting this in my online store along with other notebooks as I finish them up. I also have more rubber stamps coming to the store soon too. It's a matter of when the webmaster gets them on there. And I am not high on the priority list there. The webmaster is my son and even though I do pay for the site like any other person does I do get a discount on the data entry part. SO I could either learn how to do all that stuff or just pay at the discounted price and wait a few days longer. I feel that my brain is now completely full and I can no longer learn anything new so my choice is to just wait it out!!! LOL

I will also be putting my "Ready to Finish" notebook kits (included beaded pen stuff) in the store too!! I'll let you know when they are online!!

Thank you SO much for stopping by,
Wanda

Friday, August 08, 2008

I Give Up!

In yet another failed attempt to make the card with a single tiny flower in the bottom right corner I have come to a conclusion. An that is, I just can't do it. I am SO much a layers person and I think I'm just going to have to stick with that. I was always told to stick with what you know best. But if you don't venture out now and then you don't learn anything. Well, I really learned something here with my many attempts at trying to do a card with a small single flower in the bottom corner.

I had really high hopes for this card. I thought I had my problem with it figured out. But I didn't. So here it is in all it's "splendor!" LOL

I used one of the flowers from the Stampin' Up! set "Bloomin' With Love." Which by the way did not make it to the new catalog!!! SO sad because I REALLY like this set. I'm going to hang on to it for a while yet. It's still new to me, I've hardly played with it. When I get tired of it or realize I am not using it anymore then I'll get rid of it. Or if I run out of room on my shelves!!

I used the Cuddlebug folder to make the background and I added a ribbon. It was pretty quick and easy to make. It should be it was suppose to be just a simple card with a tiny flower in the bottom corner!!!

Like the title of this post states, "I give up." I have tried several of this style and now know that I just can't do it. So it's back to my regular style!! And I've got some fun "Weekend Projects" lined up too!! There's a lot of new things coming up and I'll be sharing them here with you.

Thanks SO much for stopping by,
Wanda

Thursday, August 07, 2008

Technique Page Faux Stitching

Some techniques are a lot easier than other and some are a lot older than others too but nevertheless they needed to be included in the technique book! This technique is one of the easier ones. Even though it is easy it does take a little bit of time to poke all those holes in the card stock and then to draw in the stitch lines.

For this technique I stamped the background of a dark piece of card stock. Using the grid from the Crafter’s Took Kit set it on your card stock. Line up the edges. Take the paper piercing tool and poke holes in a line along the edge of the card stock. Once you have gone all the way around take the gel pen and draw in the stitch lines.

You can draw in every line as pictured here or you can do every other stitch. Both create a wonderful look!

This item was made entirely of Stampin' Up! products. To view more items made entirely of Stampin' Up! products click here.

To see the other Technique Pages, click here. You can also watch them on the slide show on the right sidebar, just scroll down a bit. But if you want to see them faster just click on the link above to take you to all of them!

Thank you SO much for stopping by,
Wanda

Wednesday, August 06, 2008

Wednesday Sketch Challenge at SplitCoastStampers

Here is my card for the Wednesday Sketch Challenge over at SplitCoastStampers today. I am SO happy that I've had some time these past few Wednesday's to participate in this challenge. I LOVE to haven new layouts to play with.

To start out my card I usually look at the focal part of the sketch and find a stamp that best fits in that area and then I just go from there. I think with any sketch the hardest part is finding the stamp you want to use. This one happened by accident. I had opened up my inventory catalog and of course I open so I look at it from back to front and in the back was the Stampin' Up! retired set "Best Fiends." I still have this set because it's just TOO darn cute to give up yet. Until something else comes a long to take it's place or I completely run out of room I'll be hanging onto this one for a while longer. Oh and the Frankenstein and witch that are in this set are TOO darn cute too. And the little bat reminds me of the one from a Bugs Bunny cartoon where he was at a haunted house and singing some "abra catabra" song and Dracula would change into a bat with curly wings like the one in this set has.

Maybe I chose this set because I'm waiting for my new catalog to arrive and I since I can't play with anything new I subconsciously got out a retired set to entertain myself!!! LOL I have plenty of other sets that I have not used or used only once that I could be playing with!! LOL But I am anxiously waiting for my new catalog to arrive. I was doing ok with it at first and then I started seeing some of the items that will be in it and I started keeping an open ear for the UPS truck!!! It's SO sad, isn't it??? LOL

Ok, onto this card. I used some retired paper too. The "Halloween Night" decorative paper by Stampin' Up! I just followed the sketch for the size. If you click on the sketch you can then print it out and it should print out pretty close to exact size. Sometimes I've printed a couple so I can cut one apart or stamp directly onto one to see if I like the images there or somewhere else on the card.

Now I could have added some embellishments on the card but I chose to just keep it simple. The colors of the decorative paper and the cuteness of the image seem to carry the card without adding any frill to it!

If you get a chance stop by SplitCoastStampers and participate in the sketch. They are a lot of fun and they give you some fun new layouts to play with on your cards.

I'm off to work on a thank you card for my son's girlfriend!! She is such a sweet girl and don't tell my son but I really, REALLY want her for my daughter-in-law! I'm hoping within the next year (after he's done with his degree) that they at least get engaged!! It will happen!!! :o)

To see more of the Sketch Challenges I've done just click here.

This item was made entirely of Stampin' Up! products. To view more items made entirely of Stampin' Up! products click here.

Thanks SO much for spending time with me today,
Wanda

Tuesday, August 05, 2008

Box in a Bag! Weekend Project

WOW, two posts in one day! Lucky you!!! LOL

I have been wanting to make these fun "Box in a Bag" bags for a while now and I finally found some time and some inspiration to do it. I decided I was going to make these for my 2008 - 2009 "Stamper's 10 Club" members. I'm going to be filling it with some fun and useful "stuff" for their stamping pleasure. I can't tell you what I will fill it with since some of the members read my blog faithfully! I want them to be surprised! But be assured that the stuff inside will be enjoyed by each and every one of them!!

These bags are pretty easy to make too. It's a good way to use up your decorative papers too. I have LOTS of them and this barely put a dent in the stack!!! But that's ok, I can always make more as I need them. I can find LOTS of uses for these in the future!!

If you want to make these you can find the instructions here at Diana Gibbs' blog "Stamping With Di." There you will find very easy Step by Step instructions to make this. SO get your decorative papers out and your Red Line tape and have some fun making these!!

This item was made entirely of Stampin' Up! products. To view more items made entirely of Stampin' Up! products click here.

Thanks SO much for stopping by,
Wanda

From Sympathy to Birthday.

I took the same layout/style of the sympathy card I made and changed it into a very pretty feminine Birthday Card. I think they have such a sweet look to them. Definitely a "girly" card!!

I am really liking the Pink Pirouette. Later this week I'm going to be playing with the other 5 new colors of card stock.

This card was a fun card to make and it didn't take long either. It probably took me longer to cut the card stock than it did to do the rest of the card. I always think using background paper makes it seem like the card doesn't take long to make. Decorative paper saves you a little time in stamping and with the right papers it can really make a card something to behold. One problem with decorative paper. Once you get it taped on it's not easy to reposition it. It will rip unless you are a VERY lucky person!!! I have not been that luck so I try to be very careful about placing my decorative paper down. And if it gets crooked it's not off by that much so I just leave it. After all it is a handmade card!!! LOL Take a closer look at those machine printed cards at the card sections of stores. Not the best quality there. Plus a handmade card says a whole lot to the person receiving it!!!

For the wording on this card I used one of my most favorite sets "Sincere Salutations." I have used that birthday stamp so much you'd think the rubber would be worn out!! LOL The image is just SO perfect. It's SO "greeting card." It must be the font, I don't know but I do know I head for that stamp a lot!!

Well, I'm off to find another technique to make a page for the book. The numbers are clicking away and my blog will be at 500,000 hits soon. Some lucky winner will be receiving one of each of the pages I've posted on here!! These pages are great for reference for you and for others that stamp with you. Some are simple and others are a bit more detailed but all of them are fun!

For more birthday cards click here. There are almost 100 birthday cards on my blog!

Thank you SO much for stopping by,
Wanda


Monday, August 04, 2008

Why? Why? Why? Weekend Project!

Why can't I just walk by those dollar spots at Michael's, Joann's and Target???? I'm sure DH is asking the same question too!

I got this cute little notebook at Joann's last week. They have TONS of them so if you want to make them they may still have some. I only bought one so when I left the store there were lots left!!!

These little notebooks measure 3" x 5". And the white paper inside is lined!!! At the bottom is an elastic band to hold the cover down in your purse. At the top is a tag. I used the smaller Stampin' Up! tag punch. I punched out two pieces and layered them between the existing tag. After punching holes in the tag I cut a slit in the top so I could just slip it on top of the existing one. I really didn't want to untie their hemp. I wasn't sure if I'd get it back just right. An their tag was just a bit smaller so it was very easy to hide.

I used the Stampin' Up! "Close as a Memory" set. To color in the flowers and stems I used markers. The background was done using the "Boho Backgrounds" set. I stamped the image using Pretty in Pink ink on the new Pink Pirouette card stock. It's such pretty card stock. I love the softness of these two colors together.

The word "notes" was done using a custom stamp I had made. You can add any wording you want there or simply remove the tag and string. It looks good without them too!

These would be a fun Make N' Take, Hostess Gift, Customer Appreciation Gift, Stamp Camp item or even for a Craft Fair.

Click here for more Weekend Projects. There are over 40 of them on my blog!!!

Thank you SO much for stopping by,
Wanda


Sunday, August 03, 2008

With Heartfelt Sympathy

The mother of a dear friend of mine passed away and I thought I would make her a sympathy card. She passed away yesterday, the 2nd. Exactly a month to the date of when my mother-in-law passed away.

I wanted to keep the colors soft and subtle so I used the new Pink Pirouette along with the Pretty in Pink. Using these two colors together reminded me of using Pretty in Pink with Regal Rose. But with these two colors it creates an even softer look. I LOVE those two colors together and I can see myself using them in a lot of my girly cards!!! I have not yet opened the other 5 packages of new colors but I will be soon. It will be fun to see what colors I can mix with them too!!!

The decorative background paper was some I had picked up at Michael's or JoAnn's during one of their sales. I thought it went well with the two pinks. I love these little flowers in this set and may make a some more cards (until the decorative paper is used up) but I will make them into either birthday or thank you cards or even both!!!

Thank you SO much for stopping by,
Wanda

Saturday, August 02, 2008

Faux Bleaching Technique

Here's a fun technique. Sounds a lot like the "Ghosting Technique" that I will be posting in a few days. You can compare them then.

Stamp your image on glossy card stock using the Versa Mark pad. Using the sponge and the colors of ink pads you like, smudge the colors in over the embossed area. Once you have the colors the way you want them place your card stock between a couple of pieces of copier paper and iron it. You will be "melting" off the embossed area. You now have a faux bleached surface.


I like the effect this technique gives. Plus you can add whatever colors you'd like. See, now I tend to lean more towards the "Ghosting Technique" because bleaching doesn't give you that opportunity of adding colors on top of the image. Hmmm. I'm going to have to check into that one a bit more. Or maybe I'll post the "Ghosting Technique" and let you all decide!!!

Either way it's still a fun and interesting technique.

Thank you SO much for stopping by,
Wanda

Blog Problems

There was a problem with my blog today. Apparently the "Site Meter" had something to do with it. I thought I had broken the blog!!! I had even pondered the notion of not having a blog anymore because starting all over isn't an option for me. But upon actually reading blogger issue problems and finding some helpful comments left by some REALLY intelligent bloggers I was to remove my "Site Meter" and it should take care of it. SO I removed it and my blog is up and running just fine!! Plus there was another issue. Some blogs had been marked as Spam by Blogger and they were working to fix it. I thought maybe that was why my blog wasn't working. But for me it was the meter. It's now gone and all is well.

Thanks for your patience,
Wanda

Friday, August 01, 2008

Another Card From the Wednesday Sketch Challenge

I was glad I was able to find some time to try another card from this weeks Sketch Challenge at SplitCoastStampers. I just wasn't happy with the first one. It was the background around the snow angel that I didn't like. Mostly because it was the same color as the stars and I didn't think they stood out enough.

SO this card contains NO stars to bug me!!! LOL I ran across some fun background paper. It looked like an old catalog page or old newspaper page. It sure didn't take much for this card. You could do 12 cards with a piece of 12" x 12" decorative paper. Good information to know if you're planning on making a bunch of cards.

I sponged the edges to give it an even more aged look. I had put it all together and realized the main card part, the vanilla was just too bright so I took off the layers and sponged the vanilla to "age" it a bit. It seemed to work. It all blended well and I now have a fun masculine birthday card.

For the words I used a stamp from the new Stampin' Up! set "Heard from the Heart." And the car is from the retired set "Classic Pickups." I REALLY like that set.

Isn't it cool that all the new rubber stamps will be die cut so you no longer have to cut them out? Don't give up those rubber stamp scissors though. Some things don't come die cut. Like the custom rubber stamps and the sets made before the die cut change. You will still need to cut those out!! SO hang on to those scissors for a bit longer!!!

This item was made entirely of Stampin' Up! products. To view more items made entirely of Stampin' Up! products click here.

Thank you SO much for stopping by,
Wanda