Pin It

Thursday, January 31, 2008

Rubbed the Wrong Way!

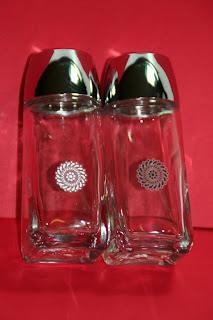
This just cracks me up. I bought these salt and pepper shakers a few weeks back with the intent to use the rub-ons using one of the flower type pieces and then rubbing an "S" on one and a "P" on the other. Well, let me tell you how humorous this is. I wiped the glass off with rubbing alcohol and instead of waiting for it to dry or even getting up to get a paper towel I used the side and palm of my hand to wipe it off. Nothing really wrong with that. Except I had just put on some really greasy hand lotion. SO I take more rubbing alcohol and wipe the glass off again. I actually got up and got a paper towel this time. It really wasn't that hard to do either!!! LOL

Then I rubbed on the white flowery circle. I didn't get it on exactly centered but it was ok, it wasn't that bad. Then I cut out a black "P" and rubbed it on top of the flowery circle. The typical black for pepper and white for salt. It didn't like the way it turned out. You could hardly see the "P". SO I took my kraft knife and scrapped off the rub on and removed the rest of it with more rubbing alcohol. Drying it off with the paper towel that was still sitting on my worktable (not a surprise since I rarely clean it off when I'm working - I allow myself a placemat size area to work!!!) Then I cut out a cute flower and started to rub it on and I wasn't holding it firm enough and it slipped and ripped and I couldn't match it up. So once again out came the rubbing alcohol!!! See where I'm going with this??? LOL Well at this point I decided to go with the original flowery circle so I cut out another one of those and rubbed it on. I decided I was not going to put the "S" and "P" on because it has just (yes just at that very moment, not the day I bought the shakers but about 20 minutes ago) dawned on me that the glass is clear and if you put salt in one of them you will be able to see it's salt in the container and if you put pepper in the other one you can clearly (literally) see it's pepper!!! Doesn't take a rocket scientist to figure out that one!!! So I left them with the simple yet elegant flowery circles. So much for trying to be too creative. Sometimes it's best to keep things simple!!!

So here's your tip. Make sure you clean the surface from any finger oils which also include greasy hand lotion. Rubbing alcohol works best to do this and it's cheap. And if you can't wait for it to evaporate (it takes a whole 30 seconds) you can wipe it off with a paper towel!!! Not your hands, even without greasy lotion on there are skin oils that could cause the rub on not to stay put.

I have these sitting in front of me and I still chuckle at the thought of labeling the obvious!!! LOL

This is a very simple project and you can make it as simple or as complex as you wish. I think I would save the complex for something larger.

Thank you SO much for stopping by,
Wanda

Wednesday, January 30, 2008

Wednesday Sketch Challenge at SplitCoastStampers

Ok, today on SplitCoastStampers as you all know is the Sketch Challenge. These are a lot of fun and each week you are introduced to a new card layout. Most of them I like and the only reason I don't like the few I've encountered was because they were just too challenging for me!!! And I do intend to go try them again someday!!! I started doing these when the numbers were in the 120's. Today's sketch is number 161 and I did miss a few in there during the month of December just because it was too busy of a month. I really enjoy it and I look forward to Wednesday morning when I open my email to find the link to the new sketch. Such a sad life I lead!!! LOL

And here's the best part. On Monday at SplitCoast they have a new technique (yes, every Monday you can learn a new technique). This Monday it was called Dahlia Fold. It's a very pretty flower. I saw all the posts on SplitCoast that day and saw the TLC153 under the pictures and I knew it was the technique challenge. SO I had to go look. Then I had to try it. It's a lot of folding but SO worth it. I got the flower put together and then I didn't know what to do with it until today when the Sketch Challenge came out. I LOVED that layout and it fit perfectly with the new technique! Now this is the first time I (knowingly) participated in the Monday Technique. I'm going to have to look into this more often. I'm trying to get more organized around here so I have more time to do things like that. It's always nice to learn new things, especially when they turn out!!! LOL

Here's the recipe!
I used a half sheet of black card stock for the main part of the card. Using the measurements from the 161 challenge I printed out, it prints out exact size (how cool is that???) I layered it with decorative papers. The top final layer strip is Very Vanilla and I sponged it in Groovy Guava. It was just too bright to leave as it was. I also sponged the edges of the decorative papers too. I used Groovy Guava on the bottom layer and River Rock on the green layer. The brad in the center of the Dahlia is a 1/2" brad from Office Depot. I was going to heat emboss the brad but I decided to use a permanent marker and I just colored it in. For the corners I was going to add brads but I don't like how they lay on decorative paper so I used the Mat Pack and a marker and colored in the circles. The words are from the Stampin' Up! set "All Holidays." For those of you who are not familiar with the Mat Pack it's also by Stampin' Up! and it can be found on page 189 of the 2008 Spring Summer catalog. The catalog can be viewed online, just click on the link above and check it out.

Thank you SO much for stopping by,
Wanda


Please send any questions via email. If you ask a question in the comment section I am not able to reply to you. Blogger doesn't have that capability. Maybe someday they will.

Tuesday, January 29, 2008

For Some Bunny

I know, Valentine's Day isn't even here yet and I'm showing you Easter "stuff." I will try to be careful not to post any more Easter until after Valentine's Day. I remember how I felt in December when I was shopping for Christmas and I saw Valentine's Day stuff out. And I am guilty of purchasing some before the "season." But I just had to have a pair of these adorable socks!!!! I was upset but yet purchased. Doesn't make sense, does it!!! LOL


I got this cute little bunny stamp at Michael's (for a dollar!!!). Above the head of the bunny it reads "Some Bunny Loves You." Awww, isn't that just cute??? I stamped the bunny on card stock and cut it out. I colored in the ears and nose.

I then took a Treasure or Nugget, either will work and I wrapped a plain white mailing address label around it. If you don't have any mailing labels you can use a regular piece of white card stock. Measure and cut it to fit. I would be that copier paper would work too but if it's 20 or 24# you may have to double the thickness to cover the wrapper better.

I then took a 1/2" pom pom and taped it to one end of the candy and I taped the head piece to the other end.

I saw these done on SplitCoastStampers last year using other bunny stamps. I didn't have any bunny stamps that were small enough then but now I do!!!


These are SO easy and fun to make. I also got the pom poms from Michael's and they were only 99 cents a package. Such a deal!!! These are pretty inexpensive to make and a great project for the kids since there is no glue involved. The tape runners work just fine and hold well. You can have bunnies all over the place with this project. You can even have the kids write their names on it or they can write the name of the one they are going to give them to. Aren't they adorable. And again I can't take credit for the idea, it's an oldie from last year!!!

Thank you SO much for stopping by,
Wanda

Calendar Information

I've been asked by several readers about the calendars and where to find them. If you can't find them at Michael's try calling Oriental Trading. Check with Walter Drake company, Miles Kimball or Lillian Vernon. You may have to call them and ask them. I would think they are willing to part with them since this month is almost over. And as a last resort you can check on SplitCoastStampers in the Forums. There are some free calendars available for download there. The only drawback is you have to cut them out and assemble them yourself.

I hope this helps you out.

Monday, January 28, 2008

Coaster Post It

I've seen these Coaster Post It's floating around the stamping blogs. They are SO fun and SO easy to make. You use the 4" x 4" coasters. If you don't have them you can cut cereal boxes to size and glue two of them together for stability. You may want to snip the corners before you glue them together it will make it easier to snip.

For this one I used the new Stampin' Up! decorative paper Bali Breeze. I cut the paper just a hair longer than 4" x 4" and glued it in place with the Anywhere Glue Stick. I trimmed the edges that needed it and I clipped the corners to fit the coaster.

I took the clip that I purchased at Office Depot and I added some of the same paper to it and adhered it using the glue stick.

The words were done using a self-inking stamp I got from Vista Print. I punched out using the small oval punch and the layer behind it I used a piece of paper from the post it pad and used the larger oval punch. I taped the pieces together and taped it onto the coaster. I taped it VERY close to the bottom so the pad wouldn't cover it up.

I clipped the pad in place and slid an ink pen under it. I tied on three ribbons and that as it. SO quick and SO simple. I like the way it's assembled. You just clip on a new pad. Isn't that a great way to do it? Then you can just add a new one without anything left behind on the coaster from the last pad. Such a wonderful idea there!!


These would make a great hostess gift, customer appreciation gift, make n takes and even craft fair items.

Thank you SO much for stopping by,
Wanda

Sunday, January 27, 2008

Ribbon Threading Tutorial

I saw this technique on someones blog a while back. I didn't remember it until I got the Stampin' Up! set "True Friends." So if you know who came up with this please let me know and I will give them the full credit they deserve and a link back to their blog.


First you stamp your image onto card stock. I did try it on watercolor paper but you need to make sure the ink is completely dry or your thumb will be colored and the ink will be smeared by the time you are done cutting it out. Here I used Purely Pomegranate.


Punch out the holes around the center flower. For this one I used the taffeta ribbon. I cut it about 12" long. On the calendars I did I used grosgrain ribbon. It was a little stiffer to work with but it will work. And if you rip through a hole you can tape it back together from behind and repunch it and continue on. It's on the back so it won't show. Speaking from experience here!!! Yes, even I make mistakes but I am willing to share them with you so you don't make them or so you know how to fix them too!!!
I taped the end of it to the back center and then I punched out the center hole. Now all you do is thread your needle in and out of the card stock. You start from the back and outer hole and then thread through to the front center hole.
When you have gone all the way around just slide the needle under one of the "stitches" on the back and cut it off. You can leave the center the way it is or you can cover it with a smooth brad, charm, rhinestone brad or half pearl. I sponged the edges to punch the color up a bit and for this one I used it on a mini composition book. Just add a little decorative papers and some layers and you can really dress up a little composition notebook, can't you? You may want to use Dimensionals to affix the flower on because the bulge from the ribbon will cause the flower to stand out.

Thank you SO much for stopping by,
Wanda

Saturday, January 26, 2008

Calendar of Months

I was just finishing up some projects I had started that didn't need to be done right away. I am good at getting a project started but if the deadline is a few weeks away I tend to let it slide until a few days before I need it. I guess I figure the hardest part of it is finding the idea and the layout. After that it's just a matter of time and putting it together.

So I finally finished the calendars. These were actually fun. The part that took the longest time was threading the ribbon through the flower. I made a notebook using that same technique. I don't remember where I saw it but it's not my original idea!

I like the rhinestone brads in the flower centers. It gives the whole calendar a little bit of class.

There is really not much to making these. You cover a 4" x 4" coaster with decorative paper, add the calendar, some ribbon and the flower. See, not much to them but then again it took me 3 weeks to finish them!!! LOL Actually I've got TONS of stuff I'm working on and many of the projects are almost done and it's just a matter of taking the time to finish them.

I got the calendars at Michael's and the coasters were purchased at our last Stamp Share. I was told there is a company on the Internet you can purchase them at but you need to buy a minimum of 1,000 of them. You can just use Google for the information. I did that sometime last year and found that company the others were talking about. I didn't need that many and didn't think I could get rid of the remainder. And I REALLY have enough projects to work on. Including the coaster challenge that I was given at the last Stamp Share!!! I haven't started it but after the next Stamp Share I'll post it here.

Thank you SO much for stopping by,
Wanda

Friday, January 25, 2008

Dum Dum Sucker Tutorial

Isn’t this just the cutest thing? I made this earlier this month at our quarterly Stamp Share. I need to give you a little information first so you’re not confused. My upline (manager/boss) is Sue. And Sue’s upline is Terri. Terri is the one who puts the Stamp Share on each quarter. It is an absolutely fabulous time. We have demo’s and sharing of ideas. There’s always card samples and 3-D samples. Terri demonstrates some fun projects. There’s a business meeting part and a fabulous and fun Make & Take at the end. This item was January’s Make & Take.


ALL products here are by Stampin’ Up!
You need some Real Red, Regal Rose and Whisper White card stock.
Real Red and Regal Rose markers
Scallop, 1-1/4" Round and a 1-3/8" Round punch
Pink Brad
2 Gold Brads
Flower punch from the "Three for You" kit
Mat Pack
Piercing Tool
Dum Dum Sucker
Ribbon
Dimensionals


You will need a piece of red card stock cut 6-1/2" x 2".

Score this piece at 3/4", slide it over and score at 2-3/4".

Turn and repeat scoring on other end. Turning it allows you to have both ends come out the exact same size.


Fold the two scored lines that are closest to the center inward. The two that are closest to the edges fold them outward. Setting it upright the paper will look live a "V"


Bring the top pieces together. Taking the piercing tool and the foam piece from the Mat Pack, poke holes two holes for the gold brads. These brads hold the piece closed. You can add one brad but wait until you have added the scallop to the sucker stick to close the other brad.
The stamp set used here is the new "Happy Heart Day." SO cute and versatile.


Punch out two red scallops, one Regal Rose (1-3/8") and after stamping your flower image line up the round 1-1/4" punch and punch out the circle. Stamping the image first allows you to have your image better centered. Color in your flower. Affix the flower to the Regal Rose and affix that piece to the red scalloped piece. Set one red scalloped piece on your work surface. Add the Dimensionals and expose the tape. Set the sucker stick on top of the scalloped piece and sandwich it in between the finished scalloped piece. Insert the candy part of the sucker into the opening of the red scored piece. Hold it shut with the brad.

This one used the cute tag punch in the set. It was punched out in white and layered on Regal Rose card stock. The two pieces were taped together and then slipped under the "cuff" of the red scored piece. Isn’t that just the cutest idea? Terri is SO creative. Ok now tie on your bow and it’s ready to set upright.

Then Terri showed us how to use this project for other occasions by using double-sided decorative paper. She cut the sides a bit to make it more of a flowerpot shape and now it’s a perfect gift for someone’s desk. It can be used as a little thank you, birthday and thinking of you gifts. It can also be used as a place card and these would be fabulous for bridal or baby showers.


I can't even begin to tell you how lucky I am to be a part of Sue's group which allows me to be a part of Terri's group. I am among some VERY talented people. Both groups are a wealth of information and let me tell you how wonderful it is to be among a group full of wonderful talented people who are all "Minnesota Nice." Even the ones who come from the Dakotas, Wisconsin and Iowa!!! LOL We converted them!!! LOL

This card was made entirely of Stampin' Up! products. To view more cards/items made entirely of Stampin' Up! products click here.

Thank you SO much for stopping by,
Wanda

Thursday, January 24, 2008

SO Versatile

Ok, I have found another Stampin' Up! set that is VERY versatile. It's the "True Friend" set. Last night I needed to make a thank you card and I used this set. Then I found out a friend of mine wasn't feeling well so I thought I'd make her a get well card. I liked the layout of the thank you card and thought I'd just convert that card into a thank you card. I could easily make this into a Birthday card, a Thinking of You card, Friendship card, Mother's Day, Valentine's Day, pretty much anything for females!! This set will get a lot of miles on it that's for sure.

For my card I used Pretty in Pink for the main card. I folded a 5 -1/2" x 8-1/2" piece of card stock in half. On top of that I added a piece of Stampin' Up!'s new "Berry Bliss" decorative paper cut 5-1/4" x 4". I sponged the edges in Close to Cocoa. The brown strip is the back side of the decorative paper. Pretty isn't it?? I cut it 1-1/2" wide by 4" long. The Close to Cocoa piece behind it is cut 1-3/4" wide by 4" long.

The flower was colored in using markers. I used Pretty in Pink over the whole flower and then came in with Regal Rose over the edges. The stem and leaves are done in Sage Shadow. I cut my card stock the same size as the wood on the stamp. And I added 1/8" around for each layer.

The circle was done on my computer using a program called "Print Artist" by Sierra. I have been working with Print Artist for over 10 years. I just LOVE their software. I wrote "Get Well Soon" and had the program make the words go in a circle. I had to work with the circle a little until I got it to fit in the 1-1/4" punch. I punched it out and sponged the edges in Close to Cocoa. I then punched out a Pretty in Pink circle using the 1-3/8" punch and then I added a Closet to Cocoa circle using a 1-1/2" punch.

Before affixing the brown piece to the decorative paper I added the ribbon. I like to add just a piece of ribbon and tape the edges on the back. Then I assemble the rest of the card and the last thing I do is tie a little piece of ribbon to the taped piece. This way I can move it where I need it. It lays much nicer than if you just tie a knot and it's SO much easier to work with than trying to tie a knot and hold the paper at the same time. The thing I do like the best about it is that the knot I just tied is movable so if I want to slide it over just a bit I can without having to make a big production out of it!!!

For the finishing touches I added a couple of half round pearls. The card will now require the 17 cent surcharge stamp but that's ok. A sick friend is worth it!!!

I'm posting early tonight, I have stampers coming over and I will need to devote my time to them while they are here. Stay tuned tomorrow I have a VERY fun Valentine's Day project for you all to work on!!!
This card was made entirely of Stampin' Up! products. To view more cards/items made entirely of Stampin' Up! products click here.

Thank you SO much for stopping by,
Wanda

Wednesday, January 23, 2008

Wednesday Sketch Challenge at SplitCoastStampers

I have not done a Sketch Challenge at SplitCoast since before Christmas. Life just got too busy then and things are slowing down a bit here now.


This was a very fun sketch. You can find this Wednesday's sketch here. I print out the sketch sample and measure from that.


The background, main card color is Close to Cocoa. On top of that I added a piece of Always Artichoke that I sponged with Close to Cocoa. On top of that is a piece of Groovy Guava that I stamped with the Linen background and Close to Cocoa ink. I also sponged the edges with the same color. I used the tag punch on the corners. I put these two pieces together and added the brads and some Wild Wasabi ribbon. Then I measured and cut out the pieces. Again I used Always Artichoke and on top of that I added some decorative paper I got at Michael's. I used the Sidekick Sayings stamp on watercolor paper and black Staz On ink. I colored the leaf in with a blender pen and Groovy Guava, Always Artichoke, Wild Wasabi and Pumpkin Pie markers. I sponged the edges and added a layer of Close to Cocoa behind it. I taped it in place and that was it. There's lots of pieces to this card but SO worth it!


If you have the time I highly recommend you head on over to SplitCoastStampers and check out their challenges. There are 160 Sketch Challenges!! That should keep you busy for a while. There is something new to challenge you every day. It's great to learn new things. I check other blogs and SplitCoast almost every day. I use them as a study. Plus I like to leave comments for other stampers. I have done the technique challenge a couple of times and didn't even know it!!! I was just using an idea I saw on SplitCoast and didn't know it was one of the technique challenges. It's all about having fun and I find the Sketch Challenge a lot of fun when I have time to play!


Thank you SO much for stopping by,
Wanda

Tuesday, January 22, 2008

For the Birds!

Literally!!! This Valentine's Day gift is for the birds. I have had this poem attached to the bird seeds (or is it the seeds attached to the poem?) for a few years now. I don't know if it was from a Stamp Camp or just a stamping project. It's been too many years. But I still like the poem and the concept.


I just printed out the poem on the computer and then stamped the bird in place. I cut around the words and bird and then did my layering from there.

When stapling this together make sure you staple it backwards. You want the long bar of the staple to be on the back and the two bumps on the front. That way when you cover up the front with your wording layers all that is exposed of the staple is the nice single half inch bar of metal. It's a lot nicer looking and you don't have to worry about the prong coming up and poking anyone.


Now if you were to sell these at a craft fair, would you have to put a warning on them??? I suppose you would. I'm sure there is someone out there who may mistakenly eat them and then come back to you about it. I know it's bird seed and you know it's bird seed but then again you have to remember there is a recipe out there for a human consumable treat called "Puppy Chow!" It's just best to be safe than sorry.


So be sure to make some of these up to give to your friends to make for the birds for Valentine's Day. These would also make a great birdy treat for the kids to pass out at school instead of candy. Most schools are trying to get away from the candy giving and this would be the perfect gift. No candy and helping out the chilly birdies!!!

Here's the poem:

I gave a hundred Valentine’s
A hundred, did I say?
I gave a thousand Valentine’s
One cold and wintry day.
I didn’t put my name on them
Or any other words
Because my Valentine’s were seeds
For February Birds!

Thank you SO much for stopping by,
Wanda

Monday, January 21, 2008

Love is "Priceless"

I was looking through my stamps to find a heart I liked and I ran across one in the Stampin' Up! "Priceless" set. I stamped it on white card stock and cut it out. I'm not a big fan of cutting but after all it was only one heart. I punched a 1-3/4" black circle and taped it on top of a red punched scallop piece.

I used my Cuddlebug folder and dry embossed the white background piece. I taped that on top of a piece of black cards stock and then added the ribbon around it. I taped that to the red card base and then tied a bow on the ribbon. I taped the scallop piece to the card and it was done. A pretty quick card. I set it down and looked at it and realized I didn't like the red ribbon. SO I thought about it and felt maybe black ribbon would be better. I made another card and added the black ribbon instead. I think I like the black better. Which one do you prefer and why?


Thank you for stopping by,
Wanda

Sunday, January 20, 2008

Baroque Valentine

This is one of the most versatile sets I've ever worked with. This set can cover MANY events. Birthday, Thank you, Anniversary, Wedding and even Valentine's Day. That's a lot of miles on one stamp set!!

Tonight I went for a Valentine's Day card. It's all in the colors you use that determines the event! I went with the traditional red, black and white. And it worked too!!

This was a very quick card to make too. I think every card I have made with this set was a quick card. You don't need to do much with this set to make a fabulous card.

I like the new 5/8" wide ribbon. I like to make those cuts in the ends. It gives it a nice new fresh look.

I added a few rhinestones and taped everything in place and it's ready to give!

Have fun making these. You can make a bunch of them in no time at all. And if you don't have any rhinestones you can use dazzling diamonds for the sparkle!

Thank you SO much for stopping by,
Wanda

Saturday, January 19, 2008

Such A Baby!

I was looking for a way to make cute, impressive yet simple and quick baby card. And I found it!!!

This was one of the sketches at SplitCoastStampers. I don't remember which week it was but I really did like this sketch layout. I have not done a sketch since just before Christmas. I need to get back into playing on Wednesdays. I LOVE to learn new card layouts.

For this card I used a black piece of card stock for the main part of the card. Use a piece of Very Vanilla on the inside to write on or you can use the white gel pen. I prefer to use the lighter colored paper on the inside. I usually write on it before I tape it in place. I'm pretty much guaranteed to make a mistake writing if the paper is already taped in. Murphy's Law!!!

Ok on to the card. With the base being black the next layer is the Ballet Blue cut 5-1/4" x 4". You can stamp the "Canvas" background stamp on it before or after you cut it. I do it after just in case I get it a little crooked. I have 1/4" to trim and get it straighter. Now my secret is out!!! LOL I sponged the edges in Ballet Blue and taped it in place.

Then I took a 1/4 sheet of Very Vanilla card stock and stamped the "Flannel Plaid" background stamp on that using Ballet Blue ink. I cut the stamped piece 1-7/8" x 3-1/8". You want two of them. Cut two pieces of black measuring 2-1/8" x 3-1/4" for you layering. Sponge the edges of the flannel and then tape them on top of the black. Tape these pieces to the top of the Canvas stamped piece. I lined up the sides and edge so it looked even on those 3 sides. The gap in the center is a little bigger but that's ok because you're going to wind some gold cording around it. I went around it five times on this card. I used regular tape and taped the ends of the cord in place. Tape that piece in place on top of the main card.

The baby buggy is from the Stapin' Up! "Fun & Fast Notes" set. I taped off the word on the stamp because I only wanted the image. I cut my Very Vanilla card stock 2" x 2", stamped and colored the image. And again I sponged the edges. I took my Crystal Effects and dipped the tip of a toothpick in it and touched the dots on the buggy and added Dazzling Diamonds. I layered it on top of a piece of black cut 2-1/4" x 2-1/4". I used Dimensionals on the back so it would lay flat across the top of the cording. And that's it. A quick, simple, cute and yet impressive baby card!!!

Thank you SO much for stopping by,
Wanda

Friday, January 18, 2008

Michael's Meets Archiver's

Yes, I was out shopping today. In the frigid temperatures we're having here. It really wasn't that bad. It's suppose to be 3 out there today!!! The sun was shining and the wind was pretty calm so it really wasn't that bad. I don't think I'd want to stand out there for a very long amount of time but to go from your car to the store and back to the car it's a piece of cake. Or should I say cupcake???? Boooo! I know!! I'll stick with stamping and leave the jokes to the professionals!!! LOL


Actually I shopped at Joann's too. I mean I was out there and the stores are fairly close to each other so why not? I was looking at some beads at Joann's. Nothing to write home about. They did have their papers on sale and I did pick up one 8" x 8" piece of embossed white card stock. Oh and a pair of Easter socks. They're SO cute!!! (For me!!!)

I headed on over to Archiver's. I finally got to use my free "Hot Spot" coupon. I didn't let this one expire. SO what did I get??? A stamp of course!! And I also picked up a piece of pink double sided decorative paper. I knew what I wanted to do with it the minute I saw it. And then at Michael's I had to get some brushed silver beads. SO that was the extent of my shopping. Kind of boring I know. But DH will be glad to here there's still money left this week!!! LOL


I had this adorable cupcake stamp that I had gotten at Michael's and with the new decorative paper I just had to make a Valentine's Day card. I know some of you are needing a break from the crafty things for a day or two. It does get to be a bit overwhelming when you want to make all the projects I show here. SO this will give you a little time to catch up!


Using decorative paper is a lot of fun and saves a lot of stamping time. All I had to stamp and color here was the cupcake. SO quick and simple even my DH could do this!!! (I hope he reads this!!!!!).


Now while I was at Archiver's looking at this beautiful double sided paper I started whining because it was $1.29 for just this one lonely sheet of paper. I mean it's just a piece of paper. A pretty expensive piece of paper. But it was pretty and I did want it so I got it. After I got home I was looking at the package of Stampin' Up! decorative paper I had sitting on my worktable. It's the new "Berry Bliss" one. There is a really pretty pink design in there and I got to thinking about the cost per piece. SO I did some math (I HATE math) and with Minnesota sales tax it came out to 98 cents per sheet. Ok, done whining about the prices at Archiver's. I know where to get good quality paper cheaper!!!

SO here is my card. SO quick and simple!!

Thank you for stopping by,
Wanda

Thursday, January 17, 2008

Easy Notebook "Purse" Holder

Isn't this just the cutest little purse notebook holder? And it's SUPER easy to do too.

You just take one of those clear plastic boxes that hold 4 cards and envelopes comfortably. If you're like me I try to shove 5 or 6 of in there!!! LOL The original post (and I'm sorry I don't remember where I saw this) suggested you cut it in half. I had these adorable small 3" x 5" composition books and two of them fit in the holder nicely. SO I proceeded to decorate the notebooks. Once I had them decorated I cut the plastic box to a little above the height of the books inside. I cut a piece of matching decorative, scored it and slipped it inside the box. I added some coordinating grosgrain to the outside of the box. Cut each piece the same length before you tape them in place. The ends of the ribbon meet at the bottom of he box. Make sure the loops aren't twisted before you secure the other end. I affixed the ribbon with the Red Line tape. You really need something VERY sticky here. I punched a hole in the left side and added a piece of Hodgepodge hardware to make it look like a purse zipper. Though when I thought about it (afterwards of course) I realized the zipper on my purse isn't on the side, it's actually inside to close the opening on the top. LOL Ok, so it's suppose to give the illusion of having a zipper!!! How's that? LOL
The stamp used here is from the Stampin' Up! set "Embrace Life" and the paper is from the "Ginger Blossoms" group. And the words are from the "Office Accoutrement" set. That is my favorite little stamp from that set!!! I use it more outside that set than I do with the set.

These are very fun and easy to make. You could even get a little more creative with the ribbon and make small loops on the back that would hold a pen or pencil too! You can make the box deeper so there's room for a pen or pencil. Probably a pencil sharpened down far enough to fit inside nicely. Or you can do like I did and make them find their own pencil!!! LOL These would make a very fun Stamp Camp item or they'd be happily accepted by your hostess or customers. They just make a great little gift!

Thank you SO much for stopping by,
Wanda

Wednesday, January 16, 2008

It's Still Trash! Step by Step Instructions

I was trying to do another one of those "From Trash to Treasure" items but this one still ended up as trash. Well, maybe not so much as trash as a pattern.


My friend Katie just LOVES this Cobalt gum. I was more interested in the box the gum came in. It's a pretty interesting shaped box, isn't it?? Well Katie was so kind as to remove the gum she had left in the box and gave me the box. And the box sat in my car for a couple of weeks. I finally took it out and tonight I thought I'd try something with it. Well, what (other than more gum) would you put in this box??? The regular Ghiradelli square candy pieces fit nicely in it so I had a yet another reason to play around with the box.


I took the box apart. My plan was to affix some decorative paper to the outside and have fun with embellishments. I laid the box on my new Stampin' Up! "Berry Bliss" 12" x 12" decorative paper. I traced it and then scored it. I don't have a Score Pal. I did look at them and was seriously thinking about getting one but I realized that my Fiskars cutter does pretty much the same thing except I have to move my paper around to score where I want. Well, for $40 I can move my paper around. I slowly and carefully removed the clear guide from the cutter. Be careful not to pull or you could break off the plastic ends that hold the piece in place. I then took my bone folder and just scored on the lines where the original box was scored.

Once I got the piece of decorative paper scored I was going to affix it to the gum box but because the paper was double sided it was thick enough to support itself so I decided that I really didn't need the gum box, except for the pattern. The box didn't get used the way I planned so it's still trash, unless I decide to keep it for a template.

I decided I wanted to use the dotted side of the paper for the front of my candy box. The other side was pretty too but I wanted something more soft and subtle. I taped it together and now I'm ready to decorate it.
I decorated mine using the Stampin' Up! set "Happy Heart Day." I used corner punch and Regal Rose card stock. I added some black punched out dots to the corners and taped them in place on top of the layers. I tied a pink grosgrain ribbon bow around the sides. I did put the candy in before I tied the bow but the ribbon does slip off easily enough to add it later. I didnt tape the ribbon on, if I were to make a lot of these I think I would tape them in place just to make sure they don't all fall off before they get to where they're suppose to go.


This is such a cute and simple gift to make.


Thank you SO much for stopping by,
Wanda

Tuesday, January 15, 2008

Valentine's Day Chocolate Gift

I had a coupon!!! LOL When don't I have a coupon??? It was a buy one gt one free for the larger 1.3 oz. Ghiradelli chocolates. And I did instruct DH not to eat them!!! He's such a chocoholic!! He reads my blog so now he will see exactly what I did with that candy he wasn't allowed to eat!! He can have it but............ NOT until Valentine's Day!!!


To make this holder I cut a piece of white card stock 4-1/4" x 7". I scored it at 1", 1-3/8", 4-1/8" and 4-1/2". You can set the candy inside and tape the back shut.


For the front I cut a piece of decorative paper 2-1/2" x 4". The little strip is cut from Really Rust card stock and measures 2-1/2" x 1-3/8". The decorative paper strip is cut 2-1/2" x 1-3/16". I tied the ribbon around the strip. Actually what I did was I cut a piece of ribbon about 3" long and folded the edges around the front and taped raw edges on the back. I then cut a small piece of ribbon and tied the bow. I like using this method because I can slide the bow where I want and the bow always lays nice too.


I stamped the mouse on watercolor paper and colored it in with markers and blender pen. The shirt is decorative paper. I stamped the mouse on the decorative paper and then cut the shirt out and glued it in place. I added some Dazzling Diamonds to the flower on the heart and then cut the watercolor paper to measure 1-3/4" x 1-3/4". I cut a piece of Really Rust 2" x 2" and taped the two pieces together. I taped all the layers in place, adjusted the bow and it was finished.


It was a very quick project and it will make a nice gift, right DH?? LOL


Thank you for stopping by,
Wanda

Monday, January 14, 2008

Get Well Wishes

My sister's mother-in-law had surgery today and I made her a get well card.

I just LOVE this card layout. You cut your sheet of Bashful Blue card stock at 4-1/4" and fold it in half. I then rolled on the flowers using the Stampin' Up! "Fast Flowers" wheel and Bashful Blue ink. The flower pot is from the "Fun & Fast Notes." I thought it was a cute little cheery design. I stamped the image on watercolor paper using black StazOn. I colored in the flowers with a blender pen and markers. In the photo the yellow around the flowers looks more orange. I used Apricot Appeal and it really isn't that bright. I need to start taking my photos in regular day light. Maybe I'll retake the photo tomorrow and show you the difference.

For the Certainly Celery piece I cut the card stock 2-1/2" x 4-1/4". The Barely Banana piece is cut 2-1/4" x 2-1/2". The watercolor paper was cut 2" x 2-1/4". I layered the colors lining them up at the bottom and sided. Fold the top of the Certainly Celery card stock over at the 1" mark. I located center an eyelet at 1/4" in from each edge. I tied some black gingham ribbon on and the card is ready to be attached to the front. I eyed up the top and bottom of the card and moved the layered piece out a bit so it overlapped the white area. It's up to you how much you want it to overlap. Mark it lightly on the back, turn it over and add tape and set it in place on top of the blue. For the inside I cut a piece of white card stock 4" x 5-1/4". I did add a flower in the corner from the wheel. It took a bit of masking to accomplish it but I managed with only a little blue dot at about the 11 o'clock mark on the flower. I tried to remove it with a blender pen but it didn't work. Now had that background been watercolor paper the blender pen would have erase that blue dot!! I taped the white on the inside and the card is ready to go!!!

I have a fun Valentine's Day gift project coming up for you so stay tuned!!!

Thank you SO much for stopping by,
Wanda

Sunday, January 13, 2008

More Casing!

I just couldn't resist this card either. It has several features that really caught my eye.

First I'm going to add the card info before I forget. I found this on SplitCoastStampers and it was made by the registered user name juliemlacey. Just click on her name and you'll be taken to her SCS post.

I like the crisp clean look of this card. I like the idea that you only need a little bit of decorative paper. Not that I don't have enough decorative paper but if I were to make a bunch of cards for a swap I'd want to make sure I did have enough of one color to make them all. And I especially liked the way the ribbon was attached with the Hodgepodge Hardware. Isn't that just the coolest look?

The colors used here are Ruby Red, River Rock and Whisper White. Also used was black StazOn and the Ruby Red marker. Nope, no blender pen today!!! The Scallop, 1-1/4" and 1-3/8" round punches were used. River Rock stitched ribbon and the Hodgepodge Hardware. The "thank you" is from a self-inking stamp by Vista Print.

Thank you SO much for stopping by,
Wanda

Blog Candy Winner!

Ok, I have to admit some of you got some interesting gifts for Christmas, including those pajamas!!! WOW!!! This is a good place to come look when you receive a gift you don't care for. Just remember that there are worst gifts out there!!! LOL


And now onto the winner of the blog candy. I used the random number generator and the luck winner is #24 MaryAnn in nj. Here is her comment:

Mary Anne in NJ said...
I have a bottle of the worst-smelling lavender body lotion, that I would be happy to trade..
I'll pass on the lotion Mary Anne but thanks anyway!!


Please email me with your snail mail address and I will get the stamps off to you. If I don't hear from you by Wednesday evening the blog candy will go back up for bid. If you don't hear from me within 24 hours after you email me please post a comment on my blog. I will not publish it but will be able to get your info. Sometimes emails go to junk and I receive too much junk mail to go through them all and I wouldn't even know what address I'm looking for. Thank you.


Thank you all for playing. My blog has hit the 600+ post and I will have more blog candy coming. And then more after that because I see it's reaching the 1/4 million hits!! WOW!!! SO stay tuned!!!


Thanks SO much,
Wanda

CASE

I received an email and was informed of yet another acronym for CASE. This one I REALLY like. It sounds warm and inviting. Copy And Share with Everyone. Though it should be written out CASWE then!!! LOL But it has a sweeter feeling to it than the other two do.

I did fix my last post. While having computer problems last night I lost all that I had typed and had to rewrite the whole post. In my frustration I forgot to give Josee credit for the card cased off her blog. Check back on that post for a link to her blog. She's got some nice things on her blog to see!!!

Thank you,
Wanda

Saturday, January 12, 2008

Shameless Casing!!!

Back at it once again. LOL Have you ever seen such a wonderful card that just caught your eye and you just HAD to have it? Short of hunting the person down and begging them to mail it to you, you decide to copy it. Or case it as it's commonly referred to. CASE is the acronym for Copy and Study or Steal Everything. Now since I am giving credit (which I highly recommend you do) to the person and place where you cased the item from.

For this card I used River Rock card stock and stamped the small flower image using River Rock ink. I then cut a strip of Ginger Blossom decorative paper and taped it in place on top of a piece of Rose Red Card stock. I wrapped and tied a piece of Groovy Guava ribbon around it and tied a knot. I stamped the words at the bottom and colored in the word "Friend" with my blender pen and the Purely Pomegranate ink pad. I colored in the two flowers with the Groovy Guava ink pad and blender pen.

For the flower I stamped the image on Purely Pomegranate card stock using the Purely Pomegranate ink pad. I cut it out and then stamped the image again on Rose Red card stock and cut out the inside layer. I stamped the image one more time on Groovy Guava card stock and cut the center out. I took a small hole punch and punched out 12 pieces of Groovy Guava. I glued the dots in place on top of the Rose Red card stock over the stamped images. I then taped that piece in place on top of the Purely Pomegranate flower. I taped the center circle piece in place after coloring in the center flower. I was going to cut it out of card stock but by then I was tired of cutting and I wasn't sure how many layers the brad could handle. Not that it really mattered because I can always cut the prongs off the brad and set it in place with Crystal Effects. I added the brad and taped the flower in place.


All in all it was a pretty simple card to make. A bit of cutting but that's pretty simple. Sorry for the delay in getting this post out tonight. I got it all typed up and my computer must have been running something in the background because it made it seem like the mouse was stuck. When it finally realized what it was doing it took me to my previous window and of course my work wasn't backed up. SO I had to retype everything. Don't you just LOVE having to do that?? LOL Oh well. It's now done and as soon as I hit "Publish" you can finally see it!

This card was cased from Josee at Stamping Jo.com
She's got some cute cards on her site. Sorry I forgot to add this to my post. In all the frustration with the silly computer I totally forgot. SO sorry about that Josee.

Thank you SO much for stopping by,
Wanda

Friday, January 11, 2008

So Regular!!

WOW, doesn't that sound like something personal??? Like I'd share that kind of information with you!!! And I bet you're glad I don't!!! LOL

I'm talking about the size of the card. This card fits in a regular size envelope. The ones you can get anywhere. The envelope measures 3-5/8" x 6-1/2". It's not the long legal ones.

I wanted to make some cards for my mother-in-law to use but I didn't have any extra envelopes. I did have some "regular" envelopes so I thought I'd just make the card accordingly.

The white card stock measures 6-1/4" x 7" and you fold it in half so it measures 6-1/4" x 3-1/4". The Ruby Red layer measures 6" x 3-3/4". I used the Stampin' Up! wheel "Rough Texture and Ruby Red ink. The flower comes from the Stampin' Up! set "Embrace Life." I stamped it on a piece of watercolor paper cut 1-1/4" X 4-1/2" using black StazOn. I used the Ruby Red marker and a blender pen to color in the flower. Around the flower I added Apricot Appeal. Now the photo is showing the apricot SO much brighter and yellower than it actually is. I'm sure it has to do with the lighting and the flash. But trust me here, it is very subtle. I sponged the edges with Ruby Red ink. Then I took a piece of moss grosgrain ribbon and tied a knot in it and taped the ends on the backside of the -flower piece. I then taped that to a piece of black cut 4-3/4" x 1-1/2". I taped the flower to the black card stock. I set it in place on top of the Ruby Red piece to see where I'd like the wording to go. The "Happy Birthday" came from the "It's Your Birthday" set. I taped all layers together and put them with the "regular" envelopes for my DH to give to his mom!

These were very simple to make and they are great for a limited supply card. This card would work well for a Sympathy card, Get Well, Thank You and Thinking of You!

Thank you SO much for stopping by,
Wanda

Thursday, January 10, 2008

For the Birthday Boy!

My nephew's birthday is on the 13th and from the looks of the calendar that would be on Sunday. And that means that I need to get the card out in the mail on Friday so he will get it on Saturday. Or maybe Monday if the post office is slow!!! But at least it will be close to his birth date. Last year I was late with pretty much every birthday card I sent out!!! And no, I wasn't going for a record!!! LOL


For his card I wanted it to be of course masculine. He's going to be 17. WOW, hard to believe! I thought I'd make a shirt card. I went online here to find the pattern. It's a video which I just LOVED because I could follow along. I have made these shirts before and found them very frustrating. This one is done using a dollar bill but I just cut my paper 4" x 7" to fit on the card nicely and followed along step by step. I did it and here it is.


I used the "Canvas" background stamp on the Bashful Blue and use Bordering Blue ink. The main part of the card is Bordering Blue. The words are from the "It's your Birthday" set both by Stampin' Up! I used the ticket punch in the corner and then sponged the edges. I added silver brads to the shirt to represent buttons and that was it. Very simple once you know how to make the shirt.


Thank you SO much for stopping by,
Wanda

Blog Candy Up For Bid!!

A change in the Blog Candy. this fun "To Cheer You" set is the one up for bid. And what would you like to bid for this fine item??? Get any of those "wonderful" gifts for Christmas you have no idea what to do with or what the person that bought it for you was thinking???

Have fun!!!! I will draw a name on Sunday afternoon. PLEASE check back to see if you are a winner.


Thanks for playing,
Wanda

Wednesday, January 09, 2008

Little Birdie Birthday

This is a fun card to make. I wanted to try a card with different punches. There's the Ticket Punch on the corners. I used the Label Punch and the small Oval Punch to hang the words from the hemp. And the bottom is the Key Tag Punch was used. For that one I stamped the words and punched them out. I affixed it to a piece of copier paper and slipped it back in the punch so I could make it smaller. I did use a scissors to trim the top and bottom. I then took a piece of black card stock and punched another piece out. I taped the white piece with the words on it to this piece. Then I affixed it to copier paper and punched it out to fit.


I used the Canvas Background stamp on the Bashful Blue piece. I used decorative paper for the yellow strip. The camera made the yellow look more orange than yellow but be assured it is yellow! I added a black brad. It just looked like it needed something there. I stamped the bird on watercolor paper and used a blender pen and colored it in. I made a mask of the bird and covered the yellow one up and sponged on some Bashful Blue to cover the background. I sponged the edges. I tied the hemp and added the wording. I taped it to a layer of black and used Dimensionals under the black and set it in place.

It's a pretty quick card.


Oh and the feather was colored and placed on the wing. I punched a hole in the paper and then inserted the end of the feather and taped it on the back. It gave it a nice 3D effect!! Click here to learn how to color the feather.


Thank you SO much for stopping by,
Wanda

What Color is Your Feather? Tutorial

I always laugh when I see feathers. When our son was little and had supervised baths we'd tell him to make sure he washed his armpits. He didn't understand the word so we started to tell him to wash his feathers. And as he got a bit older we'd always ask him if he remembered to wash his feathers!! LOL And to this day he still remembers where his feathers "were!" LOL I don't remember why it was feathers but I guess it didn't matter, at least we got the message across to him and he had clean pits!!! LOL You really needed to know that didn't you? And I know our son won't care that I told the world because he doesn't read my blog. Maybe he should start!!! LOL

Ok, onto the tutorial. When adding some 3D items to your cards or scrapbook pages you like to have things match. That is one of many reasons why I like Stampin' Up! products. Before I ever became a demonstrator I had their inks, papers, markers, chalks, etc. Because EVERYTHING matched!! That is VERY important to me.

I am working on a card and realized I wanted to add just a touch of unique 3D. A feather is pretty unique. I suppose I could go out and buy a package of colored feathers and hope that I get a match to the ink I'm using OR I could just color one myself and have an exact match. I had a package of white feathers which are great to have because now I can make them any color I want.

Here is what you need:
A feather
Ink pad
Sponge


Ink up your sponge. While holding the feather down set it on the feather and sponge towards the tip. Repeat until you reach the desired darkness of color. It doesn't take long to do and the results are great.


Now you have a feather to match the project you are working on. The next post I will show you what I did with the feather.
This is a quick and easy technique and can be used for LOTS of projects and cards.


Thank you for stopping by,
Wanda

Tuesday, January 08, 2008

Cute Little Sucker!!!

The title is pretty interesting, isn't it? I bet it got your attention too!!

I was shopping at Michael's today and saw these most adorable little suckers. At the widest part it's only just a bit over 1-1/4". Isn't that tiny. And then there's the plastic stick. With the stick (as it was when I purchased it) measured almost 11" in length. A bit excessive!!! I'm trying to understand why you would want a sucker that long. I suppose if you were going to put them in a vase, maybe??? Anyway, I cut it down to fit with the card.

This is a very simple card to make. So when I sit down to whip out a TON of them I will be able to do it quickly. I was thinking about adding some white craft ink background on the black but I decided to leave it solid and keep it very simple. You can add what you like on yours.

This card is cut the long way on the cutter. Cut it at 4-1/4" and fold it in half. Then cut off the top of the card are 2-3/4". If you don't want to cut it you can fold it inward and secure it. I cut the watercolor paper the same size as the wood on the stamp. I added a 1/4" layer of black to that and then another 1/4" layer of red. I punched out a red tab, folded it and taped it on the red layer piece. I taped down the black layer and after coloring and placing the sucker I taped it all in place. I added a non-Stampin' Up! heart brad to the corner. It just needed a little something there.


A little more info on the sucker. The original wrapper was too long so I had to remove it and wrap the sucker in cellophane. I took a small piece of cellophane and snipped a small hole in the center. I inserted the stick and wrapped the cellophane around the sucker and tied it at the top. Once I got the sucker on the card I trimmed the cellophane a bit more and the stick a bit more to. I just thought this sucker was SO cute and knew it would fit this stamp perfectly!!!


I'm off to work on a baby blanket. I am making them for an organization that distributes them to newborns in need. You can knit or crochet them. I started out crochetting but gave up after about an hour and a half of it. The poor little baby would be graduating high school before I would get the blanket done. SO I dug out the knitting machine and I've now made 5. Well, almost 5. I have to finish the edges of the one I knitted this afternoon and I will have 5. I have a friend who told me about this organization and she crochets the blankets. She said she doesn't have the time to crochet the blanket part and offered to finish the edges when I get one done on the machine. Such a deal!!! I HATE finishing the edges. SO between the two of us we'll be able to get a lot of blankets done this month!!! I have SO much yarn in bins to use up and this is the most perfect way to do it!!! I use to knit my own sweaters but it's SO much cheaper to buy them than it is to make them. I will make afghans once in a while but my family all has them now so I put the machine away. But now it's out and there's going to be some warm babies out there!!! It makes me happy! I'll take a picture of them when I get the ones back from my friend and I'll share it with you.

Have fun making the cards!!!

Thank you for stopping by,
Wanda

Monday, January 07, 2008

Neighbors on Wheels!

If you saw my workroom you'd know that I really LOVE wheels, especially the jumbo ones. This wheel is perfect for the "Welcome to the Neighborhood" Forget-Me-Nots. The wheel is by Stampin' Up! and it's called "Neighborhood." Though I really didn't do it justice here. Of all the mediums there are out there to use, I chose colored pencil and it's one of the things I don't really care much for. Mostly because I find them difficult to blend. So you can see by the coloring job that my heart is just not in it. Normally I would have used watercolor paper, watercolor crayons or markers and a blender pen. But since I stamped on regular card stock I really didn't want to use a blender pen on it. Anyway, you get the idea here.

I may just redo the card here so I like the coloring and then I'll be bringing it to my new neighbor across the street. Then when spring comes they'll plant the seeds and think of me. And when they have to go out and weed the flowers on a hot steamy summer day they'll think of me. And then in the fall when they have to clean out the flower bed they will think of me!!! LOL Hopefully by then we'll have been chatting a bit when we are outside in the upcoming summer.

These flower pockets are fun to make. You can find the measurements on the other one I posted. Just click here. The white card stock is a bit shorter here because of the images on the wheel. Just adjust your card stock accordingly.

Thank you for stopping by,
Wanda

Takin' Care of Business!

Here is a card I made for the "business" side of stamping. I use to work in a real estate office and the agents would order Forget-Me-Not flower seed packets and put their business card labels on the backs of them. Or should I say, they'd have "us" office workers do it for them. It's designed to get their name out there and to hopefully generate business. SO I got to thinking. Why can't this work for stamping?? Personally I just like the idea of sending out flower seeds. I have made several other cards that hold flower seeds.

This one is very simple to make too. I printed out the poem onto white card stock and then cut it to fit. I needed the width to be 4" and the length I had to work with because of the length of the poem. With this poem the white card stock length is 8-1/2". I folded it at 3-1/2" and added a thin line of glue to the sides. Before gluing I wheeled on the flowers from Stampin' Up! The whee is called "Fast Flowers." I used the flower punch in the "Three for You" kit. I sponged the edges and then punched out 3 little dots to put in the center of the flowers. I sponged all the edges and then glued the sides. I taped the pocket to the background and inserted the flower seeds.

Be sure to put your business label on the back of the flower seeds. The company I ordered them from is Sanzo. They will sell them to you either way, blank on the back or you can order them with your business information printed on each packet. It's all in what you want or need. The page to the seed packets can be found by clicking here. What is nice about this is the blank ones are 25 cents per package and there is no minimum to order, so you can get as many as you need or want.

I think these would be a nice "Welcome to the Neighborhood" little gift too. Not just for demonstrators to give out but for everyone else. Just make a pocket card and insert the seeds. Be sure to write or add a label to the back of it with your name and address on it and welcome your new neighbor to the neighborhood. You can hang it on their door, hand it to them personally or mail it to them. Just a nice gesture for a new neighbor! I will add that card on the next post. So back to this card.


I'm adding the poem in the event you would like to use it for your customers.

Hello my Friend, it’s been a while
Since I’ve heard from you.
Just checking in to ask you if
there’s anything I can do.


You’ve has some time to view the book.
There’s so many things to see.
Please let me know if I can help you
place an order with me.

I’ve enclosed some flower seeds
To plant in the ground or a pot.
I want you to think of me
When blooms the Forget-Me-Not.
© 2008 Wanda Pettijohn

Thank you SO much for stopping by,
Wanda

Sunday, January 06, 2008

Quick!!!

Yup you guessed it. Nestle's Quick! And it's Strawberry Quick at that!!! I used a Frappuccino bottle and decorated it up a bit to make this cute gift item for a special girl. I used the new Stampin' Up! rub ons. They are pretty easy to work with. And because they are SO new is part of the reason they are easy to work with. They haven't been sitting on shelves for a long time drying out.

The top of the bottle has a label on it that reads: "Strawberry Quick, Add 1 scoop to 8 oz. milk. Who really limits it to one scoop?? LOL I should include a note to remove the marabou feathers before opening. Those little feathers are still floating around in my workroom. I hadn't worked with them in a very long time and the moment I cut the piece off the boa I knew what the future of my workroom would be for the next 5 days. I swear these little feathers hide and come out just when you bring your coffee cup into the room!!! LOL I don't have that problem with the cat hair but one little boa can mess up a room quicker than anything!!


Anyway, back to the bottle. I have a sweet friend (thank you Peggy) who saves me her Frappuccino bottles. Alas I can no longer have caffeine so those wonderful drinks are off my list. Oh well. I use these bottles for lots of things. I made milk bath and decorated the bottle to go with that theme. Click here to see the bottle. You can decorate these bottles and fill them with candies, little gifts, money, etc. They are a LOT of fun to decorate and give away. Just be careful with the feathers!!! LOL
For the front of the bottle between the rub ons I used the Stampin' Up! Designer Label punch and two round punches. Plus the Horizontal Slot punch on the sides for the ribbon to slide through. I tied the ribbon in a bow in the back of the bottle. I didn't want to glue or tape it. I tied on the boa and then the scoop. Add just a touch of glue to the very ends of the boa to keep those little feathers to a minimum. And be sure to add your mixing instructions to the bottle. Mine is on the top. And if you are making these to sell don't forget to add the Stampin' Up! copyright label to keep it all legal. It's best to be safe than sorry. You can easily stamp on glass with the black Staz On ink pad.

The scoop is from the Southern Goose company. The handles are solid so I had to heat up a needle under a candle flame and poke it in the center and melt a hole. Then I took a pointed file and reamed out the hole to clean it up a bit.

These make wonderful gifts for teachers and students alike. They could be used for a Stamp Camp item but the Strawberry Quick is a little expensive. But then again the bottle didn't cost you anything. I guess it's all in how much you want to spend. Maybe candies would be cheaper. That is something you'll have to do the math on. I HATE math!!! My checkbook can tell you that!!! LOL

I have more Valentine's gift items coming up. Lucky you!!! LOL

Thank you for stopping by,
Wanda