Saturday, June 30, 2007

Quick, Simple And Yet Elegant

For tonight's card I wanted to make an elegant thank you card. One that could be used for a wedding thank you. The "French Flair" background stamp by Stampin' Up! was used here. I masked off the birds because I didn't want them on the card. I embossed the "flairs" in a Silver Pearl powder. I did the left bottom and right top corners. Then I took the "Greetings Galore" set and masked off the envelope with the hearts coming out of it because I wanted to use the "thank you" words on it. I wanted something short and thin for the "near center" of the card. I don't have many current word stamps left so I had to make do with what I had.


The photo doesn't do this card justice. I wanted some reflection from the flash so you could see the silver pearl embossing. I may try to rework this card at a later date. I do like the brushed silver card stock that is in the background too, it attributed to the cards elegant look.

This is a quick, simple and yet elegant thank you card.


Thank you for stopping by,
Wanda

Blog Candy

Ok! Finally. Here's the photo of the blog candy for the 300+ posts. I see a lot of you are having fun with the "Dot to Dot!" Sorry it's SO difficult for you all but I can see you're working though it! I'm SO proud of you all!!! LOL


There is a package of double sided tape, colored rhinestones, chalk daubers, 2 packages of clear stamps and a tube of micro beads for making beaded pens or decorating cards.
Click here to be directed to the page to leave your comment.
Thanks for playing!

Important Information

Here's a website everyone should check out before you sell what you are making. It's the information site on all stamp companies. It lists the company and their policy on the use of their products. It's a great help if you're going to make things to sell at craft fairs, boutiques or the Internet. It lets you know whether or not you can use their products for profit. A must if you're a crafter or just looking for a few bucks for Christmas shopping.


I have used this list for years. Fortunately I was able to find it again as I had a few stamps that were newer than the last time I checked this list. I wanted to make sure I am able to use them for my project I want to sell at a shop. It's very important to follow the laws on these things. The fines and penalties are not worth the few bucks you earn.


SO to help you all stay legal, here's the Rubber Stamp Angel List website. While you are there be sure to check out the other items there too. There's altered items plus cards, etc. A very fun website to visit!

Friday, June 29, 2007

Playing With Petals

I was playing with the new "Pick A Petal" stamp set by Stampin' Up! I wasn't sure what I wanted to make. I just knew I wasn't in the mood to cut out petals tonight. I tried several times to get this flower in the corner and not only to get it in the corner but to make it look like you didn't try to squish it in the corner. I will NOT show you my messed up ones! I also wanted to keep the card clean and simple looking too. I wanted layers but not too many. SO I sat and played with layouts until I came up with this card. It's got the clean look I was seeking. It's got layers and the flower is indeed in the corner!!! Once I got it figured out I realized what a quick card this one is. I will be making more of these and in different colors too! The Purely Pomegranate would be pretty, Elegant Eggplant, Pumpkin Pie. WOW, lots of possibilities here!

I did use a 1 inch circle punch to punch the center of the flower. I stamped it in Black Staz-on and then punched it out. I affixed it to the corner and trimmed it on the sides. This circle is a bit deceiving because of the lines inside are not completely round. I started cutting it out with scissors until I realized how round the circle actually was. I got the punch out and much to my surprise it was perfectly round! Made cutting the circle out SO much easier!! I added my words and and sponged the edges and assembled the card. I gave it a bit of bling and it's ready to go!


Thank you for stopping by!
Wanda


P.S. Don't forget to leave a comment for the next Blog Candy. It's mystery candy tonight! I'll be posting a picture tomorrow.

More Blog Candy To Celebrate 300+ Posts!

Yup, you read that right. I have hit the 300 mark on posts. I can't believe I've posted that much stuff! But I'll take this websites word for it, I sure don't want to go count them all myself!

So to commemorate this auspicious occasion I'm giving away more Blog Candy. I will post a picture of the "candy" tomorrow. I'll be adding the photo to this post so you'll need to check back right here to find out what it is!

And of course it comes with another perplexing puzzle. A puzzling puzzler of a puzzle!! I know they keep getting tougher and tougher. But if you stick with it and concentrate you can do it! I have faith in you!!! Were you able to finish this puzzle? It's ok if you didn't, your name will be put in a random drawing to be held in the afternoon of Tuesday July 3rd!


Have fun!

Blog Candy Winner!!

It was another fun and challenging game for you all and from the comments you left I can tell it was a pretty tough one!!! LOL Thank you all for playing along and keeping it fun! I have more blog candy since my blog has it 300 posts!! WOW! Pretty chatty, aren't I? LOL So to celebrate that milestone I'm going to be giving away more Blog Candy!!! I will post that next. But for now I need to finish up with this!!!

The winner of this Blog Candy is flygirlual and here is what she said...
"well it really depends on whether I have my glasses on or not, since I have them on today, I will guess A"

Flygirlual please email me your snail mail address and I'll get the package in the mail to you.

Again I'd like to thank you all for playing and good luck with the next Blog Candy!

Thursday, June 28, 2007

June Challenge

Sue (you know who you are!!!) gave her stamping group a challenge for this month. It was to take this little 3 1/2" x 3 1/2" black notebook and decorate it! This is what I came up with. I opted to use the On Board chipboard name place piece. I took the eggplant marker and colored around the edges of the chipboard after I glued the decorative paper in place. I attached a couple of white brads to the nameplate.
I used the "Little Lamb" font by Stampin' Up! on my computer for the words. The larger circles are also chipboard from the same package. The buttons are actually yellow buttons heated up carefully with the embossing gun and dipped in white embossing powder a couple of times. The little black dots are from the holes of the name plate. Remember, I throw nothing away! I took the needle tool and picked it up on the backside. I heated it up and dipped it in black embossing powder a couple of times.

The paper is from the new 6 x 6 pack and behind it I used Elegant Eggplant. I also used eggplant grosgrain ribbon along with white organza ribbon and wove it around each coil.

This was a bit out of my element. I'm not use to working with chipboard.
Don't forget to leave your guess for the Blog Candy. Click here to be directed to that page.
Thank you for stopping by,
Wanda

Wednesday, June 27, 2007

A Work In Progress

This has been a work in progress. I think what takes the longest time to do a memory album is getting the photos in chronological order. Once I got the photos in order and set on the pages, actually doing the pages doesn't take very long. Well then why isn't the book finished yet???? I've got my hands in too many other things. But like the other things, I pick away at them and eventually it all comes together and I will have to find new things. I wouldn't want to get bored!! Bored? What's that?


I found this book at the local dollar store. It already had the holes cut in the front of it. I wasn't sure what I was going to do with it or if it was the book I really wanted to use for my memory album. But once I found that quote I used I knew I was glad I spent the dollar on a book I'd never read!!! If you click on the photo it will enlarge and you can read the quote. I think it was a self-help book. I didn't really pay attention to what it was, I just liked the cover. There was a pretty sunset in the large part and the word "Hope" in the smaller part.

Now when I saw these being done on the Internet somewhere they showed you just adding card stock, papers, embellishments, etc. to the pages. And if the book was getting too thick you just took out some pages. That book they were using was a hardbound novel type book whereas this one is a spiral. What I found here was that if you use the new spiral hole punch by Stampin' Up! and then go over each hole with the small square punch it fits the spirals with the square holes. I go over the holes because they are just a little bit too small and the first punch keeps the holes straight. The pages can be removed but are not loose in the book and won't pull out easily. They have to be intentionally removed. I actually removed the pages that were originally in the book and replaced them with card stock. I used the Anywhere Glue Stick by Stampin' Up! to glue the pages together when I was ready to put them in the book. I carefully pushed each tab into the spiral slots and the page was finished.

I still have a number of pages to go but like I said I pick away at it now and then and eventually it will be finished. It's fun to look back at old photos. I wanted to get this posted because this decorative paper will no longer be available after June 30th.

Don't forget to leave your guess on the perplexing puzzle for the random drawing for blog candy. Just click here and you will be directed to the page. Good luck!

Thank you for stopping by,
Wanda

Tuesday, June 26, 2007

Getting What You Need Done!

I needed a thank you card and I remembered one someone had that I copied (mentioning no names Sue!!!). The technique here is called reverse masking and I think I'll do a tutorial on it here because it was a very fun and interesting technique. Plus it was quick!!!


All in all this was a pretty quick card to make too! And we all know how much I LOVE quick cards!!!

Thank you for stopping by and don't forget to leave your guess on the perplexing puzzle for your chance at the blog candy!
Wanda

The Daily Stamper Newspaper

I saw this on another blog (sorry, I forgot to take the address of that blog). She had this posted along with the link to go make your own. Click on the picture so you can read it.

Here's the website to the Newspaper Generator. I think these would be fun for milestone birthdays, baby announcements, fake lottery winners, etc. There's no end to the fun you could have with this! Be sure to read their rules and have fun!

I Must Confess

I must confess here. I didn't think I was anxious about the new catalog coming. I still have plenty of work to do with the preview stamps, papers and inks. But ever time I hear a truck outside I have to look. Today I was caught twice. Once it was Federal Express and just a bit ago across the street it was the Schwan's truck. How dare they do this to me??? LOL

What Time Is It? It's Blog Candy Time!!!!!

You know what time it is. It's BLOG CANDY time!!! I have yet another tough perplexing puzzle for you!! More of a brain teaser than a puzzle. I know, I know. Some of you are still trying to figure out that animal while continuing to be lost in the maze looking for the elephant. Such demanding and mind boggling puzzles. What will I do when I run out of them. Which will be after the next blog candy. I wish I knew where on the Internet that I found these. They are a hoot!! And I'm not that ingenious to figure out how to make something like that on my own!!

I am glad you all are enjoying my blog. I am having a lot of fun with it and hope to continue to do this for years to come.

SO here is today's perplexing puzzling puzzler!!!! Say that three times really fast. No, that's not the puzzle!!! LOL

And as always you do NOT need to have the correct answer to win. Your name will be drawn by the number generator found at the right side of the blog (scroll down). I just enter in how many comments are left on this post and tell it to pick a number. Simple as that. Then I count down the list and viola, I have the winner.

The Blog Candy I have for you is the ever so coveted mail box and the "Little Shells" rubber stamp set from Hero Arts. Plus I toss in a few extra things too!

Have fun with this! And try not to think about it too long. It's best to go with your first thought.

I forgot to tell you when the deadline for the blog candy is. How about Friday June 29th sometime in the afternoon!

Monday, June 25, 2007

I Can See Clearly Now

I was playing with the Classic Pickups tonight and decided to finish up a project I had started a while ago. These are fun to make and serve a purpose too!

These are used for wiping the film off the inside of your car windows. They work great for that too!!!

They are a regular chalkboard eraser. I stamped and layered the image of the long vehicle on the eraser. I also covered it with clear contact paper. I didn't want the ink to end up on my hands should my hands be wet. Then I printed the header on the computer and stamped another vehicle image on the front. I put the erasers in a baggie and added the header. They are now ready for gifts and all I need to do is add the Stampin' Up! copyright stamp to the back and they are ready to sell.

It's a quick project and a good seller at craft fairs. I am hoping that Stampin' Up! will have another vehicle stamp to take the place of this one. I'm not done with my vehicle stamping ideas!


Thank you for stopping by,
Wanda

Better Backgrounds

I would like to share with you how I make my backgrounds a little better. I use to just press the ink pad all over the background and hope for the best. (Don't pay attention to the left end part of the B. I didn't press hard enough there, my mistake which can be fixed. I'll explain that at the bottom of this post). This background is ok but I wanted it a bit better.


What I do is ink up the image and then I come back in with an inked sponge and go over the whole thing. I continue to ink the sponge as I go too. I go over the entire image. This way I know the whole area has ink on it. Then stamp as usual with the rubber side up, your card stock on top and then a sheet of scrap paper over that and press down with your hands. Always keep one hand on the paper at all times or it will shift.

Ok, to repair that spot on the first image I will take my mask and lay it over the B matching up the edges and then I'll come in with an inked sponge and gently fill it in.


I fell upon this technique by accident. I had a word rubber stamp, I believe it was "The Legend of the Candy Cane. I tried and tried to get a clear copy of it but had no luck. I inked up my stamp pad so much that the "e's" filled in with ink. NOT pretty. SO I took a sponge and sopped up the wet ink and stamped the image onto a piece of card stock. It was the most crisp clear image I had ever done!
I published this post and the sponged B doesn't show up much different than the ink pad only one. Trust me on this one, it does look a LOT better.
There's also another tip for larger stamps that you have problems with the ink beading up on them. Take a regular block school eraser and go over the image. This will pick up any factory oils and allow the rubber to accept the ink better. Finger oils also make the ink bead up on the rubber so try to avoid touching the rubber as much as possible.

It's Getting Close to Blog Candy Time Again!!

It looks like I'll be reaching 80,000 hits within a day or two and we all know what that means!!!

BLOG CANDY!!!!


I will post the Blog Candy and another of those tough puzzles for you sometime this week!!!

I appreciate you all coming to my blog to check out my new posts. I hope you continue to find things of interest on here. I like to keep a variety of items here, cards (mostly using Stampin' Up! products but I do venture out to other companies as well, tutorials, projects, etc.


Thank you SO much for your continued support!
Wanda

What Is Webbing Spray? Questions & Answers

I get asked a lot of questions on here and I try to reply back if your name has a link to your blog or an email address. When you post a comment I can not reply back to it. I can only accept it or reject it. I will try to answer questions on my blog in separate posts.

SO, if you have any questions you'd like to ask of me feel free to do so and I'll post the answers on my blog.

Okay, onto the webbing spray. Webbing spray is just another type of spray paint but with a special nozzle that makes the spray come out "funny". On my last card post I think it came out rather thick. I'm thinking that may have happened for several reasons. One it was HOT outside when I sprayed the card stock. Two I may not have shaken the can long enough. Three the nozzle may have been a bit clogged (I never clean them off like they suggest you do after each use - sheesh, who has time for that, I want to make the card!!! LOL) or it could have been the can was old.

I found the webbing spray at Michael's and I believe they still have it. I also got it in gold and white. I'm not sure if it comes in any other colors. I haven't found a need for other colors myself. Though I think maybe silver would be pretty. But I have enough projects for now so that thought will have to be tucked away never to be found again. LOL


And the cost . . . I think it was around $5 or $6 per can.

Actually that one was pretty easy!!! Anymore questions?

Sunday, June 24, 2007

It's All In Black & White

I haven't used webbing spray in a LONG time. I didn't even think the can would work. But it did and I ran with it. I thought I'd give the zebra from "Year After Year" a try and this is what I came up with. I did use the Splitcoast Sketch Challenge layout #126. I like that layout. It allows you to use some of the smaller stamps on a full size card. I wanted to keep this simple and with a sprayed on background (just as good as a decorative paper background) makes it a quick card to make. There wasn't a whole lot of coloring to this card. Some black marker placed in every other stripe and you have a colored zebra!!! I taped it all together and finished the whole card in under 20 minutes. This is a very fun set and I'm going to have to try to do a card with each animal. Maybe not the snake. I HATE snakes and even a cartoon one isn't all that friendly to me. But we'll see. And if you don't see a snake card by me I know you'll understand!! LOL

Thank you for stopping by,
Wanda

Saturday, June 23, 2007

On Board With Chipboard!

WOW is there ever a lot of pieces in the "On Board Blossoms & Basics" chipboard package! I am just amazed. And so what do I pick out of all of it? A simple flower!!! LOL Oh well, you have to start somewhere right? I affixed decorative paper to the chipboard, trimmed around it close to the chipboard and then took an emery board and filed away the excess paper. Then I took a marker and colored the edges of the chipboard to match. I embossed the flower and then added the micro mini beads in the center along with a few black punched out dots. I added "thank you" words from the "Circle of Friendship" stamp set. For the background I used "Print Pattern" and I layered it all on Basic Black card stock. It made a great Thank you card, quick and simple too! A reminder here, with as much Crystal Effects as I used to keep the beads and black dots in place, I needed to let it sit for about a half hour before I could assemble it. So if you're in a hurry to make these, you may want to assemble the card first and add the Crystal Effects, beads and dots on last. Then use your embossing gun, a ways away from the flower, you just want to use it to dry the item, not to heat it up. If you have a blow drier, better yet!

Thank you for stopping by,
Wanda

Friday, June 22, 2007

Bubble Queen Bath Salts - Weekend Project

WOW! I'm actually posting a "Weekend Project" on the weekend!!! Shocker!!
This is a fun project. Could be used for gifts or for profit! If using for profit be sure to include the Stampin' Up! copyright somewhere on the item. It's not worth the penalties, fines and/or fees involved for not adding a few words to your items!

These bottles are from salad dressing. I saved ours plus I had someone else saving them for me too. It's always fun to get different shaped bottles and bottles you didn't have to pay for. I do have to admit that it took a bit to get the label off these bottles. I mean, what did this company think? That someone was going to try to remove their labels to reuse the bottles??? Personally I think companies should make it so their labels come off with a little soaking so their bottles can be recycled. But I can't change the world. I'm having trouble trying to change my little corner of it!! So back to the bottles. I used the "Bubble Queen" stamp set by Stampin' Up! I stamped the image on Whisper White card stock with Black Staz-on ink. I tend to use the Black Staz-on when I use a blender pen. The glycerin in the blender pen tends to make the other inks run so it's best to stick with the Staz-on. Trial and error method for me there! Color in the areas you wish and mount them on a coordinating layer of card stock. I used the Anywhere Glue Stick to adhere the layer and to adhere the whole thing onto the jar. I tried to do the layers first and then add them to the jar but once the glue dried it didn't want to bend nice around the bottle. SO it's best to do them one at a time. Make your layer and then glue the back of the layer and adhere it to the bottle. I've tried other glue sticks and it seems that the Anywhere Glue Stick from Stampin' Up! is the only one that will allow the paper to stick to the glass nicely.

In the photo you'll see one cap on top of the bottles. I used the "Bubble" decorative paper and punched out circles to put on top of the bottles. I tied some ribbon around them and on the back I added the directions for use, the ingredients (a legal must if you are going to sell them, and a courtesy if you give them as gifts) and I add the Stampin' Up! copyright too. I do that even if I'm giving the items as gifts. I make so many that sometimes I decide to sell my extra and I don't want to have to add the info later.

For the words on the tub I set up my printer to print the words and I just affixed my stamped image to the paper in that spot and ran it through the printer again. I did wreck a few and was glad I didn't color them all first!! You can also hand write the words or use a label maker or you can even be creative and rubber stamp them in with small stamps! It's your work, it's up to you how you want to decorate it!! The simplest way is to type in "Bath Salts" on the back followed by the directions, ingredients and the copyright.

The recipe for bath salts can be found here.

Have fun and thanks for stopping by!
Wanda

Thursday, June 21, 2007

Cold Play Snowman

I know, it's a bit too early for winter "stuff" but if any of you REALLY know me you know how much I LOVE winter and snowmen!!! I just thought I'd take another try at the Wednesday Splitcoast sketch and use a set that is not being retired. Though the background is not Stampin' Up! other backgrounds can easily be inserted in it's place. Something such as white card stock and emboss the snowflake from the set in white. See, so simple to convert a card into something totally by one company's designs.
There are a couple of things I could do to improve this card and they are to stamp the hat and scarf, cut them out and add them to the card using dimensionals. I didn't want it too bulky. You have to keep things in mind like that now or you're charged the extra 17 cents surcharge per unmachinable card. I send out over 100 Christmas cards. My cards this year will not have any hardware on them at all. I need to find a card that has a few layers but still remains machinable.


I just LOVE this set!


Thank you for stopping by,
Wanda

Ghiradelli Purse Candy Holder Pattern

Sorry for the delay in getting this pattern out. I'm in the process of trying to do my work and learn the Window's Vista at the same time. It's a VERY frustrating operating system. Too many changes were made to it and it's difficult to find what you use to find in a flash. I'm sure in time I'll get it all figured out and thing will go faster. I'm forever connecting to the net to download software to make my other software compatible with VISTA. Like I said VERY frustrating. I'm NOT happy with it at all. I can not even begin to tell you all the time I've had to spend on here just looking for things I use to find in a flash on the old Windows.


Ok, so onto the much awaited pattern for the Ghiradelli Purse Candy Holder. If you click on the picture you'll be able to read the instructions.

The size of the half circle doesn't really matter, use whatever you have. I used a 1 1/4" circle punch here. If yours is larger just don't go as deep. You're just creating a little indentation to grab the candy easier. (added 6.22.07)


I would LOVE to see how you decorate yours. Feel free to email me photos. I'll be happy to post them on here for you to share with the world!


Have fun with this!

Wednesday, June 20, 2007

Playing With the New "Stuff!"

It's Wednesday and at Splitcoast that means it's time for the new card sketch. I started doing the sketches about 4 or 5 weeks back and am loving it. It's a great way to get some new layouts and of course ideas from the posts that others leave on their creations. I have certain layouts I use over and over and it's SO refreshing to get something new to try and maybe stick with for a while. And if you're like me you'll use it over and over and over!!! SO in this case change is good. And those who know me know I don't handle changes very well! But I manage to accept it and move on!!!!!! Like I have a choice! LOL


SO my card for today was done using the new set "Zoofari" that will be in the new catalog on July 1st. I wonder if we'll get the catalogs early since the first is on a Sunday???????

I followed the sketch layout on Splitcoast using the vertical line and circle on a full background. Once I decided what I wanted to use for stamps it was pretty easy. I wanted a "safari" looking background so I used the "Waxed Paper" resist technique on the Ruby Red card stock. I added some splatter to the More Mustard card stock and my layer was done with Whisper White and Old Olive and of course Basic Black for the outline layers. I used a punch to create the scallops on the black vertical piece. I added some words and taped it all together. A pretty colorful and simple card.

If you have never tried the SplitCoast Sketch Challenge and you have some time, give it a try. There's a new layout every Wednesday! Lots of fun!!

Thank you for stopping by!
Wanda

Tuesday, June 19, 2007

Purely Pomegranate Meets Year After Year

I don't know why this photo looks to be washed out. I will try again tomorrow using daylight to take a better photo.

I was playing around with some color combos and really didn't like what I ended up with. I think it may be the Cameo Coral background piece that is throwing this whole thing off. I wasn't going to post this but I wanted you all to see that not all of my cards turn out exactly how I want them to.


I will try to rework this card at a later date.

I just got a look at this card as an outsider here. UGH!!! (as in UGLY!!! LOL) That background has got to go! I'm still liking the layout though.

Thank you for stopping by!
Wanda

Monday, June 18, 2007

From Trash to Treasure!

In one of the comments about the tutorial I wrote about taking a piece of scrap rubber and making a stamp from it using a punch, I was asked if I had a card with the punched flower to show you all. Well, I didn't but now I do!! You asked for it so here it is!!!

I used the new Purely Pomegranate card stock and ink pad. For the stamps I used "Fine Lace" and "All Year Cheer" for the words. The flower was stamped using the one I made. Click here for the tutorial on how to make that stamp. After I stamped it on Whisper White card stock using the Pomegranate pad, I punched it out and set it aside to dry. I punched another flower out using a piece of scrap paper. I placed the scrap paper just below the tip of the flower and colored that area in with a black marker. I did this for each petal. I place a button in the center and taped everything together. I used a Dimensional under the flower. It was too bulky under it with the word layers. SO, I not only made a stamp from a punch but I also made a card using the stamp.

Thank you for stopping by!
Wanda

Sunday, June 17, 2007

Ghiradelli Purse - Weekend Project

I was playing around today with the Ghiradelli Candy Holder I made earlier this month. I was in the process of getting a pattern made for it when I went off in a little direction!! I came up with a cute little "purse."


I WILL post the pattern later this week. I have to finish drawing it up.

I highly recommend you use either card stock and decorate it or use the double sided decorative paper. The single sided decorative paper is just too thin. It could work but it won't be very sturdy.
These would be great for "Girly" get togethers!


Thank you for stopping by!
Wanda

Make Your Own Matching Stamp

I saw this tutorial done awhile ago and I thought it was a great idea. I need to give this a try. But I had tossed out the excess rubber and couldn't give it a try. While cleaning (shocker on the cleaning) in my workroom I ran across a piece of rubber that I had left over from cutting out a larger stamp and I dropped everything and dug out a punch. I wanted to give that technique a try before it totally slipped my mind!
First you take the excess piece of rubber and carefully remove the foam backing. Then you take your punch and punch out the rubber piece. Adhere the punched out piece back on to the foam piece and trim the foam piece.


(Stamping Tip) I use rubbing alcohol on my rubber stamp scissors to keep them from getting sticky and gummed up while cutting out stamps. It also makes cutting the stamp easier too.


Once you have finished trimming the punched out design you are ready to mount it on wood or acrylic and it's all set to use. Now you can stamp your image and punch it out afterwards for some fun and unique cards!


Save that excess rubber and have some fun!!

Saturday, June 16, 2007

I'm Still Doodling!

I'm still Doodling!!! I REALLY hope this set shows up in the new catalog. But for now I'm going to be using it a bit more because I REALLY like it! This card was a CASE from someone on the Internet. My friend Cathy K. brought over a printout of a card she wanted to make here and I thought it was such an adorable card too! Great minds think alike!!!! I just had to make some myself. But I have no idea who to give the credit to. SO if this is your design, please email me so I can give credit where credit is due.


To make this card I stamped the background pieces first. Now silly me likes to cut her card stock first and then think later. I should have just stamped the background image in white first and then cut the pieces in half. Either way works. I ended up taking the half pieces and setting them together and stamping over both of them at the same time. I stamped the background first because I needed to give the white craft ink some time to dry. Then I stamped the flowers on white card stock using Staz-on ink (what else??) followed by the stems. I used a blender pen and colored in the flowers with the Ballet Blue color that I used for the background card stock. And the leaves and stems were done in the glorious Green that matches the background card stock as well. I taped it to black card stock, added the flowers which are layered in black and then I stamped the words on and added the gingham bow. Another pretty simple card.


Thank you for stopping by,


Wanda

Friday, June 15, 2007

Happy Anniversary To You!

Here's an anniversary card I made using the cake from the new set "Year after Year." I stamped it in VersaMark and then used pearl embossing powder on white card stock to give it a more elegant look. I wasn't happy with how it was going to so I decided to add black for the layers so the white and design would stand out better. I think it worked! It's very difficult to see the pearl EP in the photo and the card is SO much prettier in real life.

I used the one stamp from the "Doodle This" set for the background. I thought it gave it a little flair but not too much. It was just enough to keep your focus on the cake.

If you don't mind using embossing powder it was a pretty quick card to make. Embossing powder is ok but if I have to make too many cards with it I find it less fascinating than I do making only one or two cards with it! I like the look of the pearl. I'm not sure how you could get this effect with Stampin' Up! embossing powder, they don't carry pearl. The card would still look elegant if you used silver embossing powder instead of the pearl.


Thank you for stopping by!
Wanda

RAK


I received this card from Melissa for helping her out a bit with a problem on her blog. It's such a BEAUTIFUL card. And look at all the pieces she used to create it! She used one of the new Long Notes to make this card. I just LOVE it.

You can see more of her work at her blog Simply Pink.

Thanks SO much Melissa! You're just too sweet!

Thursday, June 14, 2007

Something Old, Something New, Something Pretty Just For You!

This was a very fun card to make. And I do have to admit a rather quick card. It took longer cutting the card stock than it did making the card!!! When you use decorative papers it helps you out in several ways. It helps you from having to stamp a background. It helps you from having to pick a background stamp!! And it helps you to make a card quicker!


The background papers are the "something old," though they are not all that old, they just came out last month! The flower stamp is from the new set "Year After Year" that will be available in the new catalog in just a few weeks! (Check the countdown counter on the lower right of the blog, it will tell you how many more days!). And the words are from the new set "Hugs & Wishes." It's a very versatile set, just like the "Year After Year" one is. These two could possibly go together as a set in themselves! I used Almost Amethyst card stock on top and stamped the flower using Almost Amethyst ink for the background. The contrasting color is Lavender Lace and I used Whisper White for the flower and the words. I added a bit of grosgrain ribbon to hide where the two colors met and I tied a bow on. I felt the bottom left needed a little something more so I added some rhinestones I had received from Debbi in the blog candy I won! I made two cards and one is going in a box to be sent to Debbi at a later date. She is sending cards to Iraq. Check out her blog to find out more on this topic, it's a worthwhile cause.


Okay, back to the card. I used Black Staz-on for the words and the flower. As you have read before I use Black Staz-on for any image that is going to be coming in contact with the Blender Pen. I used Almost Amethyst and Lavender Lace markers along with the Blender Pen for the flower petals, Sage Shadow with Garden Green for the leaves and I used Apricot Appeal for the shading in the background.


I think it turned out to be a sweet little card!

Thanks for stopping by!
Wanda

Wednesday, June 13, 2007

It's A "Classic" Sketch Challenge

The Sketch Challenge on Splitcoast today was an interesting one. I'm not use to working with so many angles. It's a bit crooked and I even stamped a bit crooked too. I was going to fix that but I have to keep reminding myself that it IS a handmade card!!! I tell people this all the time and I need to start listening to myself. They don't have to be perfect! SO this card is by no means perfect. But I do like the colors.

Last weeks challenge was my "Wedding Bell Blues" card and I still need to post that at Splitcoast.

For this card I followed the sketch for the layout. I used Basic Black, Not Quite Navy and Whisper White card stock. I used Not Quite Navy ink and I sponged in Not Quite Navy. I used the "Flannel Print" and "Canvas" background stamps. After I stamped the truck and the words I sponged over the white lightly to tone it down just a little. It was just too bright alone. I assembled it and now it's here!!

Thank you for stopping by!
Wanda

Tuesday, June 12, 2007

Keep It Clean!


Tonight I'm going to post a tutorial on what to do with that stained mat from your Stamp-A-Ma-Jig.

Believe it or not I actually used Staz-on ink on my mat. Me use Staz-on?? It seems to be the only black ink I've been using lately. And of course because I use it so much I didn't give it a second thought when I pulled out the Stamp-A-Ma-Jig and stamped the image on it. I went about my card making business and when I finally got around to cleaning up, well, that's when it dawned on me I used a VERY permanent ink on this mat. So in my infinite wisdom I got out the stamp cleaner and nothing. I used rubbing alcohol and nothing. I got out the Staz-on cleaner and it got some of it off. Then I got out the Mr. Clean Eraser sponge. Oh my, what a wonderful little cleaning item this is. I love it in my kitchen and now I'm loving it in my workroom too!!!
If you click on the first photo you will see that behind the cake is a hit of some flower stain on there too. Now look at the last photo. It even got that too. And no, it's not hidden behind the box!!! The mat is like new and ready for anything I have to stamp on it!!! And there were no chemicals involved. Just a little bit of elbow grease, not much. Gosh, I think the makers of the Mr. Clean Magic Eraser should send me a free one or at least a coupon!!! LOL
I hope you find this information useful!
Thank you for stopping by!
Wanda

And The Winner Is . . . . .

Before I tell you who won I have to tell you about the picture!!

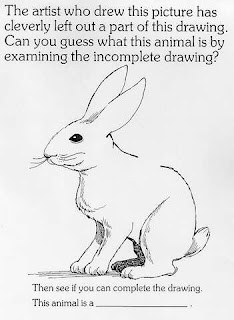
First I had to print it out. My drawing skills are not that great so it took me a while to get it right but in the end I believe the creature to be a rabbit!!! Some of you got it right and some of you are still struggling with it and there's still some of you caught in the maze with the elephant!!! LOL It was a fun puzzle. I only have a couple more left and then I'll have to actually think of something myself. YIKES!!! You probably shouldn't let me do that.

Ok, on to the winner.

The winner of this lightweight Blog Candy is:

Denise
and Denise said...
I think it's one of those exotic and rare species of rabbit who has a hump on it's back and is called a cambit!They're only found in the deserts of Asia. That's my story and I'm stickin' to it! There is more than one Denise so, will the Denise that left that comment please come forward!

Congratulations Denise. Please email me with your snail mail address and I'll get the package out to you.

Thank you to everyone who played. Don't be discouraged (especially you chelemom) there will be more! The numbers keep climbing faster now, which is a good thing. Visiting my blog and other things on my blog makes the numbers go up. Next Blog Candy is at 80,000! Not that far off.

Thanks for all the fun and mostly thank you for visiting my blog!

Monday, June 11, 2007

Artfully Asian Revisited!!!

Ok, yesterday I post a card using he same colors as another card I previously posted and today I post one using the same stamp set. I actually put them away!!! I was working on this card off and on all day. I wasn't sure where I was going with it. When I make a card I start out with the stamped image and go from there. With this card I started out with the background. WOW, that was totally out of my comfort zone. That is why I was working on it off and on today. I'd leave it alone and come back only to see something else that I thougth would make it a better card. Finally it all went together and this is what I ended up with!

I used Basic Black card stock for the base of the card. I added a layer of Bravo Burgundy on top of that. I used the Recollections decorative paper for the top layer. I put it in the Cuddlebug folder and ran it through my Sizzix machine. Then I loaded up my brayer with Bravo Burgundy ink and wheeled a little of it off first and then went over the decorative paper. I taped that down and then proceeded to color in the flowers on the stamped image. I used watercolor paper and Staz-on black ink because I was going to be using my blender pen. The fluids in the blender pen (Glycerin I believe) will pick up the regular black ink. When I was done coloring I sponged he edges with Bravo Burgundy and then lightly sponged the top of the watercolor paper to tone it down a little. This is where I got stuck for most most of the afternoon. I wanted a small quarter circle in the bottom right corner but it just didn't look right. SO I remembered doing a card a while back using a half circle. I think it was one of the challenges at SplitCoast. Anyway, I cut out two circles using the Coluzzle. I cut them in half (just in case I wanted to make two cards!!! - Like that's going to happen today!!!) The circle was just too blah so I ran that though the Cuddlebug too and brayerd across the top of it with Very Vanilla.

Now for those of you who do not have a the Cuddlebug folders (which I've been told can be used with a rolling pin - what's a rolling pin???? LOL I would think you'd need a bit more pressure but then again I don't have a rolling pin to find out). You will need a background stamp to get the effect close to this. You can emboss it using the Burgundy EP or the Bravo Burgundy Craft Pad and clear EP. I would try the Lace Background stamp on the decorative paper. It will give it a nice effect over the decorative paper.

And for the circle I would just use clear EP and the Lace background stamp. It should be enough to make that area not so blah. There are ways to make these cards without some of the extra things out there. Though some of these extra things are fun to play with!

All in all I was happy with the end results!

Thank you for stopping by,
Wanda

Don't Forget the Blog Candy!!!

I will be doing the random drawing for the Blog Candy on Tuesday afternoon. I know it's a tough puzzle but just give it a try!!! Right or wrong it doesn't matter. It's a random drawing.


I can see that a lot of you are having fun with this. That's what it's all about, isn't it?


Get your best guess in by tomorrow afternoon! Just click here to be taken to the page with the Blog Candy on it. You must leave your guess on this page.

Good luck to you all!

Sunday, June 10, 2007

Thank You!

You can never have enough "Thank You" cards can you? Thank you and Birthday cards are what I seem to make the most of. And probably an equal amount of each, though the more I think about it I think I send out more "Thank You" cards. People are always doing such nice things for me. I LOVE it and I also LOVE to send them a handmade "Thank You" card. Is there any other kind????


Last week I had made a card using the bird from "A Touch of Nature". I liked the colors SO well I just had to try them again. Though I did add a little different touch to this card. I'll include measurements for you too!


I cut a sheet of black card stock in half and then folded it. Then I cut a piece of Always Artichoke 2 3/4" x 4" and the same with the Not Quite Navy. Lately I've just LOVED that color. Alone in the package it doesn't cry out to me but when I add a background to it I just LOVE the look of the card stock! Anyway, after cutting those two pieces I cut a piece of Black 2 1/4" x 4", a piece of Bravo Burgundy 2 1/8" x 3 7/8" and a piece of watercolor paper 2" x 3 3/4". I stamped the Artfully Asian flower on the watercolor paper using Staz-on ink and set it aside. Then I took the Always Artichoke ink pad and inked up the Lace background stamp and stamped it on the Always Artichoke piece. I cleaned off the background stamp and inked it up with Not Quite Navy and stamped the image on the Not Quite Navy card stock. I took the leaf stamp from the set and stamped the images with Always Artichoke ink over the Always Artichoke card stock. This is an effect I don't do too often. Not many of the stamps go together enough to stamp two images on a background at a time but this one seemed to work. Ok, let's put it this way, I like the way it looked whether it "works" or not!! I sponged the edges of both of them in the matching colors. I taped them in place and moved on to the flower. I used a blender pen and colored the flower with Bravo Burgundy and the leaves with Always Artichoke. I used the drawing/writing side of the marker and drew in some color along the side of the stems. My marker was a bit dry on that end so I had to tap it in the ink pad as I drew in the stems. It moistened up the tip so it was usable again! Once I got done coloring I sponged the edges in Bravo Burgundy. I lightly touched the sponge on the open white areas to add a bit more color. I taped those pieces together and taped that to the card. For the "Thank You" I had used a stamp I had gotten from Vista Print. A FREE stamp! I stamped the image on a scrap piece of watercolor paper and punched it out with the small oval punch. Then I sponged that edge in Bravo Burgundy. I punched out a black oval and taped the two ovals together and added them to the card. Again this was a pretty quick card to make.


Thank you for stopping by!
Wanda

Saturday, June 09, 2007

Wedding Bell Blues

I needed a quick wedding card and I just couldn't believe how quick this one was. You see, I caught a little "bug." NO, I didn't buy a Cuddlebug. I wanted to but was talked out of it by an employee at the stamping store. I have a Sizzix and the attachment and that was all I needed other than the die cuts and folders. Well, the folders were on sale. Need I say more? I bought a few and am having some fun with them. For this card I inked up my brayer and then rolled the ink on my blotter paper. I wanted a very light touch of blue. I tried it with the brayer fully inked and OH MY, it was SO dark! I did have to repeat the light process a few times to get the color I wanted but it's always best to go light and add dark than to just start out dark. I'm sure I'll be able to use the dark piece for another card later on. My card making career isn't over yet! I used Ballet Blue for my color on this card. No ribbons, no bows but I did sponge!!! You know how much I LOVE to sponge. I'm even giving away a sponge in the Blog Candy.


This layout is the SplitCoast sketch challenge this past Wednesday. SC127 I think. I'll have to check because I do need to post it before the next one comes out.


I've found that I'm enjoying the sketches. Once you get an idea in your head of what you want on the card you just cut it to fit the sketch. It works most times!!! I'm usually not one for trying new things but these sketches help me to get a different variety of layouts in my card file!


To make this card without the Cuddlebug folders, just pick a background like the floral one and use the Ballet Blue ink pad and stamp off once and then use the next image for your card. Use good card stock for your stamped off image, you can use this on another card later.


Thank you for checking in!
Wanda

Blog Candy Photo

Here's a picture of the Blog Candy I'm offering in celebration of my 70,000 hits!!! WOW! I'm still in shock! That's a lot of hits! And it's all because of you faithful readers.


I'm still waiting for my Subscriber Counter to hit 300 so I can do the Subscriber Blog Candy. I get new subscribers and I lose subscribers. It will eventually hit 300. If you haven't subscribed please do. There's no spams involved in it at all. Just ask anyone who subscribes to these using Feedblitz. You only get an automated email telling you I have a new item posted. Simple as that!!!


Ok, the candy is a sponge, a package of 400 square foam pieces, a roll of double sided foam tape, Bold round rhinestones, Pastel round sticky back rhinestones, Bold square sticky back rhinestones, Pastel square sticky back rhinestones, square antiqued brands, a watchmaker's tin filled with bookplate die cuts (over 50 of them). This package should be lightweight enough to go to Canada without being too expensive. It will help save on postage for the BIG one at 100,000. LOTS of Blog Candy to celebrate that one! A BIG Celebration then!!

Have fun with your guesses. I know the drawing is very difficult. LOL I love it that you are having fun with it!! Please leave your comments here. This will take you to the original Blog Candy post where the named will be drawn from.

Have fun!

Friday, June 08, 2007

It's Graduation Party Time!

I thought we were getting by this year with only one graduation party to attend to. WOW, was I wrong. It's 4! SO I need to make 4 cards. This is one of the cards I made. It's for my nephew. The school colors are navy blue and silver. The silver paper went into a Cuddlebug folder nicely. It gave the paper a bit more dimension and I used the same patten on the white card stock. When doing the backgrounds like that it makes card making a very quick process!!! It gives me more time to work on projects! I love working between the two, cards and projects using card making supplies!

Don't forget to try to work on that difficult puzzle in the previous post for your chance to be entered in the Blog Candy drawing!


Thank you for stopping by!
Wanda

It's Blog Candy Time!! 70,000 Hits! WOW!!!

I am sorry I don't have a picture of the blog candy. I will post that tomorrow with a link to this post so all the comments will be left on one post for the drawing.

Now you want to know what you have to do to be in the drawing. Well, of course it's another puzzle!!! They just keep getting harder and harder all the time!!! I've gotten comments that some of you are still stuck in the maze and the elusive elephant is keeping you up at night!!! LOL


This puzzle isn't any different! It's a tough one. You don't have to be good at drawing to finish the picture. Just try your best.


I don't remember where I had found these puzzles and games from. If anyone knows, please email me and let me know. I found them many years ago on the Internet and kept them in a file. I just found them to be SO humerus. And now I get to share them with you!!!! Lucky you!!! LOL


This one is tough and if you can't figure out what animal it is, it's ok. It's a random drawing a correct answer doesn't matter. I haven't had time to work on it yet so I'm still up in the air as to what animal it is!! LOL


I will post the Blog Candy tomorrow. I need to get some lightweight stuff. One Blogger said it would have cost her $40 to send her blog candy to Canada. I don't want to discourage non-US citizens from commenting but if the postage is really that much to mail it I just won't be able to do it.

Click on the photo to see a closer view.

In the meantime have fun with this puzzle!!!
The drawing will be sometime on Wednesday June 13th! Lucky 13!!! Good luck to you all!

Thursday, June 07, 2007

It's NOT Garbage!!!

I had gotten some brads that came in an interesting firm plastic package. It was easy to open and didn't ruin the packaging when it was opened. The first thing I thought of when I looked at it was, "those Hershey Nuggets look like they fit in here." I'm thinking two would fit but only one does. So I took the nuggets I had left from making the nugget boxes and used the "Petals" jumbo wheel with Pretty in Pink ink on address labels. Then I typed the wording into my word processor (Open Office, it's like Word Perfect Corel and Microsoft Office but it's FREE!!! And it works with the new Window's Vista. My son set it up for me and told me to use it instead of purchasing a current Word Perfect, which is around $250. OUCH! Hmmm $250 or free??? What to do??? LOL I will find out where you can get this software and post it on here.)


Ok, back to my project!! I took the inside factory label out. It was just a piece of thin chipboard that fit snug in that space, no tape or glue! Then I printed out my wording on the computer using the "Little Lamb" font by Stampin' Up! It's such a sweet font! I typed out my information and printed that on one side of the card stock and on the other I printed out the "thank you." To get the words to line up with the ones on the back I made sure I paid special attention to the margins of the one so I knew where to start the words for the other side. I printed it out and it was not exact so I did have to go back and move a few letters/words over and after 3 tries I got it lined up to where I could work with it. I measured the original insert and cut my card stock accordingly. I trimmed the corners just a hair. Then I wheeled on the color and put it inside the container. I had put the address label on the nugget and set it inside the container. I closed up the container and tied a bow in the center spot where a hole is made for hanging it in a shop. I think these will be a fun addition to my customer appreciation event coming up in July. I just thought they were literally "sweet!"


And finally a picture of both the front and the backs of the container. The nugget on the top covering my information is there not only to cover the information but to show you a more clear picture of it!


You'll NEVER look at your garbage the same again!!! LOL


Click on the photos to see them up close.


Thanks for stopping by!
Wanda

So Close!

Thanks to all of you stopping by I am SO close to 70,000 hits!!! WOW! I will be getting together some Blog Candy tomorrow and posting it tomorrow night!!! And another fun but "Oh So Difficult" puzzle. I know, they're such a brain strain but you manage to figure them out!!! LOL I love how creative you all can be with these, it makes it all a lot of fun!

Stay tuned for the Blog Candy tomorrow!!!

Wednesday, June 06, 2007

Happy Father's Day!

This card is not only good for Father's Day (change the words) but a good masculine card in general.


This was Monday’s card challenge on Split Coast. I believe it’s their technique challenge. I’m not that familiar with these challenges, I’ve only begun to get into them. They’re a lot of fun and I highly recommend you try one if you have some time. This technique was shirt folding. I wasn’t going to do it because I don’t even like to fold shirts from the laundry basket. That’s why I don’t do cards that require an iron either. I feel SO guilty using an iron on card making and crafting while I have a pile of ironing to do. LOL I’d rather make cards than iron!!! Or clean!!! Or cook!!! Uh oh. See a pattern starting here???? Stamping has become more of a priority to me mostly because it’s a lot more fun and relaxing. When’s the last time you could say that cleaning your bathroom was fun and relaxing? I don’t recall EVER saying that in my life. And I’m not saying I’m psychic but I believe those words will NEVER come out of my mouth!!! LOL


Ok, back to the card. I used the striped paper from the "Pool Party" 12 x 12 papers by Stampin’ Up! I used the "Canvas" background stamp with Brocade Blue ink. I sponged the edges with the same blue too. The words are from "All Year Cheer." I added some black brads because I felt that corner needed just a little something more. The shirt (after I figured out what I was doing) was not too bad to make. I added silver brads for buttons. The buttons I had were too big and the colored brads looked too funny. SO I think had I had colored buttons they wouldn’t have looked very cute either, unless they were black. I am ok with the way this turned out. I made another shirt and I’m leaving it on the inside of the card so I have a pattern on hand and with the card I want to copy. I have TONS of patterns around here and some of them I look at and can’t figure out what it goes to. I’m wasn’t very organized. I’m getting better at it. Ok, a little better. Give me a break, old habits die hard!!!


Thank you for stopping by!
Wanda

Tuesday, June 05, 2007

Masculine Bird Card

I thought it was time to make a masculine card. It's hard to find them. This is for the nature lover. No ribbons, no buttons and no bows! But the colors seem to allow the card from needing them. You don't always need embellishments! Personally I like them but guys will probably just toss the card once they take the money out of it!!! SO why would you put those embellishments on it? Save them for those who LOVE them and who keep your cards! I know, not all guys toss the cards but the ones in my house do! And there I am dumpster diving rescuing these cards without them knowing. Please don't do the visual on that one, it's NOT a pretty site!!! LOL

I used watercolor paper for the bird which came from the "Touch of Nature" set. The "Flannel Plaid" background stamp was used on the Not Quite Navy card stock and the fern from the same set. Not a lot of sets involved in this card. I used a blender pen and markers for the bird. I stamped both backgrounds in their matching colors. VersaMark was just not dark enough, remember I had to make the colors vivid so they would hold their own without embellishments. I used Really Rust marker on the birds tummy. I wanted the bird to be the focal point and the eye is drawn right to the reds. I didn't incorporate rust into the card stock because I wanted to keep your eye centered on the card. Funny how that works, huh? I taped it to Basic Black card stock and that was it. The bird took the longest to do but all in all it was a pretty quick card!

Thank you for stopping by!
Wanda